No Sound on Videos in Safari ios 10-12

Updated April 2018

The Problems Persist But At Least Now I Know Why

I, along with many of my Readers, continue to be frustrated by this really annoying problem! Oftentimes there are simply no visible controls or even hidden ones for that matter, that will allow you to toggle the video’s audio to on.

I’ve spent tons of time trying to figure out a consistent workaround for this…but there simply isn’t one. What I’ve uncovered instead is why this has become such a huge problem.

The reason is because in the fall of 2017 WebKit.org mandated new video policies for ios. The auto-play settings for videos were changed. Videos could be set to auto-play… but only without sound.

The only way that a specific website will display the proper controls for users to toggle audio on and off is if, when the video is added, everything is setup properly on the website to begin with. If it isn’t…then there’s a good chance that there won’t be any audio controls that will be available to users at all!

Here’s a decent explanation of the problem.

Given this knowledge, as well as the fact that the problem has persisted this long, coupled with the fact that Apple doesn’t appear to be addressing it…means that there’s only one additional suggestion I can add to those that follow in the paragraphs below.

When you encounter this problem, make sure that you let website owners know it exists and that when they include videos with no sound it’s really annoying for readers like you. Send them the link above so that they understand this problem is under their control…not yours. And ask them to fix the problem!

Read on for some ideas of how to solve the problem at various websites when they have taken the time to set things up properly.


Original Post

Safari Videos Play But Don’t Have Sound in ios 10 & 11

Ever since I updated to ios 10 I’ve had intermittent problems playing videos using Safari. Sometimes if you tap on the video just right a ‘muted’ megaphone icon appears that you can ‘unmute’ by tapping on it (see the screenshot below.) Other times, as in the example of the video shown below, the ‘unmute’ option appears briefly when the video begins playing. But oftentimes that alternative isn’t available at all.

I don’t know why, but I always forget that there’s usually a simple solution to the problem, which is why I’ve written this post.

An example of how many videos default to 'muted' on Safari for ios                       An example of how many videos default to ‘muted’ on Safari for ios

Method 1

You just open Control Center and look for the volume slider….it’s usually turned all the way down. Why this matters when the volume is turned all the way up using the hardware button….I don’t know. But it’s a quick fix for the ‘No Sound’ problem.

Screenshot of Control Center Sound

Method 2

If the video is from YouTube and you have the YouTube app installed on your device, opening it in YouTube almost always resolves the sound problem. Sometimes the YouTube app is displayed at the top of the tab window and tapping on it opens the video in YouTube.

But sometimes the option to open the video in the YouTube app isn’t present at the top of the screen. In those instances it may not be obvious how viewers go about opening the video in their YouTube app. Remember this alternative only works if you have the YouTube app installed on your device.

How to Open a YouTube Video Playing in Safari (ios) in the YouTube App

Just follow the Steps 1-4 labeled in green in the screenshot below. When you reach Step 4, long pressing anywhere on the YouTube link will cause the Menu shown in the #4 screenshot below to appear.

Follow the Green Numbers for Steps

Method 3

Sometimes just tapping all around the inside edges of the video player will reveal where the megaphone icon controlling the sound is…but sometimes it doesn’t. Which is why I’m including more ideas and places to look below.

Method 4

I just ran across a video where I discovered a new trick. It appeared that there was no way to get sound playing on this video. Since it was a Corporate one, I couldn’t go to YouTube as a workaround either.

I was just about ready to give up (but I really wanted the sound to work on it) so I tried one more thing…full screen mode. Since this wasn’t a YouTube video full screen mode was actually available (a while back YouTube changed their Safari display barring ios users from watching videos in full screen mode…why they would prohibit this option is any ones guess!)

It turned out that in this instance…full screen mode was the key to unlocking sound! See the screenshot below for where I found the control.

More Examples

This post gets a lot of readers and I think one reason maybe because there’s such a large number of sites with embedded videos and every player seems to be different. I decided to add this section where I can add additional examples as I run across them. I’m still using ios 10 on my most used  iPads  because I use Notes a lot and those I’ve updated to ios 11  experience  such a large lag time when working with Notes that it’s unproductive for me at this point to switch. So, most of my examples are generated in ios 10. But the net effect should be the same.

Fastco.Design.com

This first example needs a bit of explanation. The website above shows thumbnail clips in the right hand margin. When you tap on one it enlarges and moves to the middle of the screen. But try as I might  I couldn’t find any volume control in the video player. Then I realized that the thumbnail on the screen was still there and there were some slightly opaque controls which appeared. That’s what I used to turn on the volume. But the thumbnail I show and the full sized video are 2 different ones because I didn’t realize when I took the screenshots that the video I selected hadn’t played, but the one above had instead.

Tapping or clicking on each screenshot should enlarge it.

The rest are pretty self explanatory.

N Y Time’s Documentaries

When a N Y Times video begins playing it will be silent too…but using the screenshot below as a guide you can find where the audio is controlled and just tapping or clicking on it immediately gets the audio working.

image 1478

ZDNet Does it Right

With the big, hard to miss icon at the top left which immediately appears when this webpage opens, I didn’t have to waste anytime messing with this video before viewing it!ZDNet does it right!

I was really thrilled to run across this today as I did my biannual review of botnets…if you’re wondering why botnets, it’s because that’s how this site first began. It tells me that websites are maybe beginning to figure out and solve this problem for their users!

Chrome News?

April 2018

While this is currently unsubstantiated, I could have sworn that I ran across something yesterday that referenced how Google is changing the way videos auto-play in their own Chrome browser too. If anyone has more information on this I’d love to hear about it. Since we’re traveling I don’t have a ton of time for research right now!

Comments

If my Readers come across great examples to share, please do so by sharing the link in the Comments section below my bio.

Posted in ios, iPad | Tagged , , , , , , , | Leave a comment

A New Screen Recorder Discovered in ios 11 Ends a Long & Frustrating Controversy for Many ios Users

If you’re not in the market for a new iPad 10.5″ Pro you may have missed some really exciting news…ios 11 includes a builtin screen recorder!

Apple's ios 11 Is Coming Soon

Apple’s ios 11 Is Coming Soon

Introduction

Rarely do I get my act together enough to publish news that’s actually ‘breaking’…but for once I managed to do exactly that. Maybe it’s because the topic is one I’m sort of passionate about?

It’s about a month after Apple’s annual WWDC17 event has ended. The event in which Apple announced the newest 10.5″ iPad Pro. I was looking at a few ios 11 videos the other day shortly before I placed my order for that same new iPad which I can finally now get because I just sold the 12″ Pro that I ended up disliking so much I never used it. Prior to selling it I was prohibited from acquiring another because Apple strictly controls the number of ios devices one customer may own and use with their Apple ID.

It was while I was watching ios 11 videos on YouTube that I was suddenly shocked to discover that ios 11 includes a new built-in screen recording feature located in the freshly designed, user customizable Control Center! I hadn’t watched the entire WWDC event personally but from all accounts that I’d seen and heard this new screen recording feature was never once mentioned during the event.

I have to admit, I could hardly believe this was true!

For years and years YouTubers have gone to great lengths to find and use a standalone screen recorder. One where you don’t have to tether your device to a Mac Computer.

What Exactly is Screen Recording?

What’s meant by screen recording is the ability to capture and record all of the activity that occurs on a device’s screen in real time as a video. Most often screen recorders capture audio too,, so the person who’s creating the video can narrate as they record.

The 2 most common uses of screen recorders are gamers who demonstrate their game play actions for others on YouTube. This is a huge phenomena! YouTube hosts thousands of channels dedicated to this. Frankly, I never got the point of it all until the recent advent of Pokémon Go…the 1st (and probably only) video game I’ll ever play.

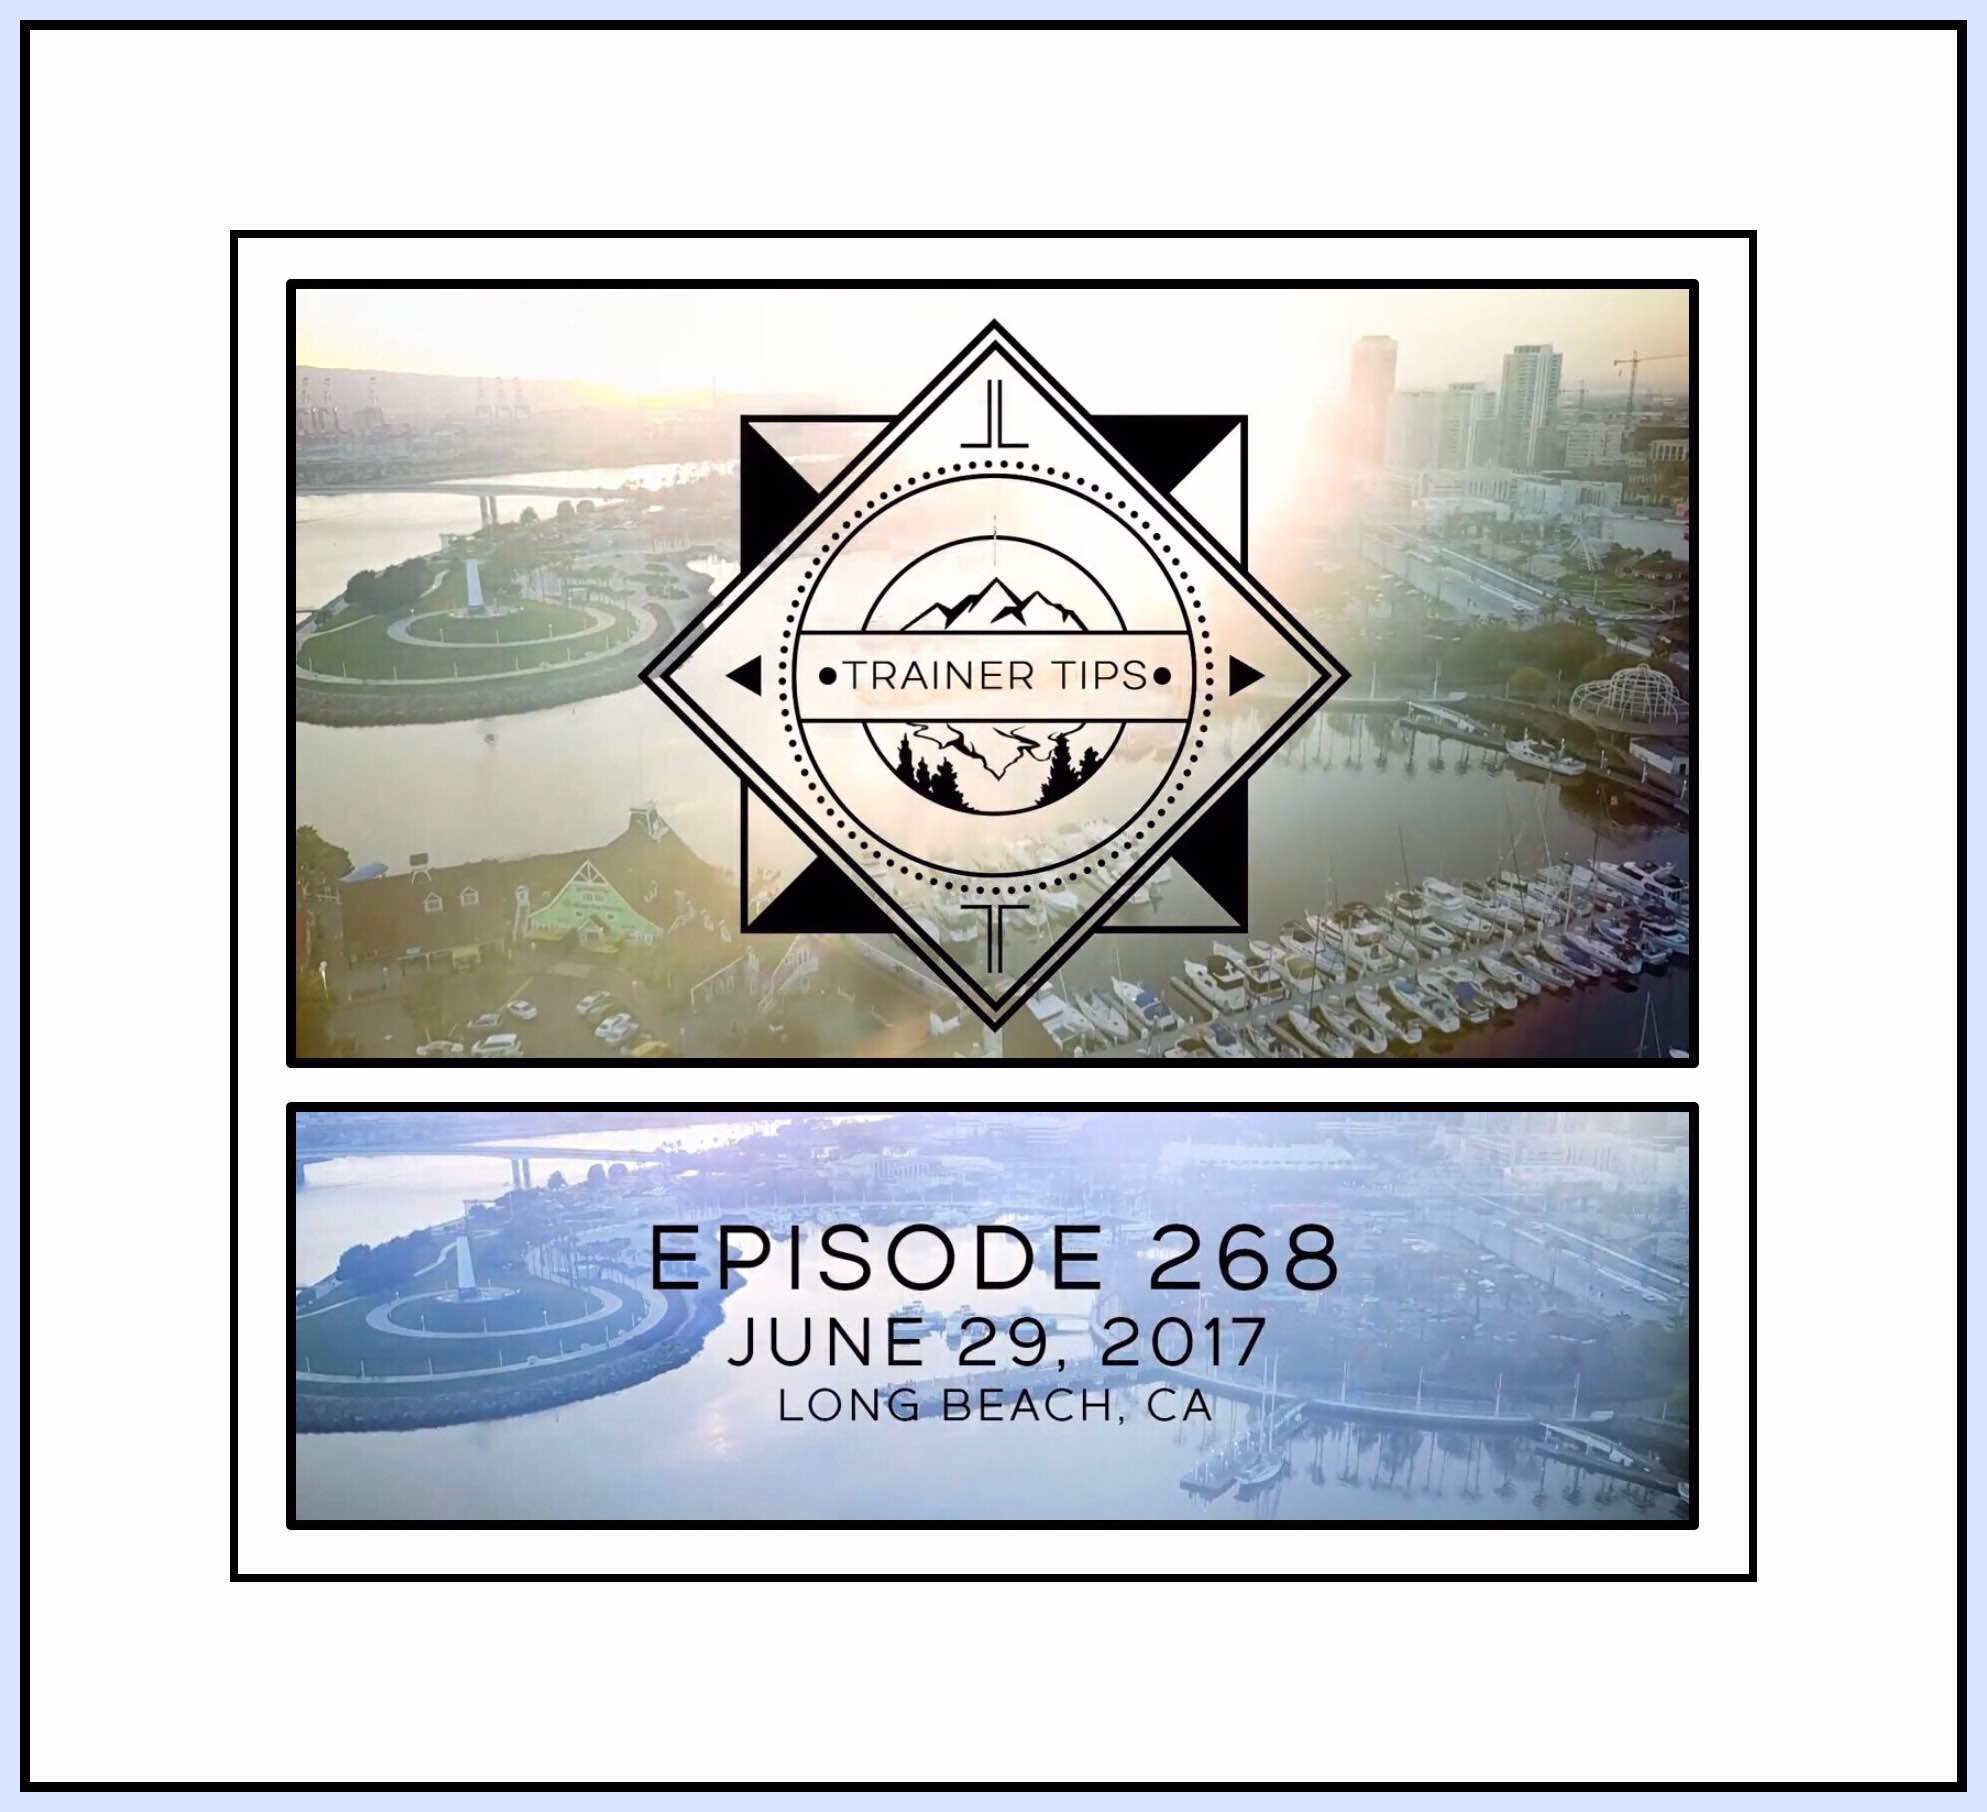
Trainer Tips is an awesome YouTube channel created by a young guy from California who apparently makes a living from his channel. He uploads new videos almost daily which give followers important news about the game as well as shows his cell phone’s screen as he wanders California and the world playing the game. His channel is quite professionally produced and it blows my mind that someone could earn a living playing Pokémon Go!

Trainer Tips YouTube Channel

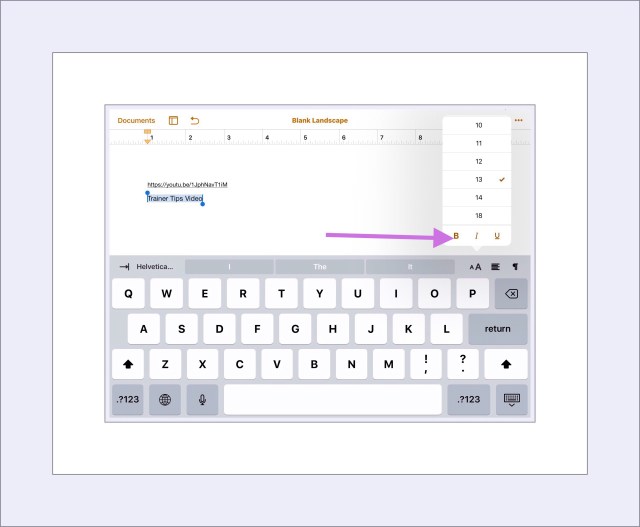
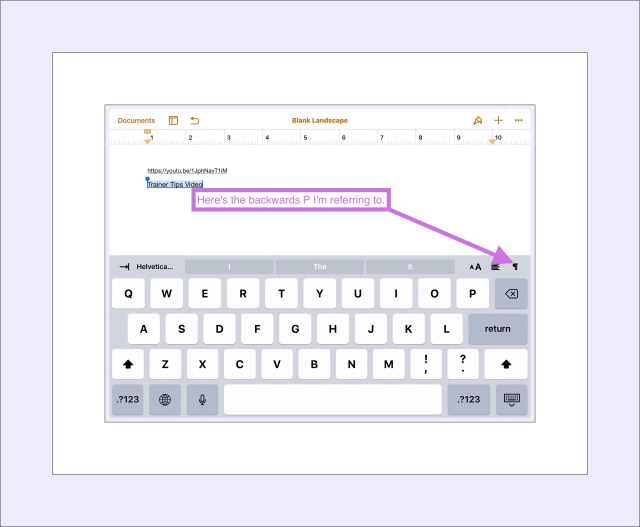
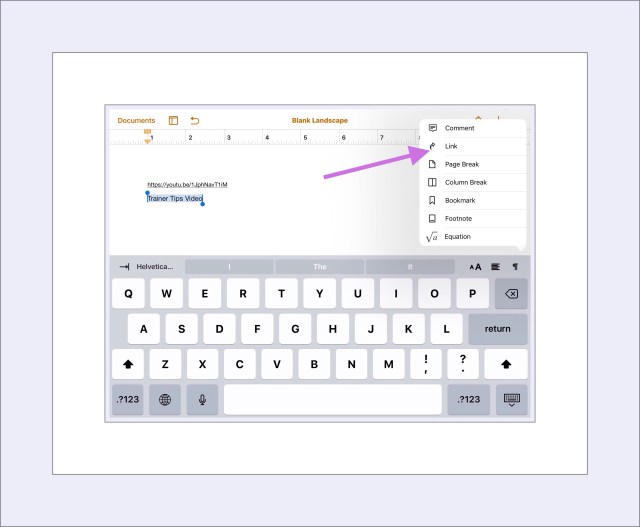
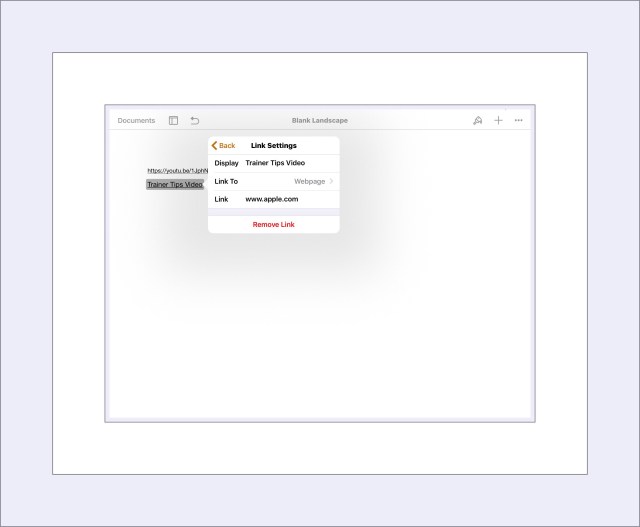
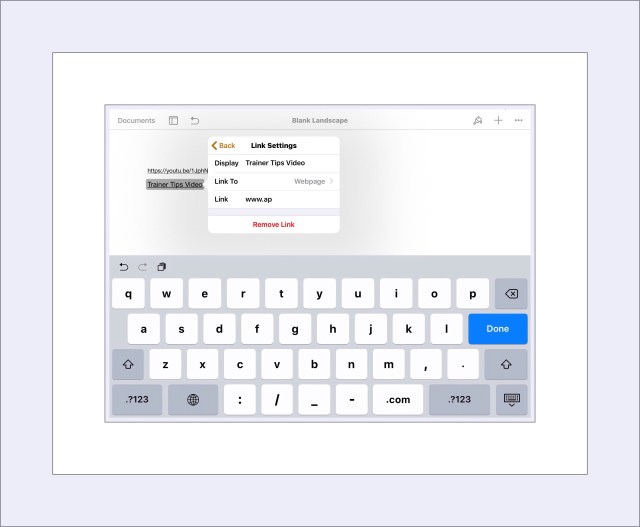
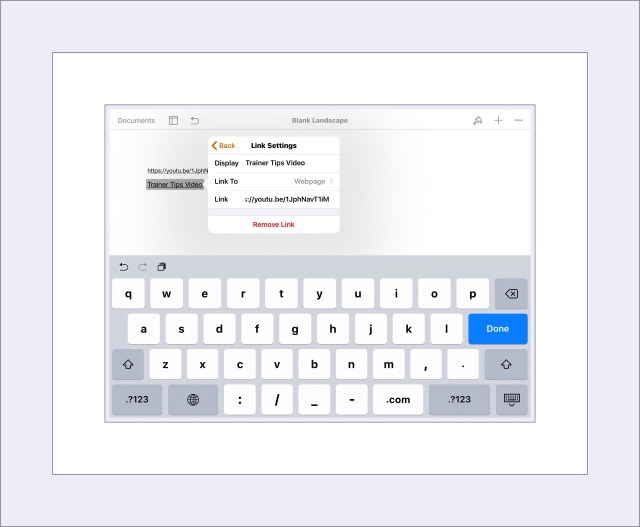
It’s probably because of all the gamers wanting to record their game play that screen recording apps even exist. As they began to gain recognition other YouTubers…people like me who host channels with content aimed at demonstrating tasks using technology, discovered the wealth of versatility screen recording utilities provide. While screenshots and annotations are great…sometimes they just aren’t enough. There are several tutorials I’ve wanted to create for quite some time, but haven’t been able to because screen recording wasn’t a reality. But now I can…so look for my soon to be published video demonstrating the finer points of using Apple’s newish Markup.

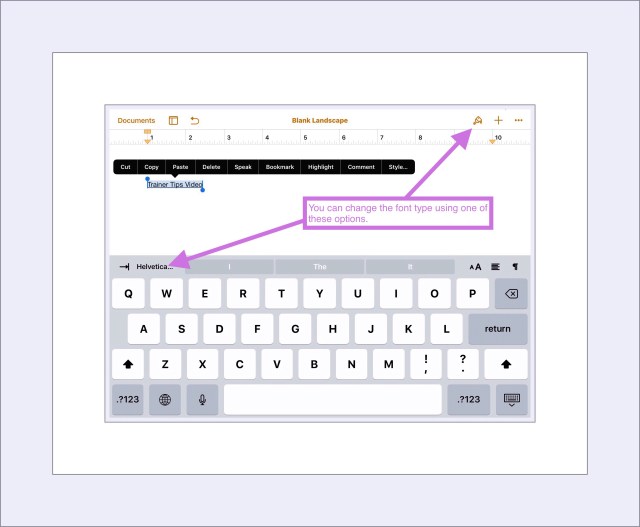
My Markup video will show you how to draw arrows, straight lines and correctly proportioned shapes…which I spent much too long trying to figure out on my own! Another video I’ve wanted to do for a while is a demonstration of the work flow I use to both write and create the illustrations for my blogs, websites and YouTube channel.

The Screen Recording Controversy

Why Apple seems to have gone out of their way to defeat these efforts, banning any app discovered to include this feature eluded me for a long time. But the knee jerk reaction was that several App developers took to include the capability hidden behind some other innocuous sounding feature in apps they’d make available in the Apple App Store. Since they needed a way to publicize their availability, YouTube was often the main mode of advertising. Apple must have employees who monitor YouTube for videos like these because time and time again, within a few weeks or at the most months, Apple would ostensibly discover it and the app would be removed from the App Store.

Last year when Apple opened ios to allow users to side-load apps, a better alternate distribution platform emerged. Alternative app stores have been extremely popular with younger tech-oriented users who learned early on that Apple’s restrictive sand boxed (aka safer) ios environment could be bypassed by jail breaking their devices, Jail breaking usually means tethering your device to a computer and downloading a tweaked version of the operating system that allows users to install better App stores.

Why Do User’s Jailbreak Their ios Devices?

If you’re wondering why people would go to the trouble of jailbreaking their devices (and trouble it is!) you’re not alone. This too has been a long standing and sometimes hotly contested debate. GottaBeMobile’s new article on Reasons for and Against Jailbreaking ios 10 & 10.2 discusses the most recent arguments both for and against. These current reasons differ somewhat from the longer term ones though. Historically, the main reason for jailbreaking was the plethora of additional customizations available for tweaking devices to make them extraordinary. The customizations let you do things to your device that Apple strictly prohibited. Things like new and better locking screens, file managers and a lot more games and media were available to jail broken devices. Overtime a more popular reason arose…the ability to use screen recording apps.

Cult of Mac wrote a great feature article on the history of jail breaking in the article from 2012.

Even though thousands of users went that route, and I did think about it often…I never actually did it for 2 main reasons. First, you know how Apple is constantly updating ios? Well, when you jail break a device you still need to update the ios periodically…but it’s a much more cumbersome process, which you can’t even do until some industrious jail breaking genius figures out how to accomplish that with the newest ios release, and then write code and make it available to the whole jail breaking community. 2nd, personally I felt that the inherent dangers of opening up your device to allow software from sources less well-known and scrutinized was an open invitation for viruses and malware. My reasoning was that for the vast majority of ios users these problems were non-existent for many years (although recently that’s changed.) Things changed when a few years back the first ios viruses entered the scene…but those were only found on jail broken devices.

A 3rd important reason, but one I wasn’t necessarily focused on at the time was that jail breaking meant voiding your Apple warranty. More recently Apple replaced one of my iPads under warranty when I didn’t even think it was still under warranty…so I gained a new appreciation for the significance of voiding Apple’s warranty.

The Death of Jail Breaking

Around the time of ios 9 Apple quietly introduced a new ability primarily to its’ developer community now commonly referred to as side loading. OSXDaily gives a great explanation of the earliest notion of side loading. But very quickly side loading became more streamlined and adopted by the jail breaking community. Now it’s readily available to any and all to try. Yesterday the Cult of Mac published an article and interviews with some of jail breaking’s pioneers on why jail breaking no longer makes sense.

Today side loading means installing apps from alternative app stores…stores which now offer a lot of apps formerly only available on jail-broken devices. All kinds of apps are available and unlike their jail broken counterparts, very frequently these apps are free. That is actually one reason to use side loading…to get an app for free that you’d have to pay for in Apple’s App Store. There are several App Stores around for this, and like using Apple’s App Store you first need to install the store as an app on your device.

More Information About Side Loading Apps

One popular App Store is HipStore…it’s the one I used to find and load some prohibited screen recorders. You can download HipStore for ios 10.3.2 here…remember you need to get the correct versions for your version of ios. But my examination of the store today didn’t reveal any screen recording apps there currently. Apps do seem to come and go more readily on these types of stores.

iPhonebyte's AirShou Guide

iPhonebyte’s AirShou Guide

The only screen recorder app that I could figure out and that worked for me was AirShou. In May iPhoneByte wrote a good guide to downloading AirShou using a different method and store than the one I used.

My Only Experience Using Side Loaded Apps

I was thrilled to finally be able to try out screen recording but it didn’t work out great for me. I tried out the first 2 of the screen recording apps encircled in red in my screenshot a little further above. Vidyo I couldn’t figure out how to use at all…although for those who do it’s supposed to work well. AirShou had more information available online to help figure out its usage. So I recorded another topic I’d been wanting to do for a very long time.

I use this amazing app called OneEdit Pro for creating almost all of the images I use on my websites and YouTube channel. It’s amazing because it has such depth and so many features that I can accomplish almost everything I need to with just this one app. Many times I’d attempted to write a post about how to use it but it wasn’t easy because so much of what I needed to communicate was visual. So I tested out AirShou late one night when I was half asleep…just trying to run through what I might include in a potential script for a video. The next day I attempted to watch the video but it wouldn’t play for me. Nor could I import it into iMovie and edit it. The file itself was huge and I think that’s the reason why. But revisiting the app didn’t reveal any ways to adjust things that would change the size of the final output in any significant way.

Both of my OneEdit Pro Tutorial Videos

Both of my OneEdit Pro Tutorial Videos

So I had about 15 to 20 minutes of roughly scripted footage I couldn’t do anything with. I wasn’t going to record anything else unless I could actually use the footage. Ultimately after hours of messing around with it, it took transferring the footage to an iPad Pro and editing it with a new expensive ($20) video editor LumaFusion to get the not-great video that was the result and which I published on YouTube.

Following that abysmal failure…I attempted to do a 2nd video that was shorter, more to the point and better… not using a screen recorder and with a companion blog post. If you’re wondering why I couldn’t drop this, it’s because the OneEdit Pro app, (which is only $2.99,) is really amazing!

OneEdit Pro App Store screenshot

It’s improved my work so much but especially in saving me time, because now I edit all of the images together at one time for most of my articles…I can get a lot more work done in a much shorter period of time. What used to take me 3 hours now takes about 15 minutes. I figure there are probably billions of,bloggers out there…and probably at least half of them use ios devices…yet no one seems to have ever heard of, much less use this app. I feel like if people understood what it did, they’d be as wowed as I was when I first discovered it.

But, as you can see, side loading didn’t really end up being the panacea I was hoping for. :-( Not only did it fail in the functional spectrum…but just like jail breaking devices makes you more susceptible to viruses and malware…side loading apps does too. And while I don’t really think it was that that accounted for why I periodically get popups now telling me that my data is locked (it isn’t really)…it’s an inherently risky move.

I realize that was a much longer background leading up to the main reason for my post…but I really feel like it’s important for everyone to understand the context and what the options are currently. Also I think it helps you to understand why my saying that I’m ecstatic about this new screen recorder is really an understatement of the greatest magnitude!

I kind of feel like shouting it from the rooftops…

IOS 11 HAS A BUILTIN SCREEN RECORDER EVERYONE!!!!!!!!!!!!!

Let’s just hope this isn’t something Apple decides to remove at some point before ios 11 goes live.

The Best Documented Proof of ios 11’s New Screen Recorder Comes From Several YouTube Videos

The screen recording icon off and on

The screen recording icon off and on

Here’s a link to the first YouTube video I watched by Iupdateos, where he demo’s the screen-recorder at around :50 seconds in.

And a link to the second video by EverythingApplePro where you can find the very brief screen recording function demoed around 2:10 minutes.

2nd example of the screen recording on and off again.

2nd example of the screen recording on and off again.

The ‘Best of the Best’ Provides Advice for Using the New Screen Recording App

YouTuber DinoZambas2 has the best demonstration of the screen recorder beginning in his video at :50 seconds, because he shows both how to set it up to appear in the Control Center as well as how to access the controls for the microphone prior to invoking the recorder.

If you don’t have time right at this moment to watch videos, I took the attached screenshots of the demos…because I myself was having a very hard time believing it!

Why is This Such a Big deal?

I already covered most of this in my very long lead in…but this is the shorter, possibly better version. I think the number 1 reason a screen recording feature is so important is because YouTuber’s need it so often to demonstrate things on the screen of their device. It’s almost impossible to demonstrate things that are happening on the screen of an ios device without this feature. Even having a second party available to record while the first person demonstrates some feature or tip, ends up with inferior video footage because the hands of the person doing the demonstrating end up covering up at least half of the screen. The smaller the device the bigger this problem becomes.

So the ability to record actual onscreen activity automatically within the device provides a much cleaner, more viewable demonstration.

What Do We Know About the New Screen Recorder?

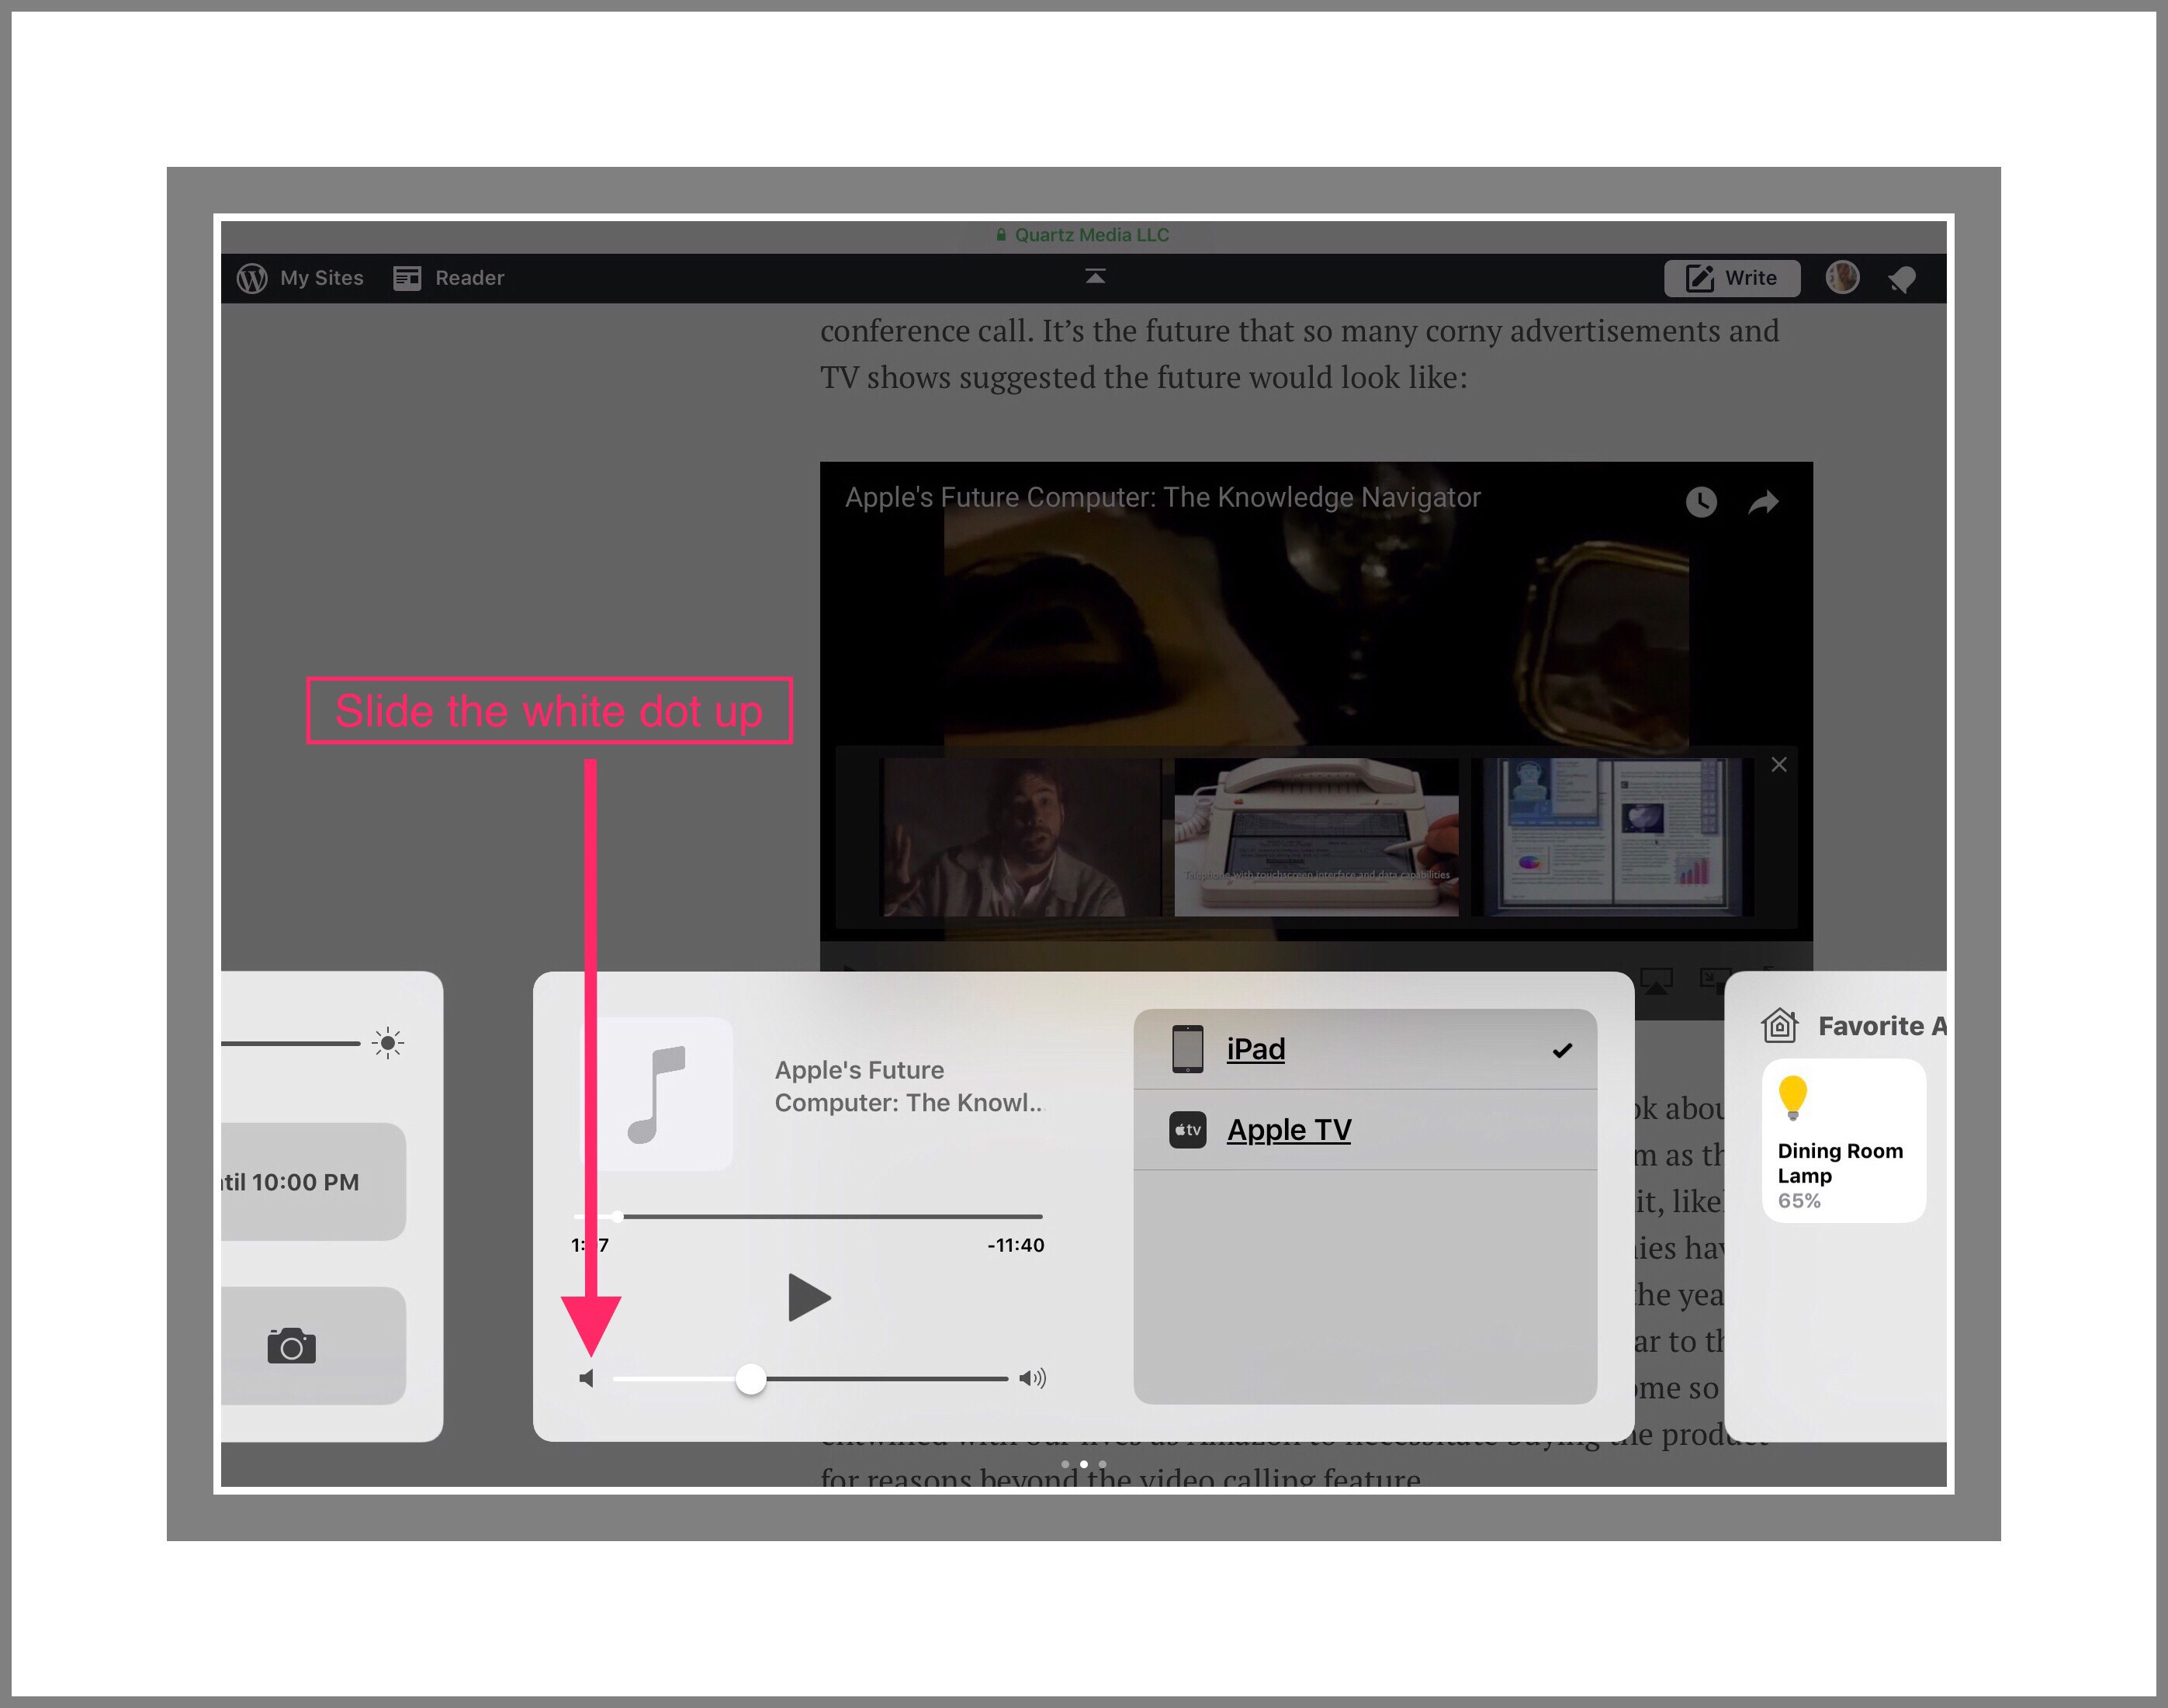
From DinoZambas2’s video we know that the screen recording feature must first be enabled in a fashion similar to that of adding widgets to the notifications area. We also know that once it’s invoked with 3D Touch turned off, you just need to open Control Center, then long press on the screen recording icon (it looks like 2 concentric circles) to pull up the microphone which you can set either to

On‘ or ‘Off.’ Last you tap the screen recording icon to begin recording. Then hit the Home Button to go to whatever app you want to record.

When your done recording you can tap on the blue banner displayed at the top of the screen that indicates a recording is in progress and then tap on the word ‘stop‘ that pops up in a small.Next go to the Photos app camera roll to view the footage you recorded.

Guides to Using the Screen Recorder

9 to 5 Mac has written a nice guide on how to setup and use the new screen recorder.

wccftech also has developed a written guide you can find here.

Mic’s article, while short, offers a quick illuminating video that was created using the screen recorder.

How to Install ios 11 | Even if You’re Not a Developer

I’m not sure exactly when this occurred, but in the not too distant past Apple changed their participation rules and you no longer need to be a developer to download and use their betas. As a developer you’d need to pay a $100 fee first. But when Apple changed that rule they made it free for the general public to become beta testers. I’ve contemplated doing this for a while…even when it took $100…but I never could bring myself to do it. I’m a beta tester for several things and I know what’s involved. Bugs can and do manifest themselves. They can chew up a lot of your time both to accurately report and deal with the fallout from. But with app beta testing the scope is limited to just that app…with ios it’s essentially your while device.

Plus I read a recent CNN article saying ios 11 is really pretty buggy. While I couldn’t find that again to link to here, I did find this one from Apple Insider called: PSA: Don’t Install ios 11 on Your Main Phone Unless You Hate Yourself.

Apple Insider's 'Public Service Announcement'

Apple Insider’s ‘Public Service Announcement’

I Just Installed ios 11 On An iPad That Was Acting Flakey

It took me longer to accomplish than I thought it would, but part of that was because of that iPad’s problems I think. It seems to have a corrupt ios, something I’ve had issues with in the past, especially with ios 8, and I was going to have to,do something with it anyway regardless.

Once I started I realized that they are really 2 kinds of betas…those meant for the general public and those meant for developers. Apparently developer betas are released earlier than betas for the general public…but according to ‘The Verge‘ the public beta became available on June 25th. Here’s the link to download it.

Because it took me so long to get ios 11 onto my iPad and I wanted to finish this…I haven’t actually tested out the screen recorder yet. But when I do I’ll write more about it or make a video or something. In the meantime…if you’ve ever longed for a screen recorder for ios…your prayers have been answered!

Comments

Please feel free to leave me any comments or questions below.

contact-formcontact-field label=’Name, nickname or just first name is OK’ type=’name’ required=’1’/contact-field label=’Email required ONLY IF you want me to email you back’ type=’email’/contact-field label=’Website if you want to share your website with me and my readers’ type=’url’/contact-field label=’Comment’ type=’textarea’ required=’1’//contact-form
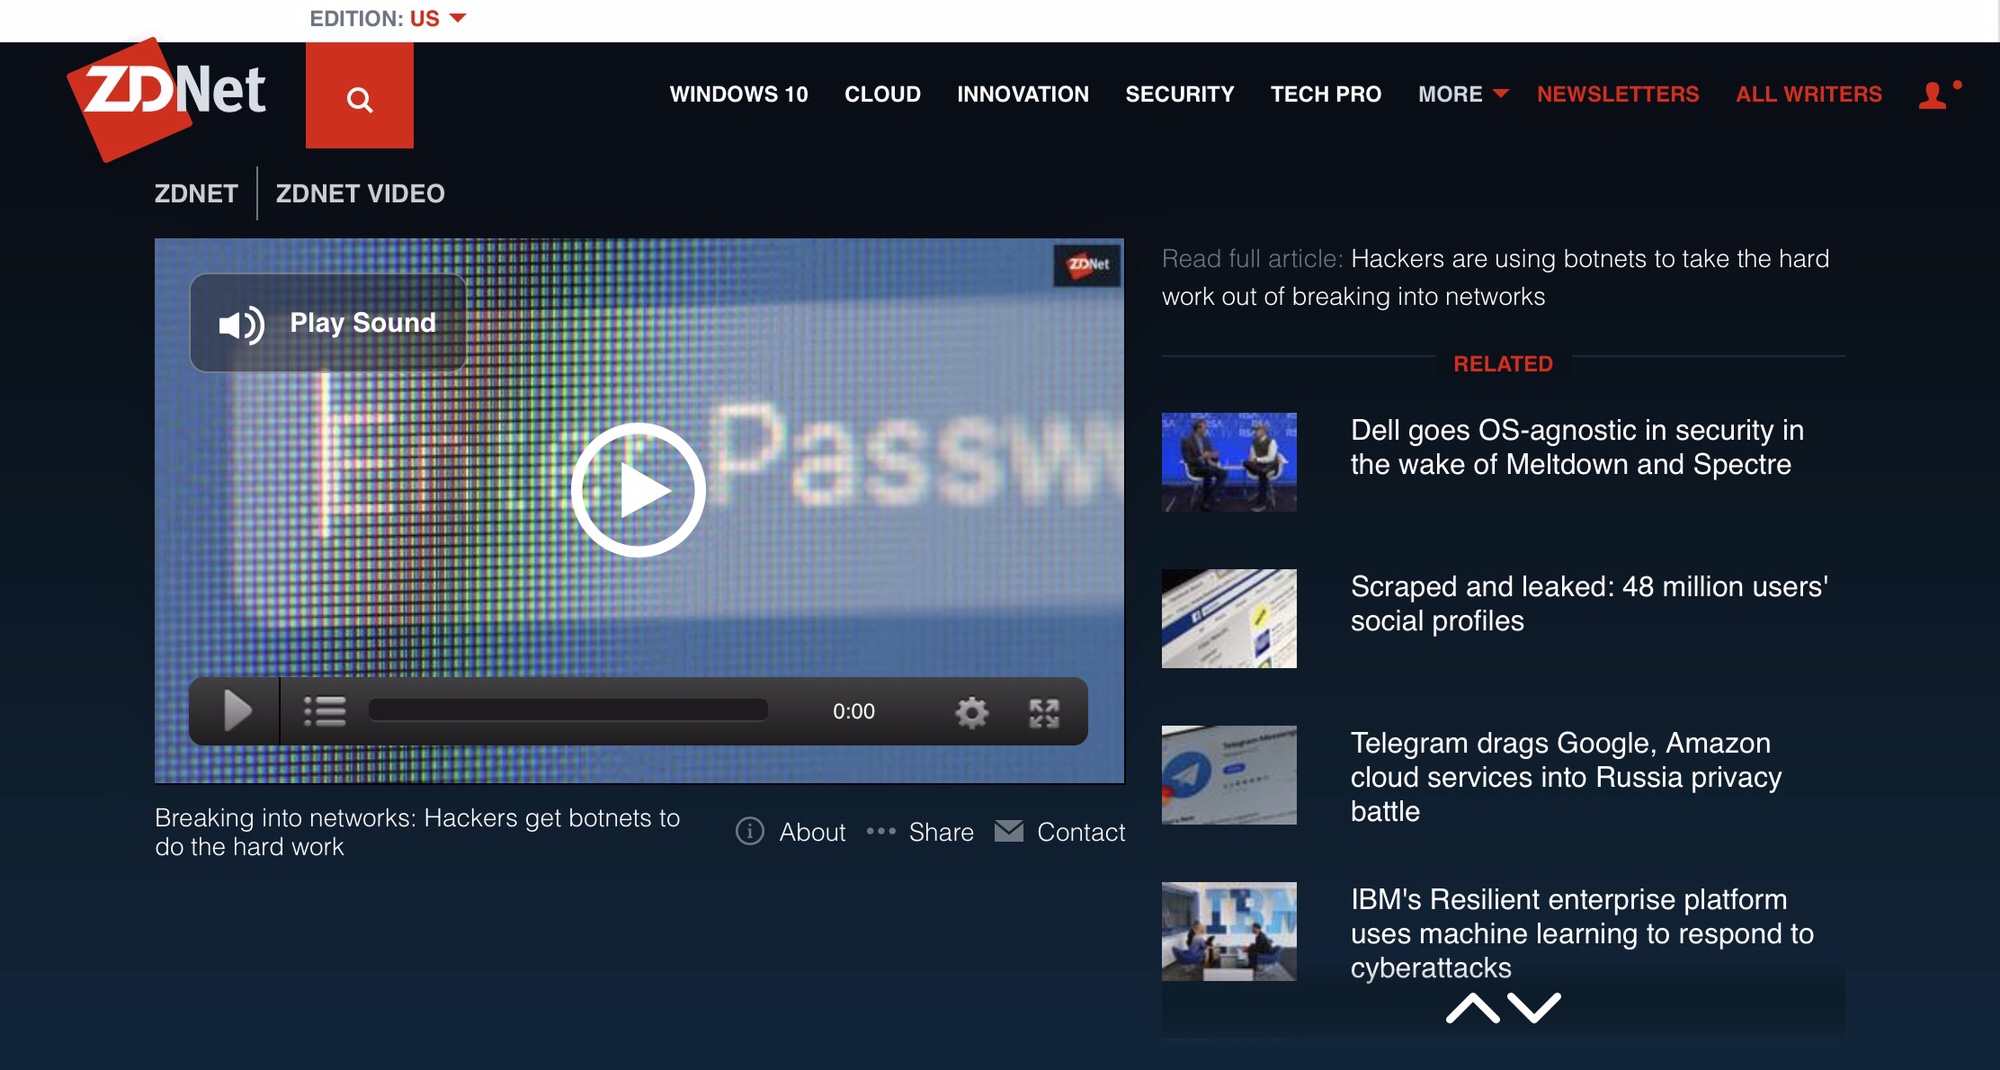
Posted in Apple apps, Apple Devices, ios apps | Tagged , , , , , | Leave a comment

Can 2 Factor Authentication Be Used for a Family Sharing an Amazon Prime Account?

Introduction

Updated: 2/17/22

The Upcoming 4th of July Means that Amazon’s Prime Days Will Soon Be Here!  

What  better way is there to celebrate our country’s most patriotic holiday than by saving a bundle during a family shopping spree on Amazon?

How about upgrading your family’s Prime account to use 2 Factor Authentication?

Authy 2 Factor Authentication

2 Factor Authentication Protects Everyone

In this day and age there should be no argument about using 2 Factor Authentication to protect the security of your accounts with passwords. It is truly a must in our current internet climate. In 2022, keeping important accounts and data secure can be a constant challenge. If your family’s like mine even a little bit, then your Amazon Prime account is probably the most important store account that your family utilizes.

If you happen to have Amazon Prime, then its likely that you share all of your amazing Prime account benefits with your immediate family members (meaning your spouse and your kids.)  With all of Amazon’s cool new IoT technology like Amazon EchoEcho Dot, Echo Tap, Echo Show and the recently retired  Echo Look…keeping your Amazon account secure is even difficult than I t was in the pre-AI-device era.

Keep in mind too that Amazon now partners with other retailers. This allows customers to buy from infrequently visited sites using their Amazon account. With your credit card tied to all those things…it just makes good sense to begin employing 2Fa (aka 2 Factor Authentication.)

One last reason you should consider adding 2FA to your Amazon account is because it now seems like horrible news of viruses and ransomware are now frequent occurrences. So protecting your family’s data and identity has never been more challenging nor more important. That’s why imho 2 Fa should almost be considered ‘A God Given Right‘…or, at a minimum, ‘The American Way.’

Beginner’s Primer

If you’re not familiar with what 2 Factor Authentication is and why it’s so important you can visit PC Magazine’s site to read their amazingly thorough article and learn more about it.

Or, you could just trust me when I say…it’s important…and it’s something you should seriously consider implementing to protect important account information,

What Can You Do if Your Whole Family Share’s Your Amazon Prime Account & You Want 2 Factor Authentication?

The Problem

Most 2 step authentication methods rely on sending authentication codes to either an Authentication app, like Google Authenticator or to a cellphone number in the form of a text message. I think you’ll immediately begin to recognize the problem with the SMS alternative. Family members usually don’t share one cell phone or one cell phone number either. Yet, the authentication process generally only lets you designate that one cell phone number be the recipient of the verification codes.

There’s no obvious work-around either. around is using an Authentication app instead. can be a great solution for situations where you don’t have cell phone service or your cell phone isn’t always accessible or handy to get to. But here too, Google Authenticator only has a procedure in place for using their app on one device.

How to Enable 2 FA for Amazon

Possible Solutions

There are workarounds for this situation published online. Several people have figured out an alternative to sort of hack Google Authenticator by scanning the QR code that’s sent very quickly onto multiple devices. If done correctly, you can add Google Authenticator to multiple devices. But this can only be done once when the original setup occurs.

So if you are trying to use this method with a family…everyone would need to be present along with their devices and remain cooperative during the setup process. This alone is an unlikely scenario if your family is anything like mine :-) Add to that the complication of when somebody gets a new phone, or they lose or break their phone, mandating that the entire setup process needs to be done over again…and you begin to realize why even this workaround is lacking,

If Only Someone Would Come Up With An Authentication Method That Could be Shared Across Multiple Devices and With Multiple Family Members

Say Hello to Authy

I discovered today that Google Authenticator isn’t the only authenticating app in the industry any more. There are others. Some which have become quite popular. The one I discovered today is a fierce competitor to Google Authenticator. Fierce, because like Google A…their service also is free. But they’ve managed to solve what turns out to be an incredibly complex problem with the multiple device multiple user scenario that’s my topic for discussion today.

Authy may be the best solution to this problem.  Authy is a free mobile / desktop app for two factor authentication, as well as security partner and SMS delivery service of many websites that want to make two-factor authentication work better for their users.

Notice to My Family:

I’m going to be switching our Amazon account to 2 Factor in a couple of days. Please read my article, checkout Authy’s website and ask me any questions beforehand to alleviate any unforeseen difficulties before Prime Days is upon us.

Thank you…Love, Mom


Some advantages of the Authy apps include:

  • Your data can be backed up to Authy’s server if your phone is lost or stolen – and afterwards, you can log out the old phone, too (settings: remove device).
  • You will receive a push notification if someone else is trying to access your account via SMS. High risk accounts (such as Bitcoin) will require a 24 hour delay with email approval, or you can turn on this protection by disabling “multi-device” in the Authy app settings.
  • You may sync multiple devices to one account – even copy and paste a token right from the desktop Authy app into the website you need to access.
  • If you are traveling, the app doesn’t need an SMS with roaming charges… just use the code generated in the app.
  • If you have changed your phone number but didn’t update your information with the websites you need access to, you may use Authy’s account recovery tools to change your number.

How to Use Authy

First you’ll need to check with the website that you need an Authenticator app for to see if Authy will work for them. There’s very good chance that it will because most sites do.

Some of the sites that work with Authy

Next you’ll need to download the Authy app. Or if you want to really streamline the process you can visit their combined cellphone # entry and download page here. Authy is available for ios, Android and Windows devices.

Better yet is to go through Authy’s setup process which begins here and visit each of the four links at the bottom of the screenshot below in succession.

More Information

Some websites have more specific information about using Authy with their website on a special page that looks like the screenshot below, you can get to that webpage using this link.

You can read more about how Authy compares to Google Authenticator here.

Authy vs. Google Authenticator

I know some of you are thinking ‘wait…is 2Fa really all that much safer? Does it really make sense to incur additional time, aggravation and risk (yes, risk!) to employ it? It just so happens Wired Magazine had the same question. You can learn what their take on it is…what the benefits or lack there of really are in their recent article ‘Myth’s of 2 Factor Authentication’ here.

Lucky for Me…Authy Works With Amazon!!!

You can visit Authy’s setup instructions for Amazon here.

Authy is a best rated app


Posted in Amazon Prime, Password Security, Tech Tips | Tagged , , , , , | Leave a comment

Class Up Your ios Emails with Professional Links Instead of Messy Looking URLs

Updated Nov. 2017

Introduction

Did you ever receive an email from someone who shared a link with you and wondered how they made the link so clean and professional looking?

The first time I was cognizant of this was a few months back when my son emailed me some information. The links he sent looked more like titles in a Table of Contents than the messy links that I usually send. See an example below:

Example of Messy URLs Versus Professional Links

Sample email with 2 long and messy links and 2 clean, streamlined, professional looking links.

Sample email with 2 long and messy links and 2 clean, streamlined, professional looking links.

I hate having long messy URL’s in my emails now that I know there are better options available.

A Simple Method I Created Uses Pages For Making My Links

I came up with a very simple method to make pretty links which anyone can use. But it involves the use of a 2nd app.

That 2nd app is Pages for ios. For many years Apple charged $6.99 for Pages. But if you’ve ever purchased a new Apple device you would have been able to download Pages for ios free. If you didn’t know about this free option however, it disappeared after some time. But some time in the recent past Apple decided to make Pages free for all ios users.

So you should grab Pages while it’s still free, because who knows how long that will last. Here’s a link to Pages.

Pages is Apple's Word Processing App for ios

Pages is Apple’s Word Processing App for ios

Using Pages for ios to Create Hotlinks in Emails

After you’ve opened Pages, select a blank document template to create a new document.

Step 1: Begin with a blank document. It doesn’t really matter what kind of document it is because you’ll delete it at the end.

Step 2: Paste the link you want to clean up into the document

Step 3: Next type out a phrase or the text that you want to become the hotlink.

Step 4: Tap somewhere on the link you pasted to select and the whole link should be highlighted…then tap on the word ‘Copy.’

Step 5: Tap on one of the words you typed in as your replacement text for the messy link to select it then drag the selection tool to both edges of the line to capture the entire line of text.

I've selected the text I'm going t turn into a link

I’ve selected the text I’m going t turn into a link

Step 6: Optional. I like my links to stand out so oftentimes I first apply the ‘Bold’ formatting option to my line

Pages gives you 2 places to find the Bold, Italics and Underline formatting styles

Pages gives you 2 places to find the Bold, Italics and Underline formatting styles

Step 7:  Tap on the backwards looking ‘P’ at the top right corner of the onscreeen keyboard. (This P is really a formatting symbol for Paragraph.)

The backwards 'P' on the virtual keyboard.

The backwards ‘P’ on the virtual keyboard.

Step 8:  Look for the word ‘Link‘ in the pop up menu that appears. If it’s not there, make sure that you’ve only selected the exact text and not any formatting symbols that might appear alongside your text.

Step 9:  As soon as you’ve tapped on the word Link a new pop-up menu appears called Link Settings. If this Menu doesn’t automatically pop up, just tap sharply and quickly on the whole text replacement line and a similar menu should display…tap on ‘Link Settings.

Link settings is where you'll enter the messy URL

Link settings is where you’ll enter the messy URL

Step 10:  You will replace the link that’s the default one http://www.apple.com with your own link. Before you do this you may want to copy your link into the invisible clipboard.So just position your cursor inside this box and backspace several times until you delete http://www.apple.com. Then paste your own link here.

Step 11:  You text should instantly become ‘linkified.’ You can tell you’ve done it correctly if the words are underlined. So now, all that’s left to be done is to copy and paste the link into your email. There is one little trick to this too.

The Apple system Font in ios 10 is called San Francisco. But Pages doesn’t include San Francisco as one of its default fonts. So if you want the font to look very similar to the rest of your email I’d recommend Helvetica Neue Bold in size 13 or 14. You can change the font type the same way you made the original line of text bold. Just select it and use the upper formatting menu (because the lower one doesn’t give you different fonts.) But there’s a 2nd ‘Font selection menu’ at the top left side of the virtual keyboard.

Two different menus are available for changing the font type

Two different menus are available for changing the font type

Step 12:  Once you’ve pasted your nice looking links into your email, while you still have Pages open, think about if there are any other formatting options you’d like to use to enhance the rest of your email. Because, most of the format changes you create in Pages can be successfully copied into an email…as long as you’re careful and make your copy/pastes cleanly, without stopping somewhere else along the way first.

What do I mean by that? Basically, I mean that if you stop and paste your text somewhere else first you may lose Pages formatting on subsequent pastes. Also, if you copy several lines and paste them into the email, with the intention of ultimately spacing them out throughout your email, you’ll want to make the same complete paste wherever you want the formatted text. You can just paste the multi-lined newly formatted text in each location you want, then use delete to remove lines you don’t need. Because if you pasted the whole block of text in one location and then just tried to copy/paste smaller portions of it from there, copying from within the email will cause you to lose the nice formatting.

This is true because only direct pastes from Pages will save the new formatting.

That’s the whole process in 12 easy steps. I know it looks time consuming…but trust me…it’s not. It’s actually a really quick procedure that can be done in less than a minute. Then all your friends and family will be impressed with your newfound tech savviness.

Comments

Please leave any comments or questions you may have for me by scrolling way down towards the bottom of the page and looking for the little comments box.

Posted in Apple apps, Apple Mail, Emails ios 10 | Tagged , , , , , | Leave a comment