
Updated September 28, 2018
Including All the Secrets & Tricks I Use to Save Time While Editing A Lot of Photos at Once
A few months back I wrote a post about my all-time favorite photo editing apps and how I make sure that I keep the highest image resolutions possible with my photos while using these apps. This post addresses many of the same topics…but it approaches the whole subject from the opposite perspective. Instead of keeping the best digital images that are possible using an iPad or iPhone, here I’m more concerned with how to keep ‘good’ but not great quality…while I accomplish many different editing tasks quickly and efficiently.
My end product needs to be good enough for illustrative purposes on my websites. All of the images I’ve included in this post were generated as I wrote this, using the techniques I talk about here so that my readers can see exactly what kind of photos will result from using the tools I’m highlighting here.
Below, my post on my favorite photo editing apps & maintaining great photo resolutions

Introduction
This post is geared towards anyone who needs to edit a lot of images and get them into great looking ‘final forms’ for presentation purposes…regardless of whether or not the end goals are for personal or web publishing purposes.
As anyone who publishes a website or blog online already knows, it’s really important to have good images…and ideally lots of them. They can help to make your information more readable and user friendly, as well as give graphic examples of your information and also be used for illustrative purposes.

This can end up requiring the use of quite a lot of images if you publish on a fairly regular basis. Images which need to both look good and not impact the overall performance of your site….especially the page loading speed! That means you need to find or create images and then add borders and oftentimes text too. Last you need to resize them to decrease the resolution enough so that your site loads quickly. Doing this one image at a time takes an inordinate amount of time when you consider that the pictures themselves are really secondary to the information you’re presenting. Yet…the images are crucial for the quality of your website.


Side Loading Apps & My 1st OneEdit Pro Demo Video
This has led to the side-loading app phenomenon. With ios 10, Apple finally gave user’s the ability to install apps on their ios devices that didn’t originate from the App Store. There are a few websites that have either free or low priced apps that you can install on your device now without going through the App Store and without voiding it’s warranty. The one I used is emu4ios. emu stands for ’emulator’ and the best of,the apps I tried is AirShou.
But for me so far the apps haven’t proven to be very polished yet. They can be both difficult to figure out and dangerous to install and use.
In desperation I did try a few different screen recording apps to begin a OneEdit Pro series of videos. But I ended up finishing only one, not so great video. It’s way too long (12 minutes) because I discovered after I shot it that the footage was virtually uneditable. No video editing app I tried seemed able to work with the video footage that the screen recording app recorded. I still don’t know why that was the case but you can see that video here . The one thing that it has going for it is, you can actually learn how to use some aspects of OneEdit Pro.
Download OneEdit Pro from the ios App Store…(it’s $2.99)
Part 1 in the OneEdit Pro Series of YouTube Videos

In this video in addition to learning how to navigate around within the OneEdit app, I thoroughly cover how to add multiple frames or borders to groups of images very quickly. By quickly I mean to say that you can accomplish that task very quickly…not learn it quickly…because the video, at 12 minutes…isn’t very quick!
Shooting a Video Using My 9.7″ iPad Pro in One Hand & While Demonstrating OneEdit Pro with the Other Hand
My 2nd OneEdit Pro video is one that I made today using a different approach. In this one which is about how to batch crop photos and then add borders to them, I tried to record my actions with the iPad I was using to shoot the video in my left hand while I performed the necessary actions with my right hand. But it’s awkward trying to keep the left hand iPad steady enough to keep the right-side iPad in frame for the duration of the video. Here’s the link to Part 2 in the series.
Part 2 in the OneEdit Pro Series of YouTube Videos

You might be wondering why I tried to shoot this using my 9.7″ iPad Pro in my left hand. I know I would wonder that myself! The reason is because I had already tried doing the same thing using my iPhone as the camera, and I quickly discovered that because my iPhone is so small relative to the size of the iPad …that it would constantly wander off-frame so much that they video footage was virtually useless.
Tiger Ng from OneEdit also has a demonstration or preview video for OneEdit Pro

What Else Can You Do Using OneEdit Pro?
The primary function that I use OneEdit Pro for is to crop and add borders to photos for my website. But oftentimes I resize them in the app too…to keep the overall files size small for page loading purposes. The app isn’t perfect and it does have a few glitches…and one of these is that the final image size reported by the app isn’t necessarily the true file size. So, while I use OneEdit for resizing (they call it scaling) I still use a few other apps to determine what the actual file is. If the finished file size is too large, then, rather than resizing it again in OneEdit Pro, I’ll usually use one of the apps I referred to above called Big Photo to resize it a little more…often just for expediency because that’s where the photo is a that moment in time.

Using the Big Photo App in Conjunction With OneEdit Pro
The reason I love Big Photo is because it performs 2 essential functions really well for me. First it tells me what exactly a photo’s meta data, file size and resolution are. Surprisingly these aren’t easy things to discover using an iPad! 2nd, it scales images both smaller and larger without hurting the resolution much better than any app I’ve ever tried before.
Whenever you scale down the size of a photo you end up hurting the final resolution of it too. Depending upon how much you resize it will determine how much of an impact there is upon final resolution. But the basic rule of thumb for me is if I scale something to smaller than 80% of its original size using OneEdit Pro, then the final resolution might end up being too blurry. But using the Big Photo app, which has a free version btw, I can usually resize it down to about 60% without degrading the final resolution too significantly. Sometimes when I scale a group of photos in OneEdit Pro a lot…meaning I reduce their size a lot…I immediately add another edit to my group of batch edits that sharpens the overall resolution of the images.
Sharpening, which is called Sharpen Luminance in OneEdit is found under the ‘Filter’ menu item and it’s one of more than 80 photo effect filters that you can apply to a group of photos in one fell swope.
Example’s of History & Merge to Montage Features | Horizontal Montage

-
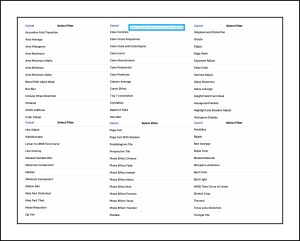
- Photo Filter Effects Available in OneEdit Pro


-

- Tiger Ng’s YouTube Preview of OneEdit Pro
-

- Apple’s Recent iPad Pro Commercial
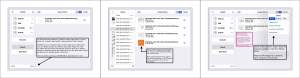


Closeups of the History & Montage Features…tap or click on each to enlarge.
Some Additional Editing Features I Use Frequently with OneEdit Pro
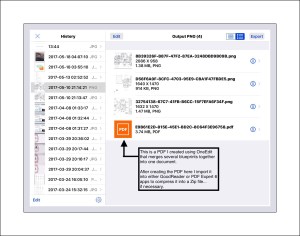
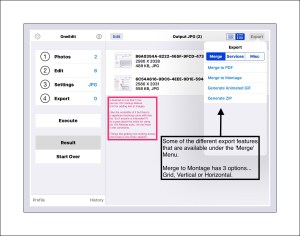
Occasionally I use a feature that allows you to add text or watermarks to your photos. I also use a lot of the advanced exporting features. In addition to being able to export to most of the popular cloud services like Drop Box, OneDrive, Box and Google Drive, you can export directly to Facebook and Flickr too. You can also use your edited images in some pretty creative ways. You can merge them together in different manners like in the grid manner I used in my screenshot that shows the 80+ filters above. You can also merge them together to create long files either horizontally or vertically. And last you can merge all of the photos into a PDF.
Conclusion
OneEdit Pro is unparalleled in power relative to any other photo editing app I’ve found in Apple’s ios App Store. Believe me when I say I’ve tried a lot of them! Between my husband and myself I’d venture to guess that we’ve used at least 50% of all the photo editing apps that exist for ios devices.
I’d love to figure out a better way of creating video tutorials for learning to use the app because I’ve developed a lot of great workflows that save me a ton of time. If any of my readers can suggest better methods for recording my iPad’s screen’s activity that don’t involve hooking it up to a computer, I be really interested in hearing your ideas.
Comments
If you’d like to leave a comment you can do so by scrolling down a little further.
