
Introduction
Recent upgrades at Weebly have rendered methods my Dad previously used for posting new content on Weebly ineffective. His old methods appear to be broken and trying to figure out a new methodology has proven challenging for him because Weebly has added so many new features that it’s hard to find some of their most basic procedures amidst the fray.
So I’ve written this guide for him to describe a simple step-by-step method he can use to publish a new Page. I know there are a lot of other ways to post things on Weebly but this is what he needs so it’s what my guide is focusing on. The one aspect I have not addressed that he may also need is adding images. But I suspect once he understands the steps here that will be an easy matter for him as well.
A Little More About My Dad
My Dad is 91 3/4 years old! I mention that fact only because I’m really amazed by it. I’m also amazed that he still works on his website almost daily. It’s a huge part of his life!! I mention the 3/4’s part because when you’re in his age range…3/4’s of a year can make a big difference…heck even a 1/4 of a year can make a significant difference in managing virtually every aspect of life.
My Dad is the reason why I even have my own websites and YouTube channel. I write tips for everyday people to help them in using technology and also in learning how to stay safe online. Many years ago, when Dad retired from the corporate world, after consulting for a few years, then he really retired. That’s when he began to record important aspects of his life for his kids by writing about them.

The kinds of things he wrote about initially were things like when he first arrived in the USA following a long cruise on a ship which sailed from Germany…he was around 6 years old then. About 20 years later he served as a Marine in the Korean War. Roughly 35 years after that Dad wrote about the culmination of his corporate career and the years leading up to it. He also searched high and low for some favorite German children’s stories and translated them for us when he found them. These were all self-published into a series of ‘essays‘ if you will, that he hand-bound and distributed. By the time he’d accomplished those things he’d been bitten by the ‘writing bug.’ That’s when he decided to try his hand at fiction.
Shortly after Dad completed his first fiction compilation is when home computer use began to become fairly mainstream. Dad came up with the idea of publishing his work on a little website for his family. This would prove to be a much better means for him to distribute his work. It’s also what ignited a hidden passion in some other family members to do the same :-)
His Pioneering Work as a Blogger
Little did Dad or really did any of us know at the time, but Dad had created what essentially was a blog! Below is a screenshot of his website today.

I’m convinced that Dad was one of the first bloggers in existence!
Fast forward many years later and Dad is still writing his blog today. He even has a healthy if not surprising number of weekly visitors (on average around 200)! But the technical challenges aren’t as fun for him to tackle as they once were. Which is why I decided to try and help out a little by writing this guide. If you’d like to visit Dad’s website you can do so here. I should warn you however that Dad is a fairly prolific writer, and while it may not look it…he has a lot of content at his site!!!
If you’d like to read more of a ‘quick overview ‘of his site…(here ‘quick’ is a relative term!)…you can read the blog post I wrote in 2015 about why I love my Dad’s website and how it inspired me to create my own :-) In it I tried to provide a good overview of the kinds of things he writes about and how his site is organized.
A Little Background About Weebly
Weebly is a free (or it can be a paid) platform for regular people who have no coding background to use to build,their own websites. The site you’re reading this on, which is WordPress.com is similar. The way in which they differ is that WordPress relies more upon standard website creation tools whereas Weebly has come up with an ingenious ‘drag and drop’ type of engine to make website creation possible for someone with absolutely no technical background whatsoever.
When Dad began using Weebly it was very different from what it is today. I doubt that the Weebly staff even recognizes who Dad is or how unique he is in their universe of users. But Weebly needs to keep up with the times just like any good company that wants to survive should, and as they’ve added new features and tools the basics of web building have necessarily changed some. I recently learned that Dad wasn’t really utilizing the true ‘drag and drop’ nature of Weebly but had developed his own methods for publishing his work. He’d use Microsoft Word to write with and then copy/paste or drag his finished work into Weebly…with all the formatting and everything in finished form. Knowing how websites are constructed a little tells me that shouldn’t have worked…yet it did!
Dad’s methods survived for many years and it was only recently that they finally stopped working. So he needs a bit of a refresher course on how Weebly is supposed to work in order to keep writing and publishing. Therefore my guide will start with a few basic concepts and then go on to demonstrate how to use Weebly to publish a web page.
Anatomy of a Webpage in Weebly
In Weebly webpages are built using what I like to think of as page building blocks. While there are many different kinds of blocks (Weebly calls these blocks…elements) there are only 2 that you really need to concern yourself with right now.
The Title Element and the Text Element
Before you can add any content to your Page…you first need to add the proper container for it. I could be wrong, but I think the reason for this is that by placing content into containers, this ends up coding that content correctly for Weebly to render it properly onto a webpage.
Adding any kind of element is done in the same way…you just drag it from the tools menu to the editor.

A Little More Information About Pages
Adding Pages in Weebly is straightforward and easy. Pages are also one of the main organizational units in Weebly…and a page is equivalent to an actual webpage, in that pages become the webpages for your website.

Organizing pages is pretty easy too.
The only tricky thing about Pages is finding the URL or link to them after creation.
Brief Weebly Tutorial on Pages and How You Organize Them in a Website
Since everything on Dad’s website is centered around pages, I thought this Weebly video guide on managing your pages might be helpful too.
The Steps to:
Publish a New Page on Weebly
If you follow this set of steps each and every time you publish new content, the whole process should be easy for you. After you’ve done it a few times, these steps will become second nature to you.
- Step 1 Add a New Page for Your New Content
When you open Weebly’s editor for the first time you’ll land at your homepage. Dad’s homepage looks like this.

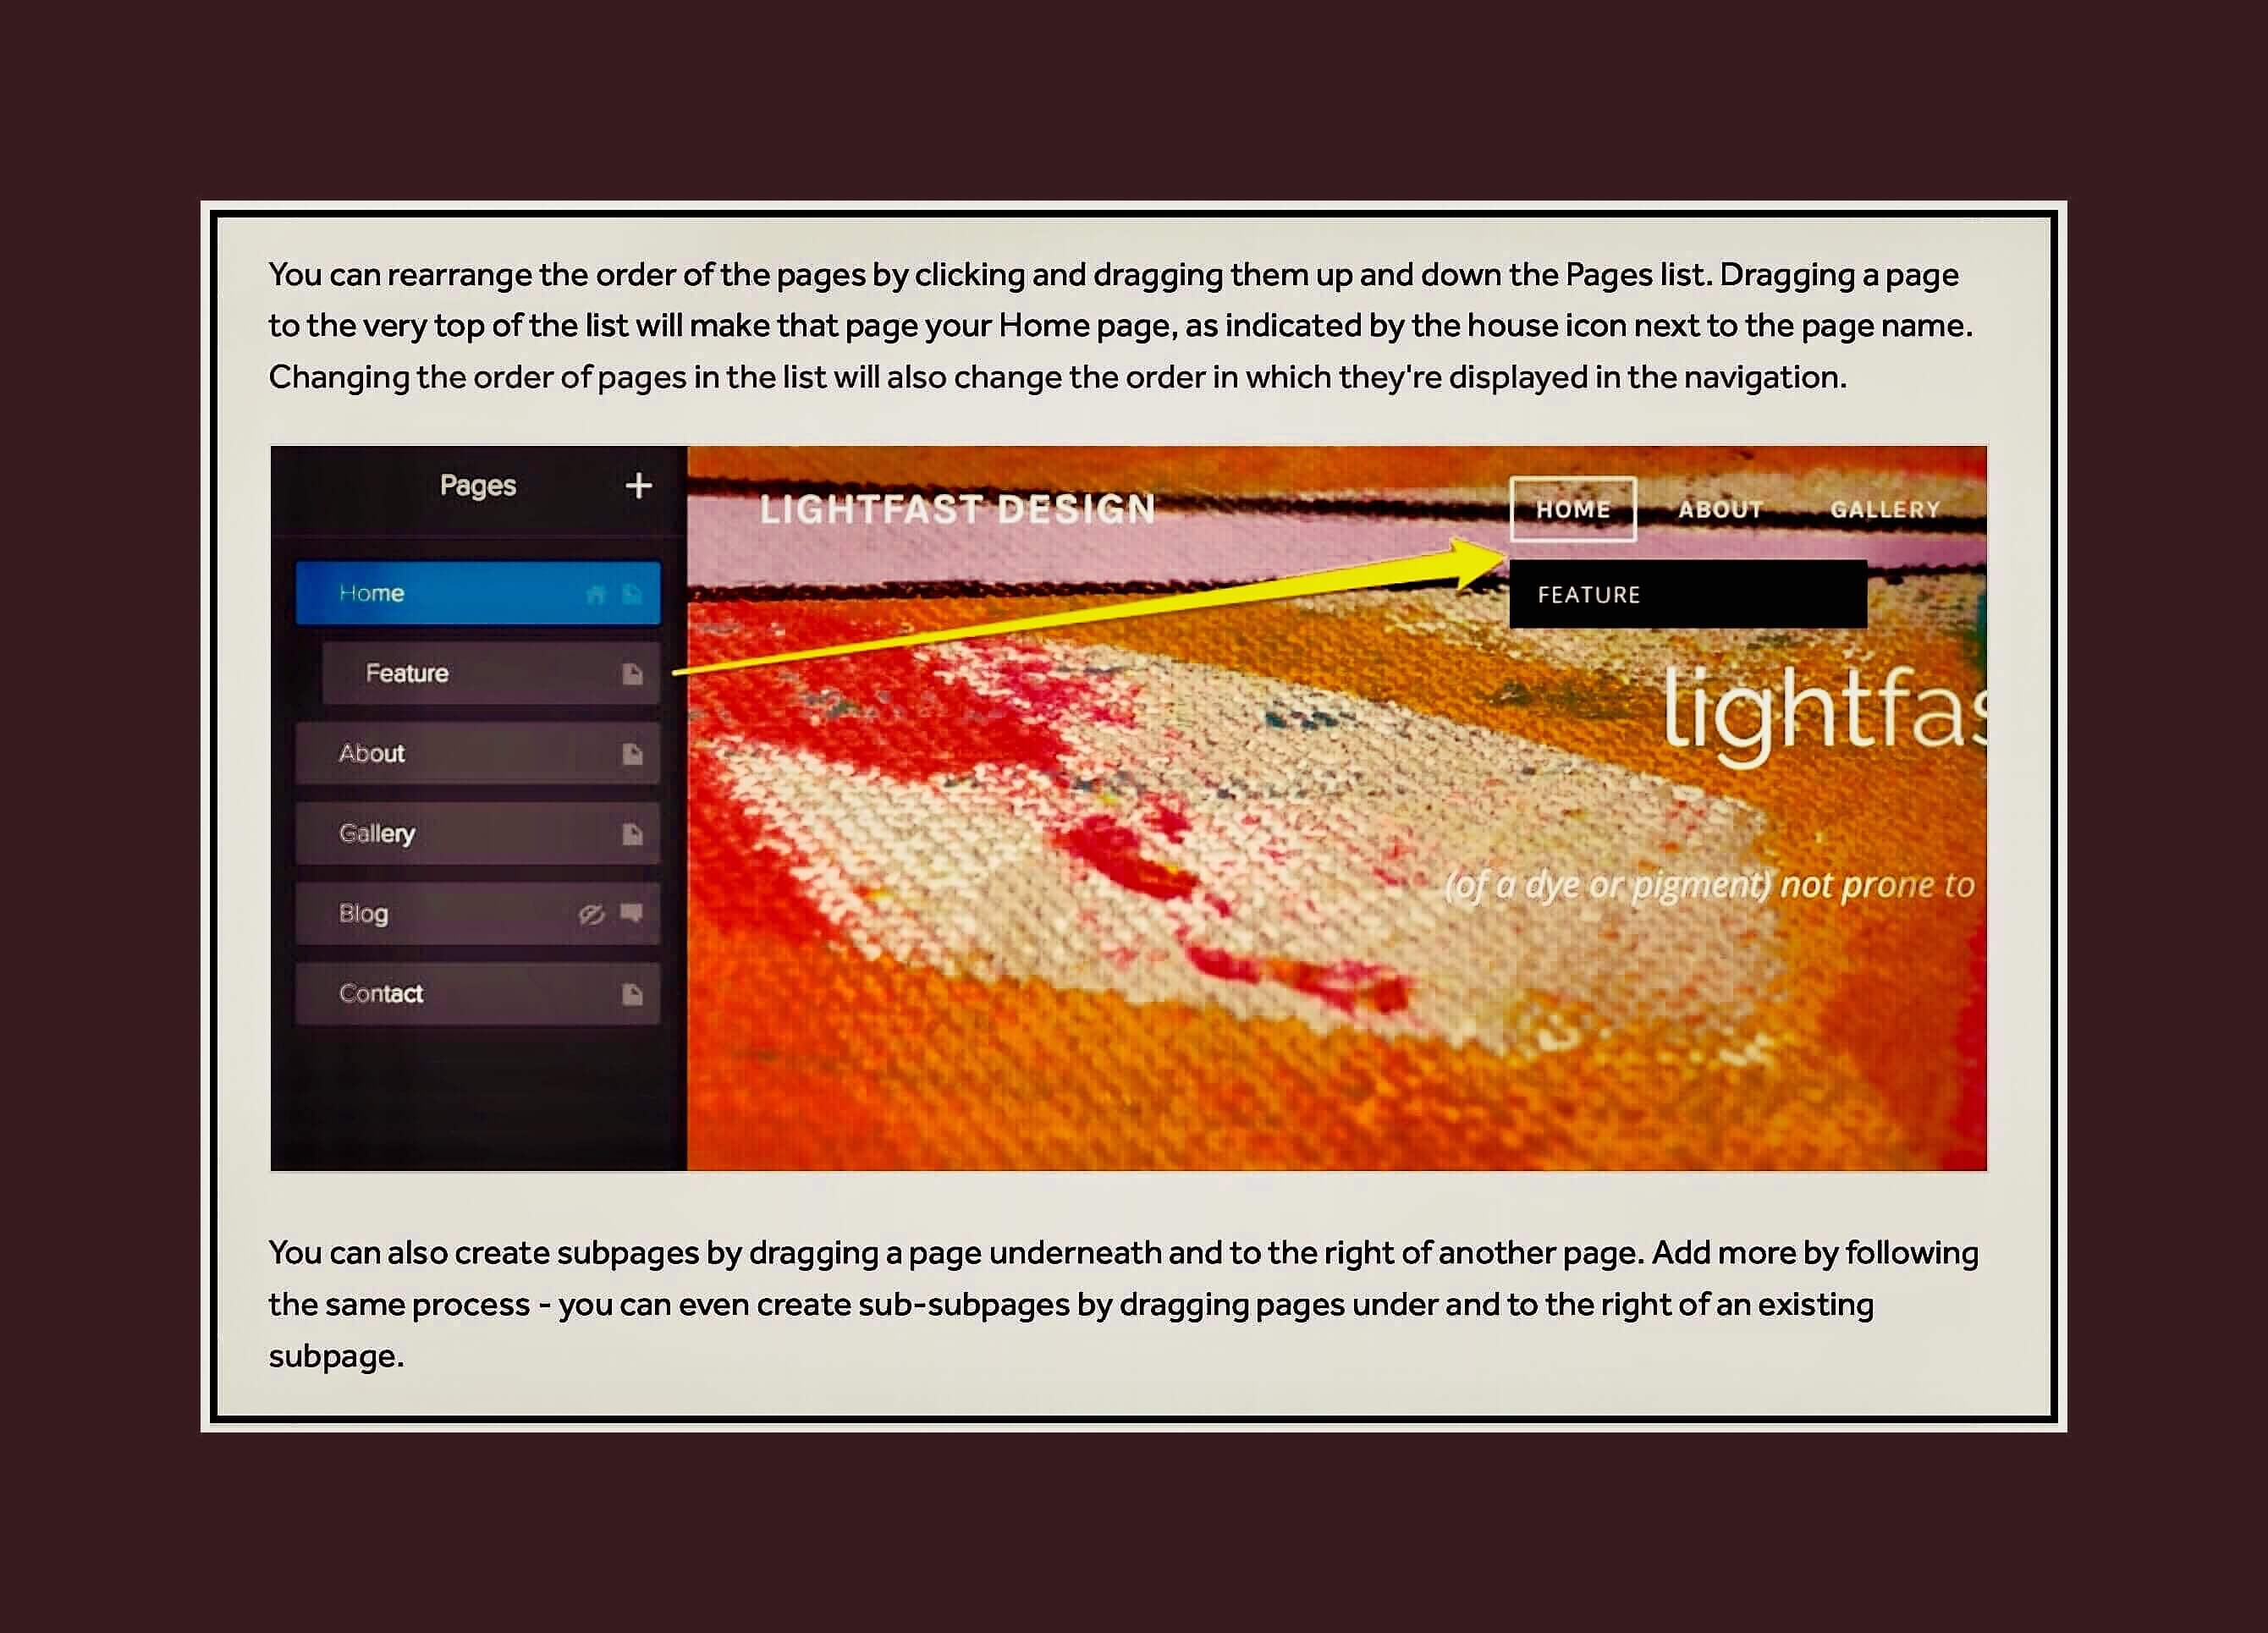
To begin publishing a new page, you need to leave your homepage and go to the location in the editor where all of your pages are displayed.
To do this, click on the menu item ‘Pages‘ using the top horizontal menu, shown in the screenshot above. The screenshot below shows what you should see and do next.

Tap on the + sign at the top of the left side menu to add a brand new page. This is shown in the screenshot above.
Select Standard Page next.


If you’ve done this correctly, you’ll arrive at something which should look like the screenshot below. You may see your own theme’s default Header Image here which you’ll probably want to remove.
If you do want to remove this header image, the next thing you’ll do is click on the down pointing arrow next to ‘Tall Header‘ on the left menu.

When you do this several different types of page layouts will be displayed. You should select the option that says ‘NO Header.’

Now you’ll have a new blank page that’s all ready for you to add your new content too.

- Step 2 Add a Title
Adding a title is probably the easiest step. Just find and drag the Title element box from the left side menu onto you new document.

After the Title is complete you’re ready to move on to adding the most important part…the new content itself.
- Step 3 Add the Text for the new page
There are a couple of ways you can go about adding your new content. You could just start typing it in right here…that’s what I do if I’m just adding something short. Or, you could have first created your new page somewhere else. In Dad’s case he was using Microsoft Word…but recently that ended up causing some problems for him so he’s been advised by Weebly staff to use something like Notepad in Windows or Apple Notes on Mac because those apps don’t let you add a lot of formatting.
So, I’ll assume that you have something already written in another app that you now want to import into your new page on Weebly. You can add it in one of 2 ways. You can either just drag it in or you can use copy/paste to add it into Weebly’s editor. In both instances it might help if you have 2 windows open on your desktop. I like to always keep the window that I’m copying from on the left and the window I’m copying to on the right…because I’m right-handed. Dragging something from left to right is easier for someone who’s right handed…if you’re left-handed you might want to do things the opposite of the way I do.
But Wait!!!
Before you drag or paste anything, remember that you need to add your container first! So, in this case, you need to add a new Text element to the page first. It will act as the ‘holding cell‘ for the text you’re about to add.
Below is an example of my container right after I added new text to it. In my example, rather than dragging or pasting some text, I’m just typed it directly into Weebly’s editor.
So, you need to find the Text box in the left-hand Menu, then drag it into your Document editor towards the right. Then either copy and paste your content into that text box, or drag it from your other open app. See my example:

(You may notice that when you begin dragging the Text element it’s a blue box…but as soon as you let go of it sort of morphs into the white text box shown below.)


- Step 4 Make any Formatting Changes
You may have noticed that the title I entered already has some formatting. The word Will is in red and the word Title is bold. These are two of several different formatting changes you can make here.
Formatting Text in Weebly’s Editor
Formatting in Weebly is really straightforward. You just select the block of text that needs to be formatted and then use the toolbar that appears to make changes.
The only aspect that may prove slightly confusing is knowing what the various icons in the text formatting toolbar refer to. So I copied something from Weebly’s support Pages that describes what each menu item refers to.

Weebly’s formatting toolbar explained
Dad is especially interested in how text is justified. The menu icon for that is in the middle of the toolbar with 3 horizontal lines and a down arrow next to it.
Changing the color of fonts.

Step 5 Publish the Webpage
Once your page looks just the way you want it to click on Publish in the upper right hand corner. I believe that Weebly auto-saves your work while you’ve working on it…I know WordPress, my regular editor does. But if it doesn’t or if you often experience problems while posting something, you can do periodic ‘Publishes’ as you’re working …think of it as ‘interim saves.’
So, the purpose of the final Publish is to allow Weebly a chance to create an internal link for it. Basically so that,you’ll have something to link to in the next task…adding a link to a menu or table of contents.
The Final Steps Are Hard To Illustrate with Screenshots So I Made a Video Demonstration
Below are the last steps which I cover in the video.
Step 6 Go to Your Table of Contents & Add the New Title
Step 7 Convert the New Title Into a Link
Step 8 Publish Your Table of Contents Page
Step 9 Thank Your Lucky Stars You Have a Daughter Who’s Happy to Write Up a Step-by-Step Guide for You
Video Demonstration | How to Create a Link in a Different Location to Your New Page
Or You Can Find my YouTube Video Demonstration by Clicking Here .
Initially I couldn’t get WordPress to embed this video, which is why I had the link to it…because really, the video has over half of the most important information in this post within it. Finally towards the end of the day imposed this I was finally able to embed it! Yay! Btw, embedding it means that it runs right within my tutorial instead of having to use a link to go watch it at YouTube.
Below: My YouTube Video
Comments
Please feel free too leave me any comments by scrolling further down the page and looking for the little comments box.
