Use Different Colored Highlights in Mobile Evernote 

Updated May 2018

Introduction & Background

I’ve written a lot about Evernote, especially about using it with ios devices…so much so that I have an entire section on my website devoted to just that topic. One frustrating aspect of using Evernote on mobile devices historically has been the lack of variety for fonts and colors. A few years back I wrote a guide for working around this…which discusses how to use different colors, sizes and types of fonts. This is still one of my most frequently visited webpages in December 2017!  Despite the fact that Evernote 8 now does allow you to use 8 different colors and 3 font sizes in its ios app. That tells me that I’m not alone in my frustration.

Evernote 8 was a huge update for Evernote and I think everyone was thrilled to finally have some variety of font colors and sizes. But this seemed in some ways to be a hard fought battle…and many wonder why that’s the case. The fact that we were given eight colors defined by Evernote is pointed out as support for the notion that Evernote has a sort of  paternalistic relationship with users…in many ways similar to Apple…and the eight colors are their way of giving us some leeway, but not too much!  Sadly, this color variety didn’t extend to highlighting colors.

Perhaps my strong dependency upon using colors to segregate information so that when I’m referring back to the data at some later date I can quickly gain an overview at a glance without having to take time to delve into a finer detailed reading isn’t something the larger population needs? And by ‘larger population’ I’m including most of Evernote’s design team…specifically those responsible for triaging users’ feature requests. Colored fonts simply did not seem to matter to those working at Evernote…nor did varying  font sizes. It seemed to me like they finally added those to be receptive to user’s needs…but it wasn’t a need internal to the company.

That observation is important because of how Evernote as a company came into existence and grew. The company was originally a small core group of passionate users which has grown a lot but still maintains that focus on using employees who use their product a lot too. If it was a different makeup of personnel I think that the company would be more amenable to addressing user’s needs above their own.

More Docs 2 Go Highlights

My Workarounds | What Led Me to Write This Guide

Below is a link to my earlier post in which I describe (in great detail) my methodology and the workaround that allowed me to use various sizes, various colors and even various different font types too.

How to Use Different Fonts, in Different Colors & Sizes in Evernote Apps on Mobile Devices

I wrote that post over 2 years ago, and it’s still gets many visitors every single day.  Shortly after writing that one I came up with another hack. This one was for using various colored highlighters with EV’s mobile apps.  For some unexplained reason Evernote allowed desktop users to have this capability for many years…but not mobile users. While this wasn’t perhaps a purposeful decision, it may or may not have been really…I don’t really know. It was more of an undocumented feature because Evernote’s desktop apps allowed users to format text using their operating system’s built in tools. So this wasn’t an Evernote feature as much as it was a sort of loophole that was never closed until quite recently.

I always intended to but never actually did write a follow up piece which described using my same methods to gain access to different colors of highlighters. One reason I guess was because I figured that since the methodology was the same my readers would figure it out after reading my 1st post. What finally prompted me to write this highlighting post was my experience when I decided to create some newer cheat sheets for myself. I discovered that the process wasn’t as easy as it had been earlier.

In light of this new development, and because I do use various colors of highlighters too, I decided that I’d once again share my work with everyone.  Unfortunately it took me a really long time trying to recreate just how I’d made my original cheat sheets.  This is an important aspect, since the way the cheat sheets are formatted dictates how useful they are.

In the end I’ve decided that regardless of what worked well in the past that the best format to use for cheat sheets of font & color style libraries is the Microsoft Word format.


Evernote’s Organizational Structure May Account for the Differences in Features


I’ve been a beta tester for Evernote for years. One thing I’ve noticed about the Evernote organization is that they seem to be organized internally by platform, which may account for the lack of uniformity in features across device types. What do I mean by this?  I mean that there’s one group that works on Window 7 applications, another for Windows 8 and yet another for Windows 10. Then there’s a group for Mac OS and another for Windows RT or Mobile ‘Surface’ platforms.

The betas for these seem to be within their main groups by platform. But for ios and Android betas there appears to be completely separate groups within the company. So, the Dev & Coding team that works on the public version is different from the 2 teams that are working on the beta ios version or the beta Android one. Oddly, the way the betas are managed is even less consistent.

To join the betas for Windows or for Android it’s a fairly simple process…they are open betas that anyone can join. But to join the ios beta one needs to apply and go through a vetting process. And new ios beta testers are only recruited once-in-a-while…usually enmass when that time arises.  Why that’s the case is unclear, because the betas seem to fall under the main jurisdiction of one person. But the fragmented organization within the Evernote corporation I think explains why different platforms have led to different feature sets. This makes it tricky if you’re both an ios and an Android user…because Evernote works quite differently for each.


The Underlying Idea for User Generated Cheat Sheets with Varieties of Font Styles

The basic concept for how my hack works is this. You create a master list with words displayed in many different variations for whatever you think you’ll need.

Each iteration of what you may want to use needs to be included as an example on your cheat sheet because you’ll use each sample like this.  You’ll keep a copy of your samples as a separate note within Evernote.  Whenever you need to use one of the stylized fonts you saved, you’ll open that note and find the sample you want.  Then using copy/paste just copy it from the sample note and paste it into your working note.

Various colored highlights

So, let’s say you want to have 10 different fonts available for use in Evernote.  Then you’ll need to include samples for each of those fonts in each different size, each different  color and each different highlight color on your master sheet.  Basically any style that you may want to use has to be included as a sample on your master cheat sheet.

In addition to those variations, I’ve also created masters for various symbols, dividing lines, unique bullet points and other elements that I’ve run across that I like to use too.  You can find a link to that download at the bottom of this post.

The Best Apps for Creating Cheat Sheets on ios Devices Currently (2016)

Generally I use a variety of word processing apps on iPads. You can also use a desktop or laptop which would open up even more variety to you, but for these highlighting cheat sheets I was limited to using just an iPad. (I talk about the fact that I use iPads for pretty much everything these days in many of my posts.  My attitude is this.  If I can’t figure out a way to do something using an iPad, then I probably won’t do it at all!  But I usually can figure out an alternative using an iPad, it just may take me some time to come up with it.)

I began with Apple’s Pages app which for quite some time was my favorite ios Word Processing app…sadly, Pages does not offer any variety for colors of highlighters.  The only color Pages has available is yellow.  I turned to Docs 2 Go, and used that to create my best sample sheet. But, the Docs 2 Go app is overpriced and doesn’t offer a lot of features for that money…so I wanted to come up with a good resource that I could recommend to my readers.  In the end it was Microsoft’s Word app that I found would work best for highlights in most circumstances.  But there’s one caveat to using the new usually free Word App too, that I discuss below.

All Docs 2 Go

The reason I’m telling you all this is because I definitely do not have all of the desired combinations of fonts and font sizes along with a comprehensive variety of highlight colors available for my readers right now…despite having spent an inordinate amount of time on this step!

One reason is because Microsoft has so many options available in the Word app that the combinations would be endless.  Also, it’s quite possible that they might not even function correctly after all my work.  So I limited this new master list to just a sampling…and in fact I discovered that they don’t always work as intended.  A big part of that is because Evernote is not a static app.

Evernote Is Constantly Evolving

Evernote’s developers are constantly working to improve it…as they do so they oftentimes alter the way that different little internal aspects function. It’s really a moving target.  This phenomenon is amplified by the fact that as a beta tester, I’m exposed to many more iterations of  new versions than the general public is…on average I’d say we get 1-2 new versions every month.  So, please keep in mind that what works today may not work tomorrow…but then there’s a good chance that it will work again in the not to distant future!  Furthermore, with a few little tweaks you can usually make something work for you right now too.  It’s all about recognizing that little variations can make a huge difference.

The end result is that in addition to providing my master copies (aka my cheat sheets)  I thought I’d take the time to explain how I made mine too.  You know, kind of like teaching a man to fish rather than just giving him some!

More variety with both Docs 2 Go & Pages

First a Little More About The Microsoft Word App for iPad & iPhone | My 1 Caveat

Microsoft’s new Word app is free for all ios users except for people who are using the 12.9″  iPad Pro…that’s the larger iPad Pro.  For some unfathomable reason Microsoft has chosen to block those users from using Word for free.  They are required to purchase an ongoing subscription to use this ‘free‘ app!  The fact that they’ve chosen to do this really annoys me!

I think that Microsoft is unhappy with how few people are actually interested in paying a monthly subscription fee to use software that they previously purchased just once…duh!  How they could be surprised by this is beyond me…but ostensibly the 12.9″ Pro was developed with Enterprise customers in mind.  And Enterprise (commercial) apparently connotes deep pockets…I guess.  Whether that actually proves to be the case is yet to be seen.  I happen to have the 12,9″ iPad Pro, and I’m not an Enterprise user…I bet that I’m not all that unique either!

Links to My Downloadable Cheat Sheets

Below are several master cheat sheets that I created in the last year and a half.

I used pages app font styles

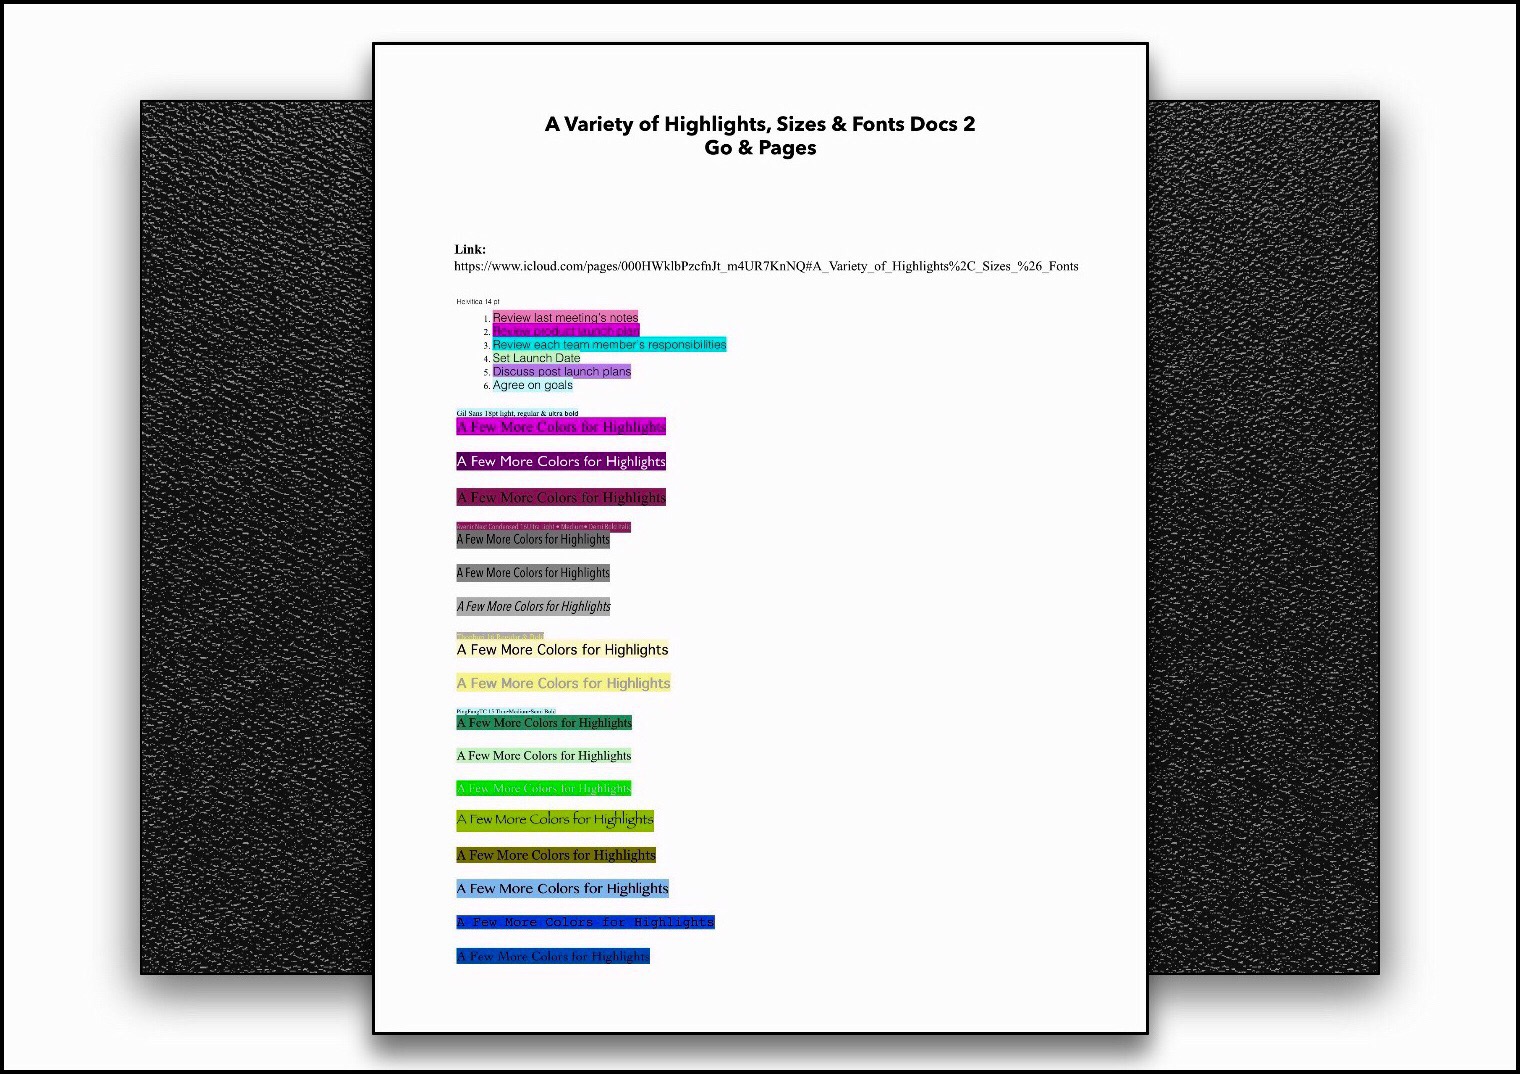
The 1st and 2nd ones below I created using Docs 2 Go. They are the best looking of the group, but they also have the least amount of variety in terms of fonts and sizes because Docs 2 Go doesn’t have very many options for those…but boy do they have lots of options for font colors and highlight colors!  In the end because of this variety I created most of my sample sheets using Docs 2 Go in some form.  Usually I used the app in the front end to create the variety of colored highlights and then imported the documents into Pages or some other app to change fonts ad font sizes.

Highlight Samples for WordPress Smaller Black Font

Highlight Samples for WordPress Larger Black Font

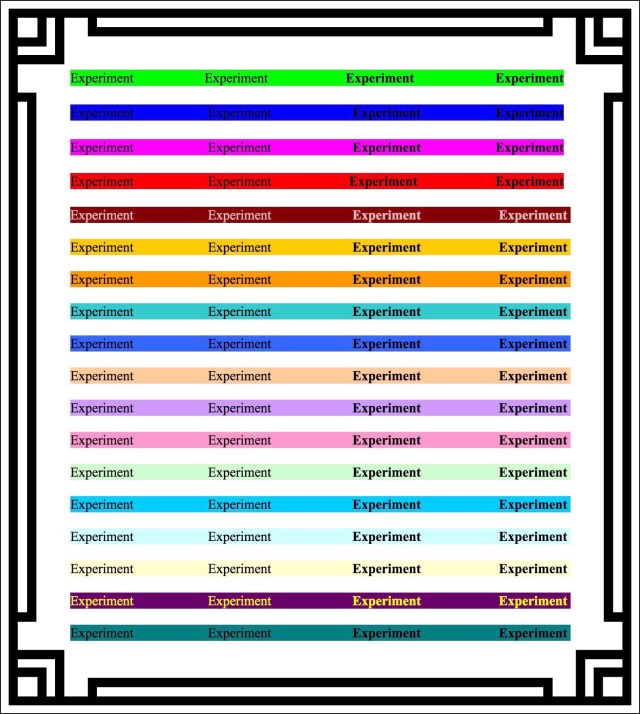
The 3rd cheat sheet shown below that I created was done using a free app from Savy Soda called Document Pro.  Document Pro isn’t a very powerful word processor…it has fewer features than either the Microsoft Word app or the Docs 2 Go apps do…but it’s also completely free.  I think there may be a paid version too but I suspect that the feature set is the same and that what you pay for is the removal of advertising.  The ads aren’t annoying though, so I give the Savy Soda developers credit for incorporating ads in a manner that doesn’t annoy their users!  But I tried to utilize a variety of fonts in this sample.

Unfortunately, Document Pro uses the rich text  format or rtf for saving documents.  When rtf documents are saved in Evernote, they appear to be fine, but when you try to copy and paste any of the highlighted words into a note, the word you copy loses all of it’s formatting including font type, size, color and highlight, so right now at least the cheat sheet below isn’t usable…but I’m keeping it because things change rapidly in Evernote’s world.

Highlights Document Pro

Highlights Created in Documents Pro App

Highlights Created in Documents Pro App

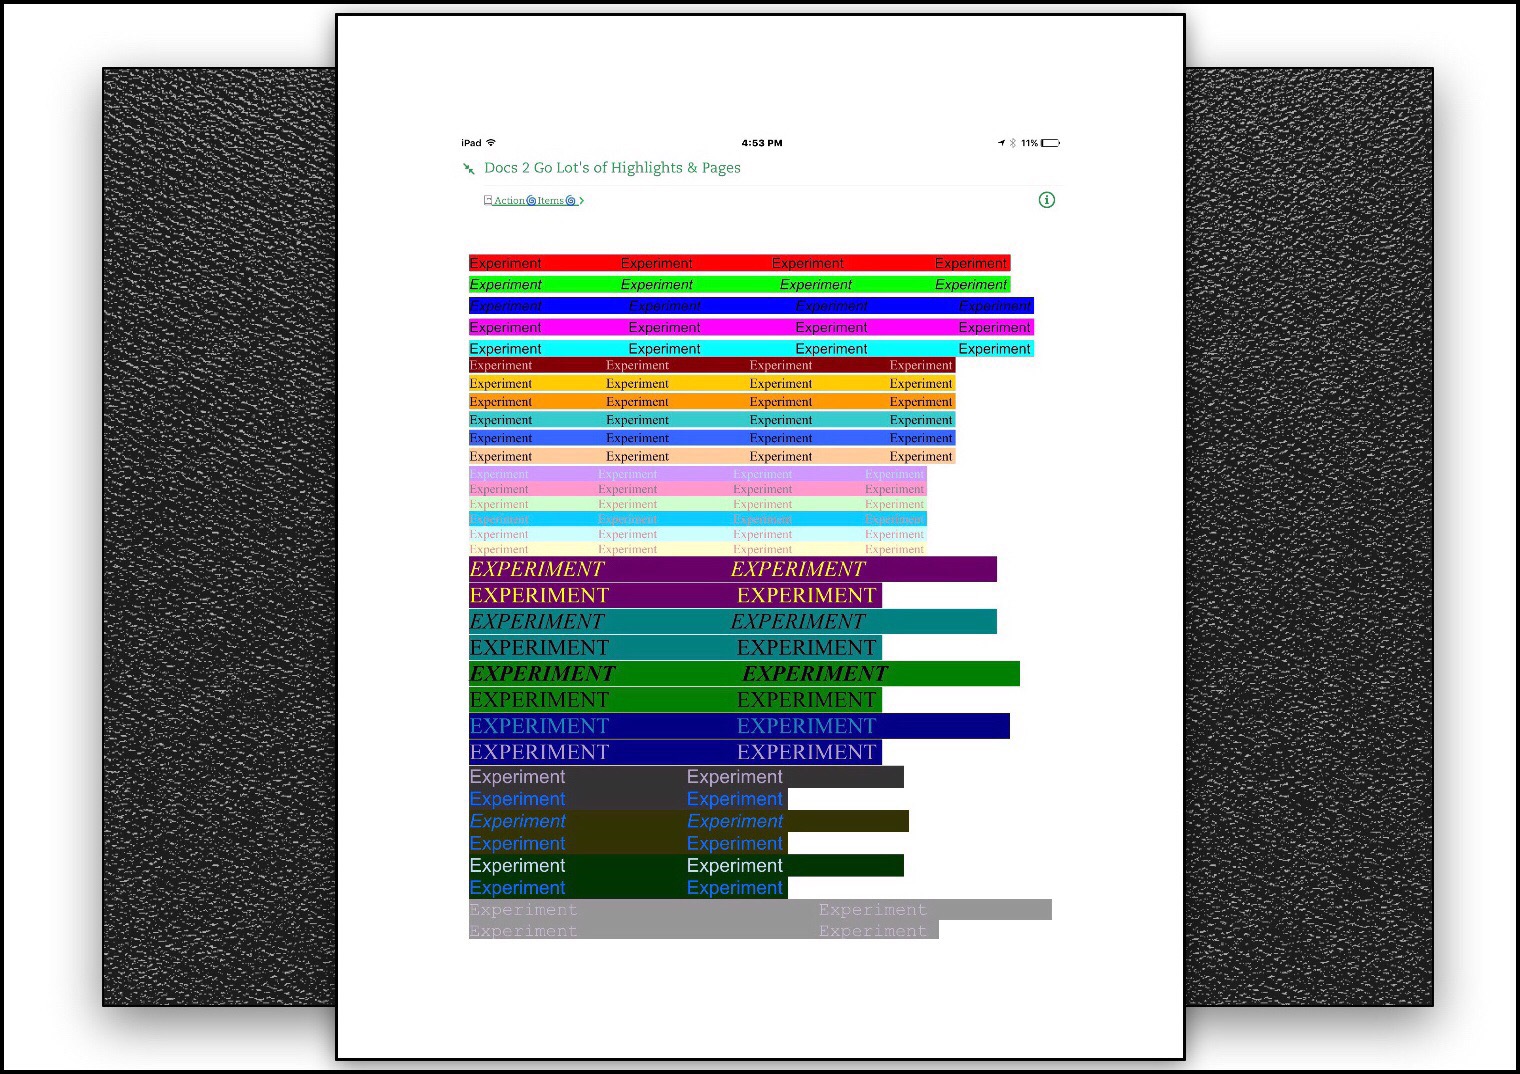
Because the Document Pro app failed for my purposes I went back to the Docs 2 Go app,and created a few more sample sheets with more colored highlights…in most cases I imported these into pages too to vary the fonts and sizes.

Docs 2 Go Highlights Smaller Font

2 Fonts 3 Sizes 20, 18 and 11 pt Trebuchet 

A Good Variety of Font Types, Sizes & Highlight Colors

I was really feeling frustrated that the only app that seemed to work was one that isn’t readily available to my readers without paying a lot of money for it, so I experimented a little bit more and came up with one more alternative for creating highlight cheat sheets that you can use easily in Evernote.  So here is one more link, this time for a Google Docs Highlight Sample.  This sample requires a little more effort however, because Google docs aren’t directly importable into Evernote.  But the way you can use this sample is to just use ‘Select All’ and then ‘copy’ to copy the entire document, then go to Evernote, create a new note and paste the highlighted words into a new note in Evernote

You can download and use all of these yourself on any iPads, iPhones and iPod touches that you may use.  I haven’t checked it out yet, but these will probably work on Android devices too.  Sadly I don’t know anyone with a Window’s or Blackberry phone that I could ask to test these out on…but my guess is that they will work on those platform’s too. If any of my readers happens to know of anyone who does use one of those devices and who might be interested in trying out these cheat sheets, please send them this link and ask them to comment below if they get a chance to let us know if they work for their platform.

Make sure prior to downloading these documents that you have Evernote, or at a minimum that you have an app that you can store them in until you get Evernote.  Because you will want to store each of these as separate notes within Evernote, so they are readily available to you when you want to use them.  Note that copying and pasting these samples from one app to another…say from Good Reader (my favorite file management app) into Evernote, increases the likelihood that the formatting won’t stick and you’ll lose the highlights completely!

Example of how I use highlights

Docs 2 Go app

The Docs 2 Go app I used for many of my samples is overpriced at $16.99 for the premium version which is the version I have. They dabbled about with different pricing schemes through the years and now it seems they’ve settled upon just 2 options. The Premium and Free versions. I decided to make include a link to the free version here, because I realized that I relied on that app a lot for creating these cheat sheets. I read some reviews for the free version and they are mixed….but for some people they seem to like it so you might be able to create much of what I have with just the free app.

Problems I Encountered Creating My Cheat Sheets

I made my first Highlight Cheat Sheets a few years back, but I never shared them because they aren’t very pretty.  By this I mean that they are just a conglomeration of a bunch of different fonts, colors and highlight colors without any organization to them…in fact I use the bottom portion of the page as a scratch sheet for testing out various combinations and styles of fonts.

I’d always intended on writing this and creating a nice looking, comprehensive sample sheet…but that’s proven much harder to implement than I’d realized.  Whatever method I used in the past I’ve forgotten…but I do remember the whole process taking up a lot of time than I’d anticipated it would before I had something that actually worked. This time around when I began working on this I ran into nothing but problems and it turned out that Microsoft Word…the ios app didn’t work for my purpose at all.

I won’t bore you with all the sad details, but the gist of it is this. When I export the final product to various sources, sometimes all the actual highlights disappear.  If they don’t, they end up being very difficult to work with.  Specifically, when I exported them as a .docx files all the highlighted formatting disappeared.  When I exported as a PDF the highlights stayed…but when I tried to use the samples via my copy and paste method, something happened…specifically, during the paste operation the highlighting once again disappeared.

One Solution I came up with was to Clean Up My Working Copies and Create Public Links to Them

In order to test this method out, I decided to include some additional useful elements that I use sometimes in Evernote.  These include, Symbols, Dividing Lines, Unique Bullets and some symbol art…which is called something else but I can’t think of what that might be right now.

So this last link that I’m providing uses the method I just described above.  I’ve shared one of my Evernote’s using a public link.  I created this note over time by gathering these elements whenever I ran across them.  Usually this involved me copying and pasting interesting variations that I ran across online. But ultimately that method changed too when I realized that I could create my own stock elements too, or really just master lists created using a variety of word processors.

Here’s a link to a cheat sheet of some lines, bullets and emojis 


All My Guides to Using Different Sizes and Colors for Fonts in Mobile Evernote

Links to All My Guides to Using Different Sizes and Colors for Fonts in Mobile Evernote

Here’s a list to the 4 guides I’ve written on using different colored fonts, different sizes of fonts, different font types and different colored highlights for my 2 favorite note apps…Evernote and Apple Notes. They’re listed from most current to oldest.

How to Change Font Colors and Sizes in Evernote 8 for ios

How to Use Different Colored Fonts and Sizes in Apple Notes for ios


THE NEXT 3 LINKS BELOW ARE TO:  

My Workaround Methods Pre-Evernote 8

As of January 2017, Evernote 8 gave users the ability to change font sizes and use about 10 different colors right in the ios app. I need to check this but I think it’s probably available in the Android app too. There’s still only one highlight color available however…which is the standard yellow. So if you want to use different highlighter colors you’ll still need to use my workaround method.

Video Demonstration of my Workaround Method:


How to Change Fonts, Fonts Colors and Sizes in Evernote Apps on Mobile Devices

How to Use Different Colored Highlights in Mobile Evernote


Comments

To see other reader’s comments scroll down past the ads WordPress placed at the bottom and you’ll find a Comment Box & any comments this post has received.

Posted in Evernote, Evernote Hacks, Evernote's versatility, Tech Tips | Tagged , , , , | 3 Comments

How to Make Your Evernote Data Extra Secure

Evernote Elephant

Introduction:  What Is Evernote?

Evernote is a free app that runs on almost every device available in the world today.  It’s not just free, it also amazing.  It’s a note-taking service that has garnered a huge fan-base worldwide including:

  • Millions of regular users worldwide – individual’s like you and me.
  • A huge Enterprise user-base which includes some of the largest corporations in the world
  • A large educational user-base including primary and secondary schools as well as colleges, both in the US and all around the world

Evernote is a key to productivity for both individuals and corporations.  This 3 1/2 minute video gives a great overview of how corporations can use Evernote:

Evernote first came on the scene in 2008.  By 2015 there were over 150 million users worldwide!  Why has EV grown in popularity so incredibly fast?  I think it’s because of the core product, the note taking app, which continues to improve by keeping up with technological advances…and of course the fact that it remains free!

While conceptually the app sounds like it is simple, and in many ways it is because learning to use it is quite easy, it’s also infinitely complex in the way that data is managed, which means that it’s sophisticated enough to meet the demands of hard core coders yet uncomplicated enough to meet the demands of grade school kids.

If you’d like to read more about what Evernote is and how to start using it, I’ve written an article you can read using the link below (this is one of my early pieces, so…reader beware…the writing my be awful!)

You can read more about how I first came to learn of Evernote and how I tackled the learning curve here.

Some great examples of how the Evernote team continues to innovate can be found at EV’s blog.  I just visited it to grab the link, and was surprised by another huge innovation…Evernote is joining forces with Google Drive in order to make the 2 operate seamlessly within their own confines.  What does this mean?  Well, you’ll have another attachment icon in your notes…one for Google Drive.  Anything you connect will be kept up-to-date with synced changes.  This could really end up being a huge coup for both Evernote and Google Drive!  Here’s a link read this and more EV blogs for your self.

3 Different Versions of Evernote Are Available

Evernote currently has 3 versions in terms of pricing, the Free Version which is their core product,  the Plus Version and the Premium Version.  Below is a chart showing one key difference between the versions…the amount of data that you are allowed to on a monthly basis.

Differences in 3 Versions of Everboten

While the free version of Evernote is amazing and really offers all the power of the paid versions, each of the paid versions offer a little bit more in terms of the amount of data stored monthly or in terms of extra bells and whistles…especially those pertaining to security.

Evernote’s Plus version, which is $25 per year allows users to store more data, store their notebooks on their devices in offline mode so notes are available regardless of Internet availability, and last is the ability to secure the app on devices with a passcode or a PIN.  The Premium version is what I have.  The reason I do is because it offers 1 additional feature that lets me make my data even more secure…and that is the ability to encrypt portions of any note so that they can only be opened by me. Evernote currently charges $45 per year for this plan (or possibly $49.99…its stated differently depending upon where you look.)  Below is a screenshot showing more of the features that are included in the Premium Plan.

Evernote Premium Plan Features

App Password & Data Encryption

It’s specifically these 2 features which are the main subjects of this article. They include:

  1. A method to keep your note data safe from anyone who has access to your device. Specifically this gives you the ability to set up a passcode and/or Touch ID to keep your note’s data base completely private and secure from anyone who gains physical access to your device.
  2. The ability to encrypt data within notes.  This feature offers yet another layer of security so that you can store sensitive data like health information, financial information or even usernames and passwords.

Find Premium & Plus Features Right Within Evernote’s ios & Android App

ios App |  iPad & iPhone

To learn more about Evernote’s Premium versions, if you already use Evernote on ios you can open the app and go to ‘Settings – Premium – Learn More.’  This will take you to a lot of information Evernote has published about their different levels of service. See the screenshots below:

Tap on the great symbol to get into settings


Where you can see what extra features Premium users get

Android App

To find out more about the features of the current plan you subscribe to right within the Android app first open Settings. Tap on the top item in the left hand column…Account Information. Once that opens tap on the top item in the right hand (really the main) window…which should display your username and your account status and type…i.e. Premium or other.

To learn more about the other plans you need to hunt a little bit, but the easiest method of doing so is by opening the ‘Explore Evernote‘ menu item in the main menu.  This will display an ever changing variety of Evernote features that help users get the most productivity out of using EV.  Look for features that say ‘learn more‘ in blue on the bottom right.  These are the features that aren’t included in your current plan. A good one to check out is Offline Notebooks.

FYI:  Another thing I love about Evernote is the ability to crop and annotate screenshots from within any note.  This was always available through a standalone companion app called Skitch, but the workflow was cumbersome before.  Now Skitch functionality is incorporated into the main editing functions of Evernote so you can annotate notes on the fly easily like I did with all the screenshots here (primarily the arrows and the pixelation to obscure sensitive data).

Setting a PIN

Once you’ve subscribed to Evernote as a premium user, you can setup a 4 digit numeric PIN code to access the app on ios and Android devices.  This is accomplished in the same manner as shown above.  Just go to Settings – General – Passcode Lock and follow the instructions.  It’s pretty straightforward and easy to setup and use.

The only additional aspect that may require some attention may arise if you uninstall the app for some reason, and then reinstall it, in which case your PIN setup must be done again.  This might occur if you’re having problems with the app and are advised by support to uninstall and reinstall it.  (Which reminds me that there is another cool feature for premium users and that’s quicker response time from support!)  Or you may decide to uninstall and reinstall the app on your own because something is acting weird. That’s generally the first step to take when attempting to correct any odd ios app behavior anyway.

Encryption  The encryption feature of Evernote is simple and relatively low tech.

There are a few simple points to keep in mind about the encryption function:

  1.  You are only able to encrypt blocks of text within a note, not an entire note or notebook.

  2.  The encryption feature can only be done on a computer, although encrypted blocks of text can be accessed and temporarily unencrypted to be viewed on mobile devices.

  3.   Presently (June 2016) if you are using the search function in Evernote, encrypted parts of notes will not be searched.  However, I suspect this may change in the future.  When I first switched to Premium the search function did search encrypted sections and it was really great (quite impressive too!)  It may be that there are technical limits to enabling this and maintaining security, but I’m hoping they find a way to bring it back.

  4.  All encrypted information is viewable from any mobile device.  It’s this functionality that makes the feature so worthwhile, and it’s one of the main reasons I love Evernote so much!  Mobile devices are also capable of permanently decrypting data…you are just not able to encrypt it again from a mobile device.

  5.  Encryption can only be done on text and numeric data…at least that’s all I’ve been able to accomplish so far.  This means that you can’t encrypt pictures or audio notes for example, but you can encrypt hyperlinks or tables of numeric data (I think, but I’ve never tried to encrypt a table.)

  6.  When you encrypt something you use a code to decrypt it.  One important aspect to keep in mind is that you should record this code somewhere safe…preferably not digitally.  But if you do decide to use the digital approach, one way to keep secure data like this is through the use of a Password Manager like Dashlane, which I’ve written much more about in 2 different posts. The first is my review of the password manage I use, Dashlane. The 2nd is my post about some of the best password managers available in 2017.

Steps to Encrypt text in Windows

(These are probably the same steps as on a mac, but I don’t remember how to select text and pullup or right-click submenus, which is all that would be different with an Apple device.)


  1.  Add the information you’ll ultimately encrypt into the body of a note, keeping in mind you’ll on be able to encrypt it if its text or numbers.  This can be done using any device that has the Evernote app available for use…generally it will be a computer on a mobile device like a cell phone or tablet.

  2.  Go to your computer and open the note containing the text you’d like to encrypt. Highlight the block of text by selecting it and then right click to bring up a  contextual  submenu.

  3. In the screenshot below I’ve entered two lines of text…I’ll encrypt the second line:

Encrypting example

First I select the portion of test that I want to encrypt:

I'm encrypting the second line of text

When I right-click on the selected portion this menu appears:

The right click menu

  1.  Select ‘Encrypt Selected Text…’ and create an encryption passphrase and a hint to remember it with.

This passphrase will be the same one that you will use to ‘unlock’ or to view the encrypted sections of text on mobile devices.

  1.  Once you’ve entered the passphrase the section of text will appear like this:

Example of text right after its encrypted

  1.   To view the encrypted data on any device, just click or tap on it and enter your encryption key or passphrase.

Steps for Viewing the Encrypted Information on ios devices

  • Navigate to the note with encrypted text
  • Remain in the view where you are viewing the note but not editing it…you can tell you are in this view by the fact that the virtual keyboard doesn’t show up for editing.
  • Tap on the lock symbol for the data block you want to decrypt and type in the passphrase.  If the section you want to decrypt isn’t visible you should be able to scroll thru the note to the appropriate place without enabling editing mode and without pulling up the keyboard.
  • If tapping on the lock symbol a few times doesn’t open it, you may have inadvertently gotten yourself I into editing mode.  Just tap on another note to close the one that you’re in and then tap on this one again to bring it back into ‘view’ mode and try it again.

Below is an example of how encrypted text appears on iPad:

Example of encrypted text on mobile devices

Below is an example of viewing the note in ‘view’ mode (btw, I made up the  phrase ‘view mode’…so if you use it and get blank stares, that’s why!)

You need to enter a passphrase


Summary

That’s all there is to securing your data in Evernote!  It’s really very easy to do. I’m writing this for an absolute beginner therefore I’ve provided way more detail than might be necessary for most users!  That’s the beauty of Evernote…sophisticated, yet simple!

Comments

If you’d like to read comments left by other reader’s or leave your own or simply just ask a question, you can do so by scrolling way down this page…past my bio, an ad or 2 WordPress includes because I use their ‘free’ engine, and finally past the ‘Related Posts’ section. You’ll arrive at a little Comment box and if any comments have been made they’ll appear here too.


Posted in Evernote, Evernote Hacks, Evernote's versatility | Tagged , , , , | 2 Comments

Dashlane Announces New & Better Way to Secure Your Stored Passwords | 2FA with U2F FIDO Yubikey 

Dashlane Continues to Lead the Password Manager Industry in Innovation By Becoming the First Password Management Provider to Offer U2F FIDO Yubikey Integration

Today (May 18, 2016) Dashlane emailed all users about their latest innovation, a better method of 2 factor authentication using Yubikeys. Yubikeys are cute little usb devices that, upon setup, install an extra security layer.  While Yubikeys have been around for a while, this is a new twist on them…called U2F FIDO Yubikeys.

A Yubikey is a hardware devices that’s meant to replace older forms of authentication for Dashlane users using 2FA  (2 factor authentication.)  These older methods relied upon things like receiving a code by email or via an authentication app like Google Authenticator.  Using a Yubikey, there’s no need to wait for an email or to mess with sometimes finicky authentication apps.

These new U2F FIDO Yubikeys are Yubico’s most economically priced keys at $18. In addition, they partnered with Dashlane to offer current premium users a 25% discount off of the purchase of a new Dashlane compliant Yubikey…but this offer is only available to the first 500 Premium users who claim them.

img_0851

Use this link to read more about Dashlane’s announcement and watch their video.

Setting up and Using the new key is simple (shown in the illustration below.)

Dashlane’s latest blog entry does a great job of explaining all about how 2 factor authentication works and  how this new method improves upon it.

You can compare different Yubikey models using this link and the screenshot below.

More About Yubico and Their Yubikeys

Those Familiar with Previous Versions of Yubikeys Know They’ve Been Around Awhile

…but the new FIDO U2F keys are much simpler, better, less expensive and are already receiving wide industry support.

Some of the corporations already adopting U2F Fido include:

What makes Dashlane’s announcement so interesting is that these new Yubikeys include the newest security protocol, called FIDO U2F.  

Yubico
, the company behind Yubikeys explains it best by saying that…

“FIDO U2F is an emerging open authentication standard, with native support in platforms and browsers. U2F breaks the mold for high security public key authentication, by removing the complexity of drivers and specialized client software” that was previously required.

img_0856

Link to Yubico’s Illustration of How FIDO U2F Works & Hak5‘s Public Service Announcement Video

Scroll down the page from the above link to find Hak5’s great video explaining in simple terms what 2 factor authentication means and how the FIDO U2F improves upon it.

Who Can Use the New Yubikeys?

These new keys are plugged into a usb port, therefore you need a device with a usb port to use them…meaning that they are primarily intended for use on desktop and laptop computers.

Yubico is working on a Bluetooth model for mobile devices saying…
“Yubico will be releasing new devices that support the U2F protocol using both Bluetooth Low Energy (BLE)  and NFC in the very near future. The FIDO Alliance is currently finalizing specifications for these two transport mechanisms.”

In terms of browsers, currently Chrome is the only browser that’s supported, Yubico states…
“You must be running the latest version of the Google Chrome browser, which includes support for the U2F protocol. To check the version number, in your browser, click the Chrome menu in the toolbar, then select About Google Chrome. (Support for U2F was added in version 38.)

At this time, Chrome is the only browser supported. However, Mozilla is currently building support for U2F and Microsoft is working within the FIDO Alliance to eventually bring support to Windows 10.”

Please leave comments below:

← Back

Thank you for your response. ✨

[twitter-follow screen_name=’vsatech’ show_screen_name=’no’

Posted in Dashlane, Password Managers, Security | Tagged , , , , | Leave a comment

How to Use the WordPress Press This! Feature on ios 

WordPress Press This! Feature is A Great Way to Share Other People’s Posts

If you’re wondering what exactly Press This! is, it’s a plugin for WordPress that gives you the ability to share content that you find online on your own WordPress blog or website in what WordPress calls a ‘lightening fast’ manner!

Here’s a link to the WordPress.com support article that discusses how to use Press This! if you’re using a computer.

But figuring out how to use Press This! if you’re using an iPad or iPhone to draft your content can be daunting!  I figured out how to make it work tonight so thought I’d write some quick instructions before I forget what I did!

The Steps

  • The first thing you’ll need to do is find Press This! In your dashboard.  Go to your dashboard and open Tools – Available Tools
  • Tap on the 2nd Press This…the one that says Direct Link (best for mobile)

Press This! Is Under Tools on the Dashboard

  • After you tap Press This a new webpage will open…it’s a blank editing page to begin your Press This! post. But before you do that might want to create a bookmark to this link so that it’s easy to find again.
  • To create a bookmark just tap the Share icon (the rectangle with arrow pointing up*) and create a bookmark for the page.
  • Now go to the webpage you want to share and copy the link…then paste it into the URL box at the top of the post.
  • This next step is probably the most important one and the trickiest to figure out. After you paste the link in, it’s important that you remember to tap on the word Scan so the link can be scanned and the webpage pulled into your post.
  • Now edit the post to your liking, maybe adding a few photos and write an introduction to it for why your sharing the post on your site.
  • Then tap on Publish…and that’s all there is to it!  Go to visit your post to make sure that it looks just the way you want it to.  If it doesn’t you can go back and tweak it some more.
2 Different Versions of the ios Share Extension

*2 Different Versions of the ios Share Extension

Comments

If you’d like to read other’s comments, (assuming there are any,) or leave a comment yourself, please do so by scrolling way down this page…past my bio, past the WordPress ads, and past the Related Posts section…to the little Comment box.

Look for something that looks like the box in the screenshot below:

Comment section for vsatips Comment section for vsatips

Example of my Comment Section Box


Posted in Learning to blog, Tech Tips, WordPress ios beta app | Tagged , , , | Leave a comment