The Best Thing About Dashlane is You Can Share a Password Safely
Sharing account credentials safely after our home network was taken over by a botnet posed a real problem for me. One of my kids would call and want to know how to logon to an account we used as a family and there was no good way to send them the Password. Emailing it is an awful idea, and texting it isn’t much better. Both methods are especially unsafe if you need to share both the username and the password.
Compounding the problem even further was using unique random passwords that were long enough and included things like symbols to meet the security requirements of so many sites today. That’s why when I learned that Dashlane had a method of doing this safely I was immediately interested.
We’ve been using Dashlane to share family credentials for a few years now, and I have nothing but praise for the concept.
The one criteria that needs to be met is that the person your sharing the password with must also have a Dashlane account. Since my kids were way too savvy to want to spend their money on a Password manager, it took some convincing. But they ultimately caved because we had something they needed…our password!
Anyone can open an account with Dashlane. It’s free and they don’t need to actually use it.They just need the account so we can share our passwords with them.
How to Share a Password
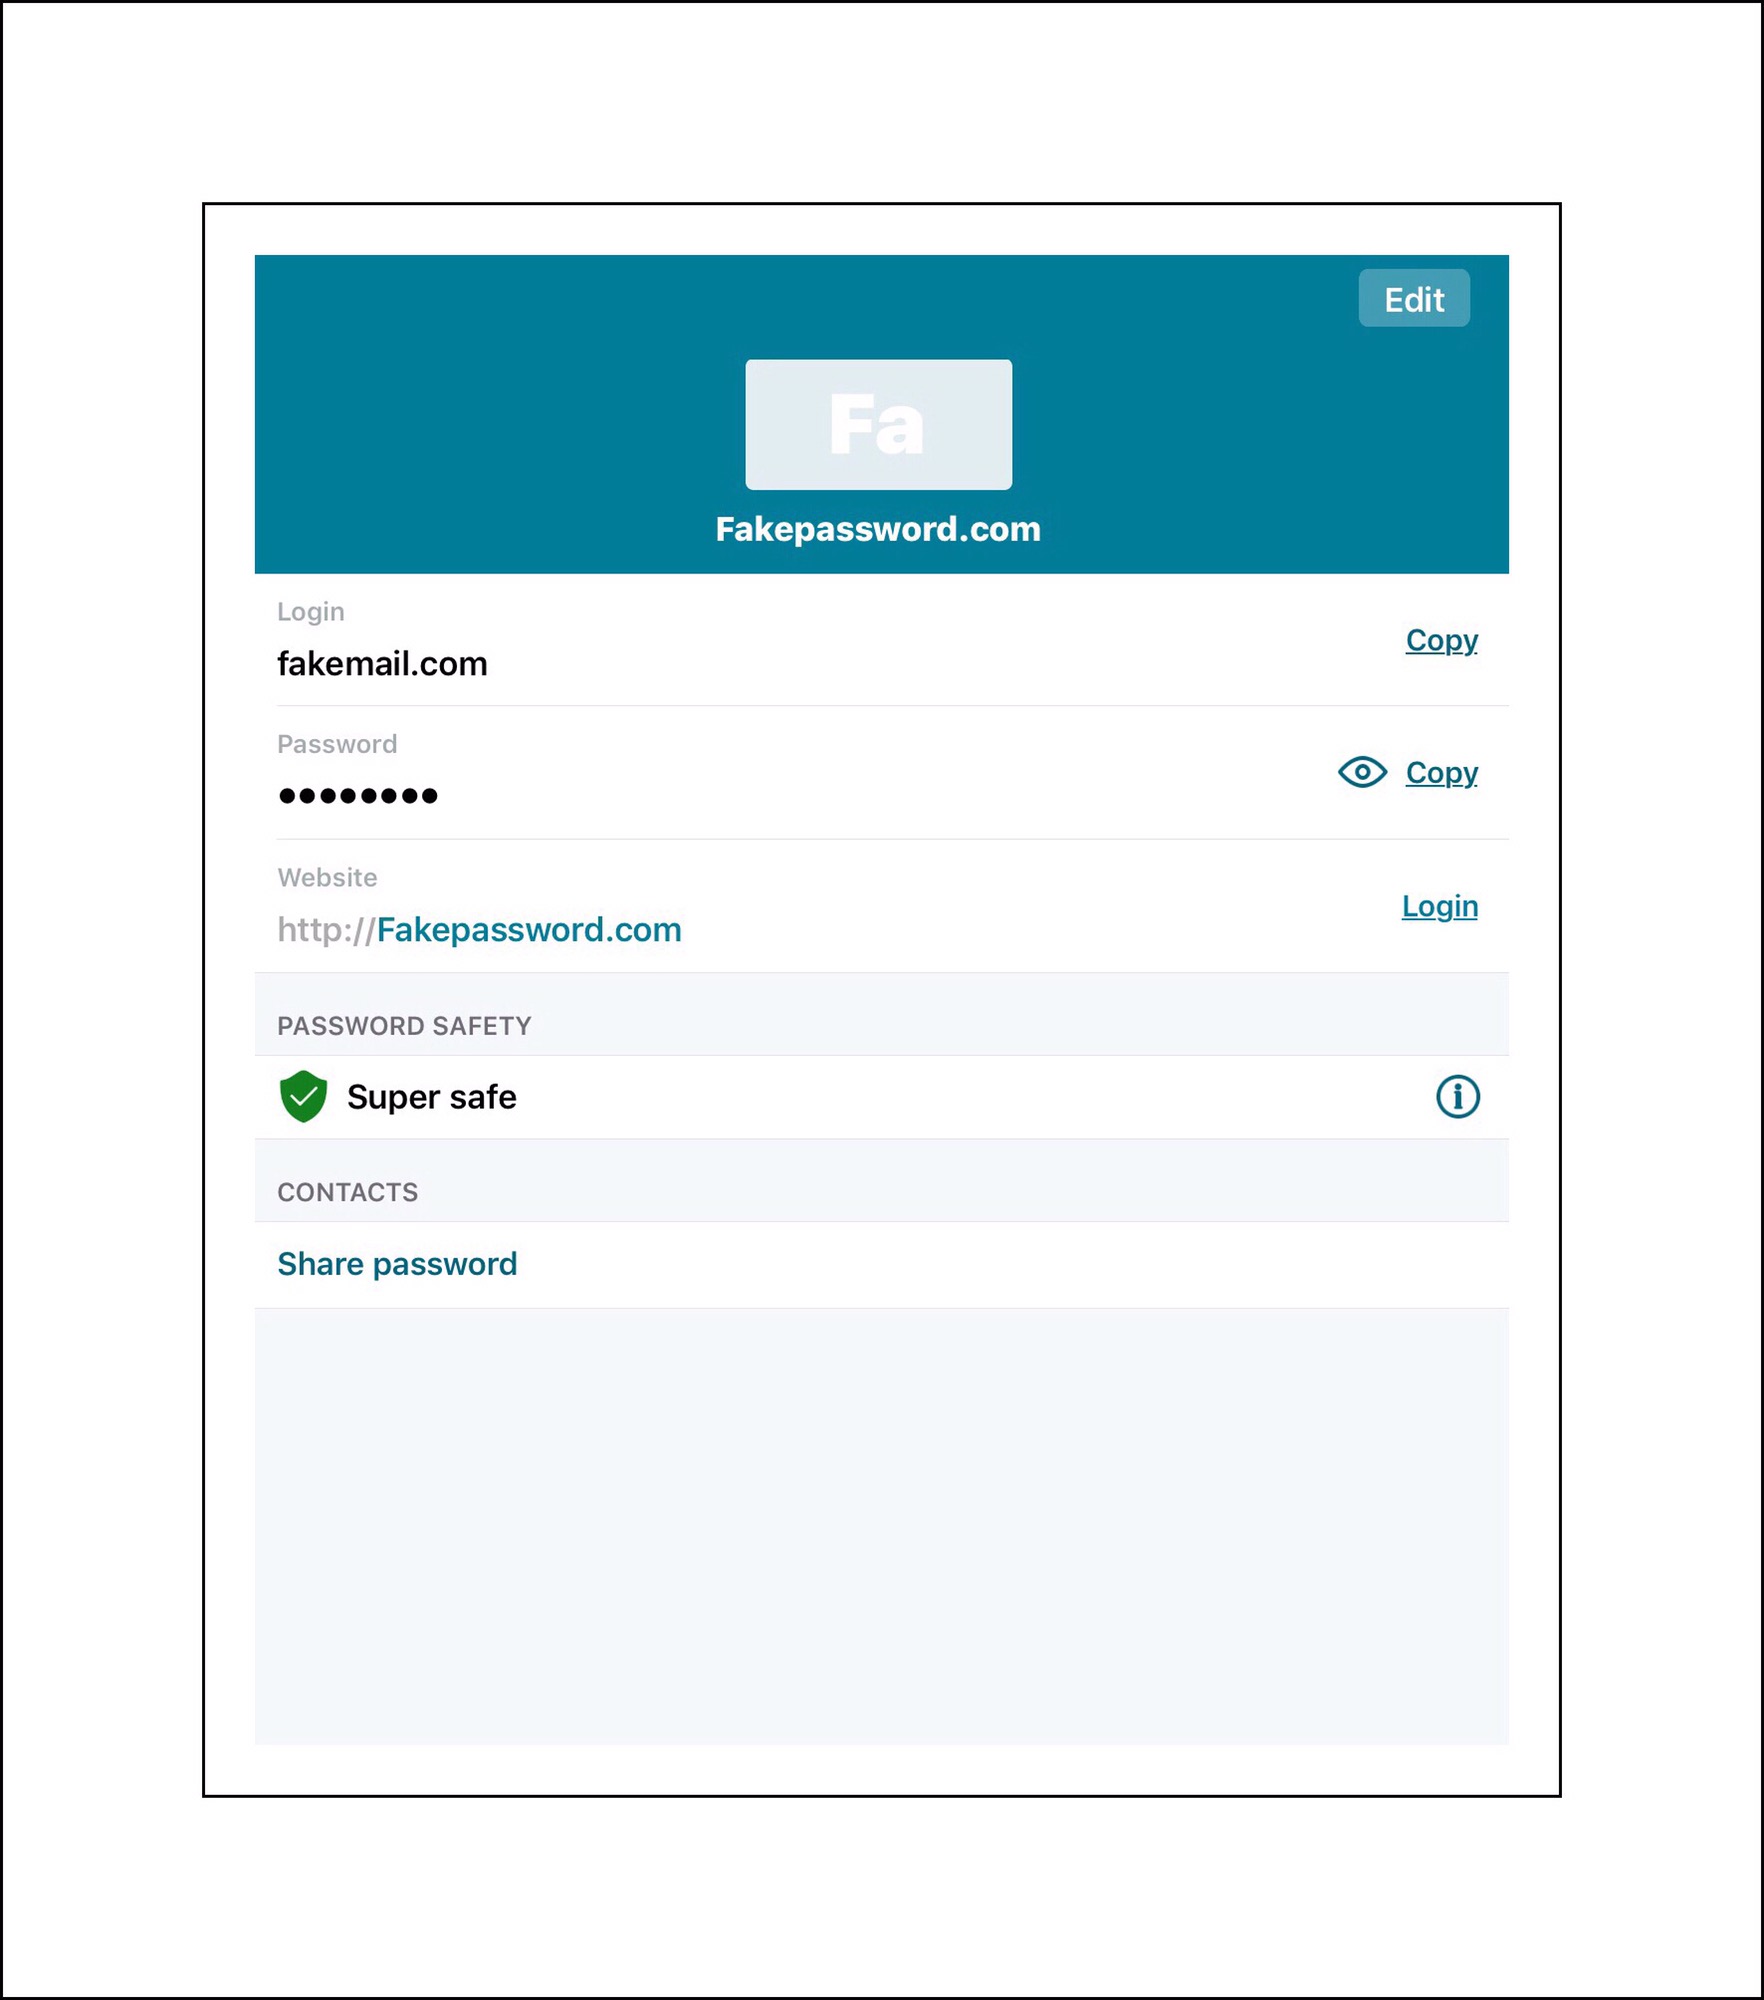
Open Dashlane and find the password you want to share. There are too many platforms that Dashlane works on for me to include screenshots of this…but if you’re using Dashlane you should already know how to find a password.
Scroll to the bottom of the password and look for the words ‘Share Password.’
Tap or click on ‘Share Password.’
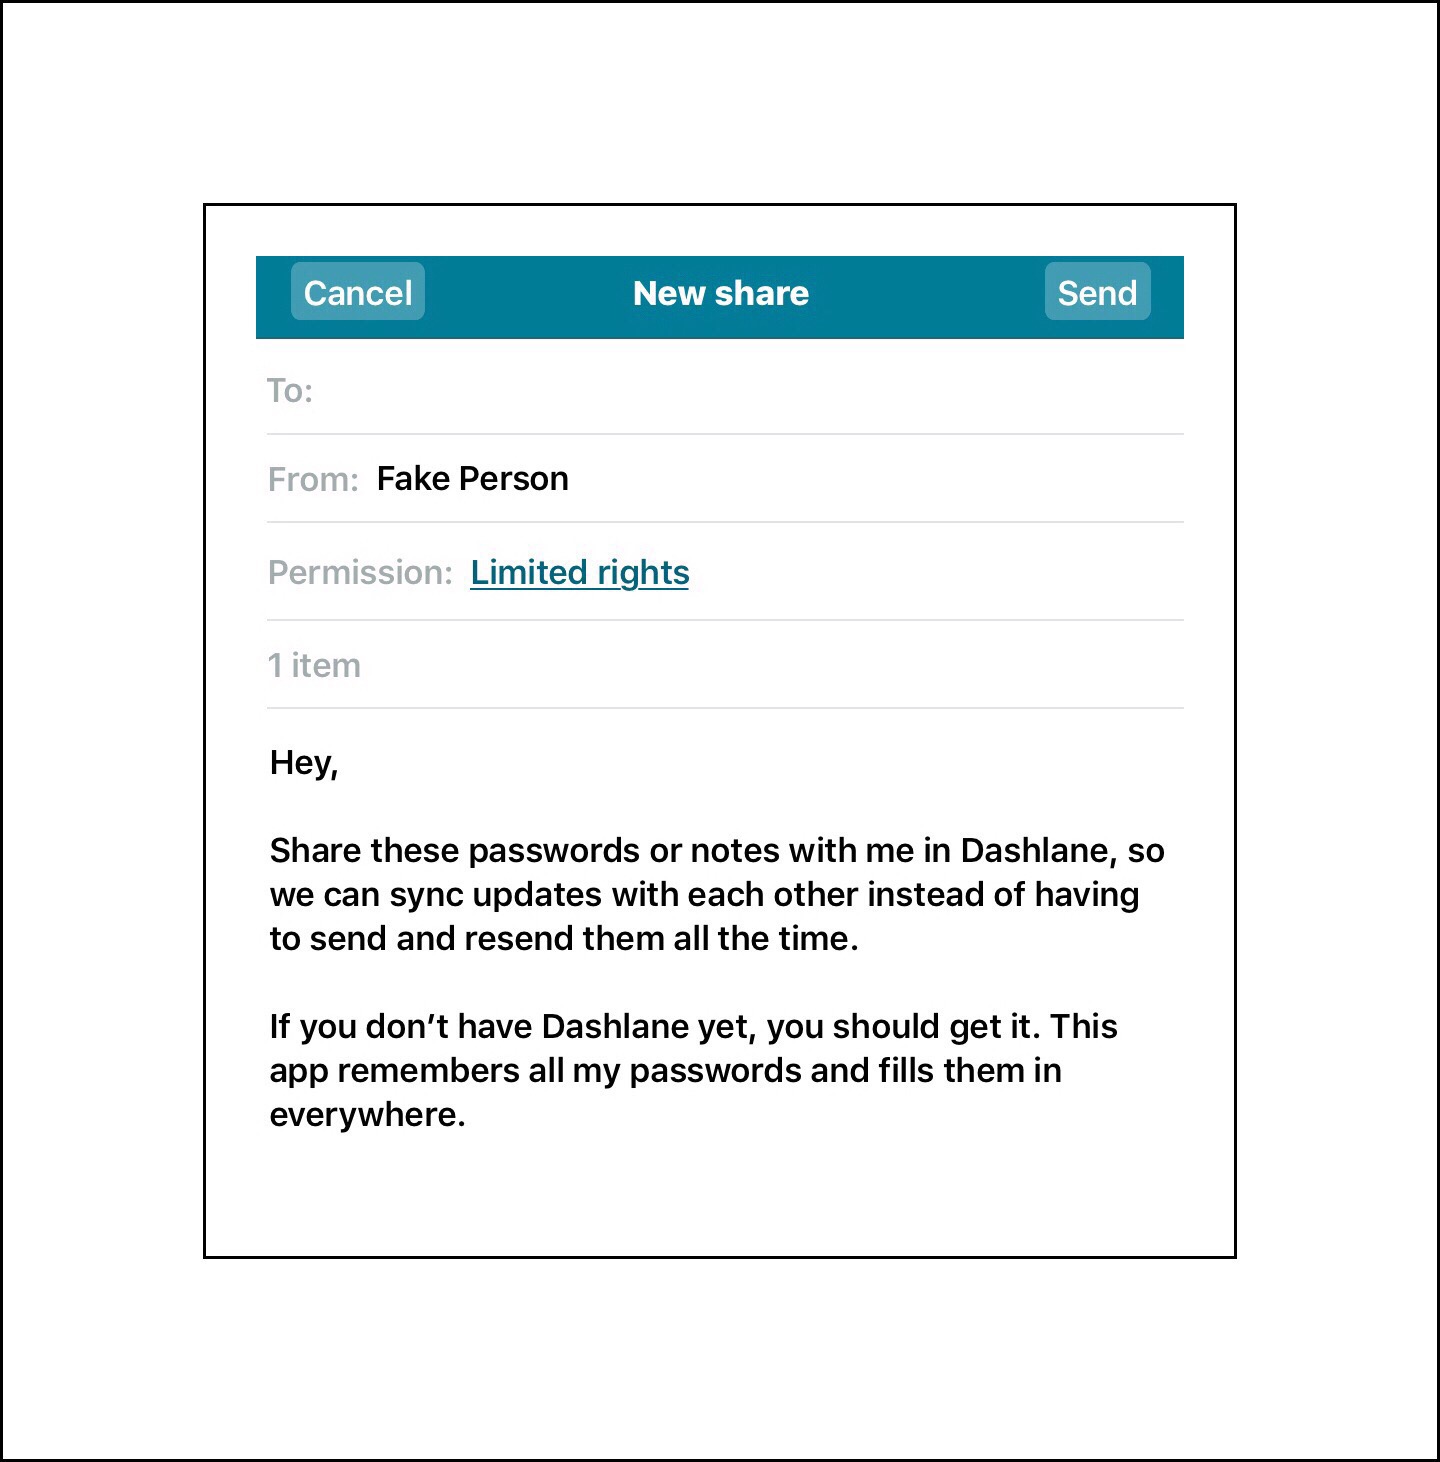
A box will popup with the password for you to share.
Limited User Rights means they can only use the password…not change it.
The box will include a default sharing message you can edit and change if you’d like. Dashlane will fill in an identity for you that can also be changed. If I wanted to change ‘Fake Person’ I’d tap or click on it and a little rolling bar with all my identities would appear that I could roll by flicking my finger on it and stopping it on the one I wanted to use.
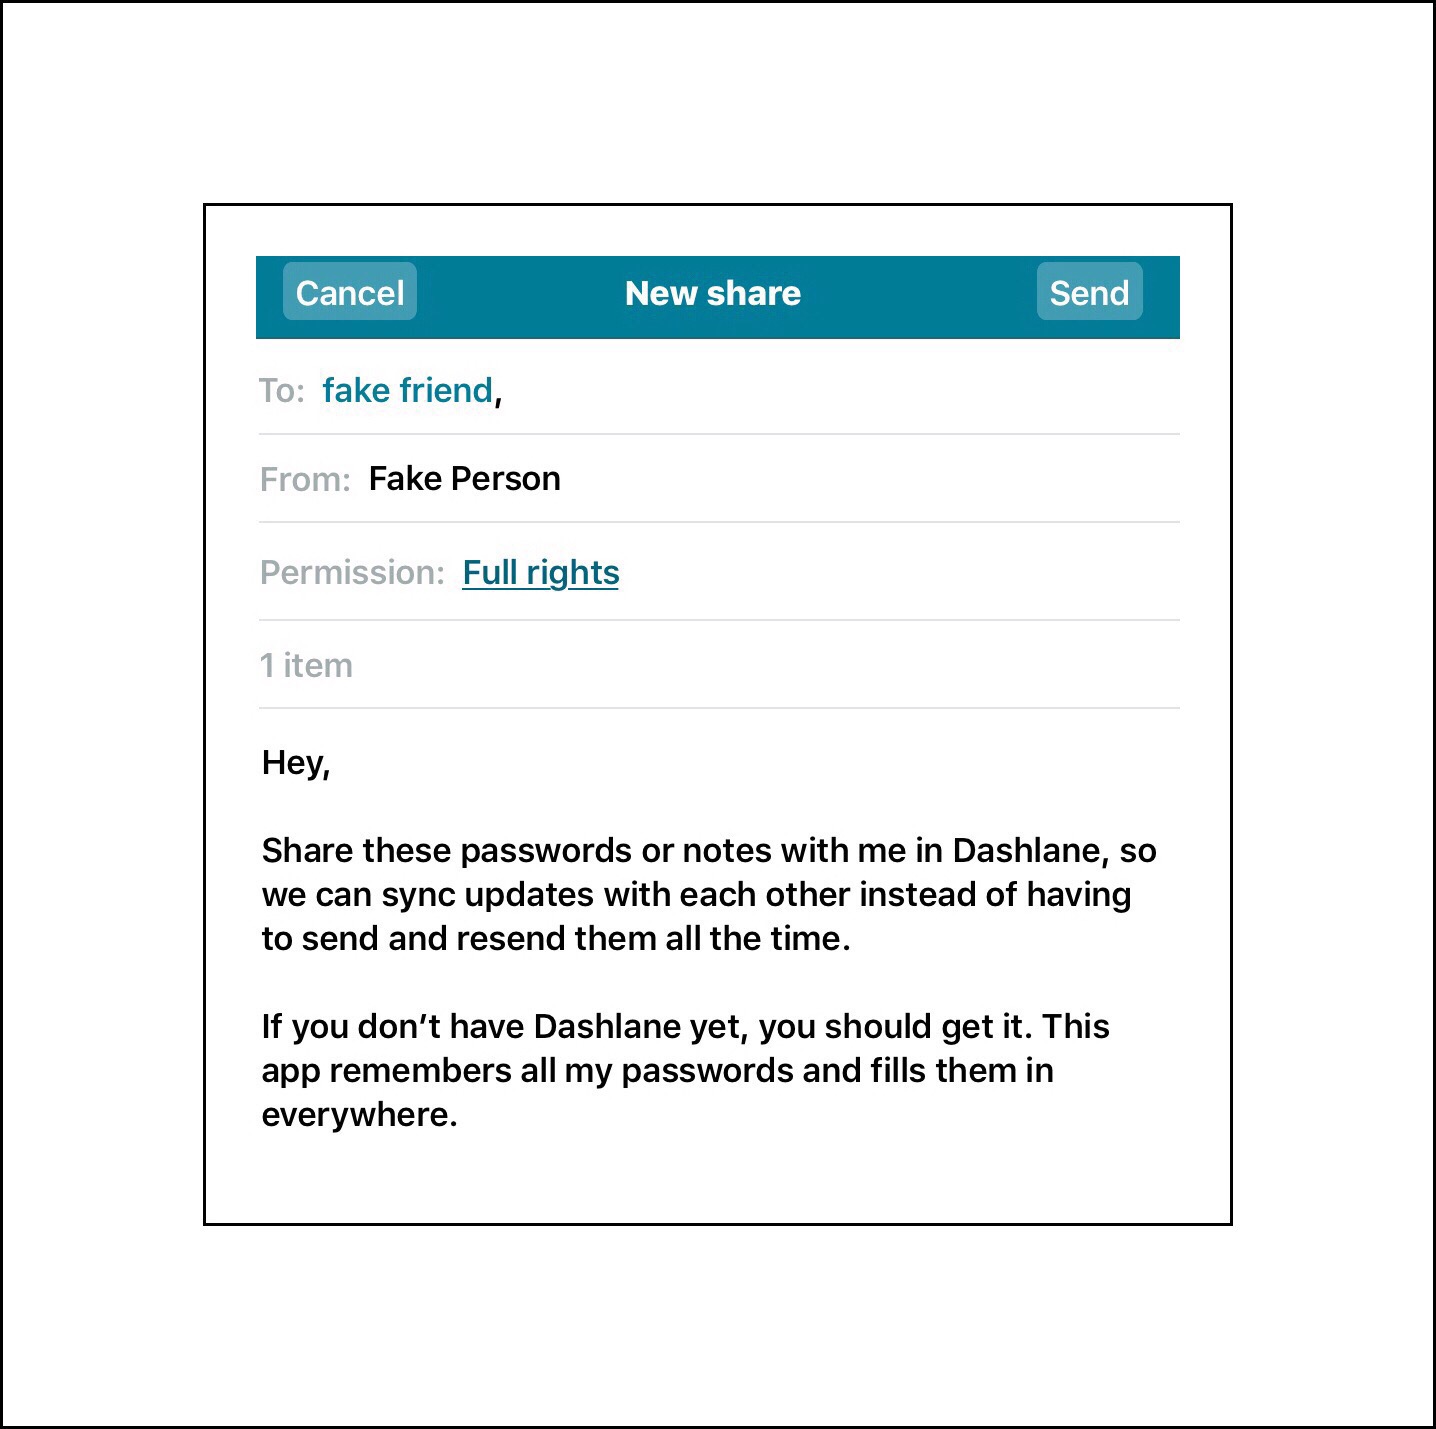
The type in the name of the person you want or share with. Dashlane will use your contacts to display possible email addresses for you to select from. Pick one and change the ‘user rights’ if you want the recipient to be able to change your password…I don’t advise this! But apparently if you did, the password would be synced between both your accounts.
Full User Rights gives them the ability to change the password.
Then tap send and your done!
Your recipient will get a notification within Dashlane and if they have notification badges turned on in ios a red number will appear by the Dashlane app icon. As soon as they open Dashlane a message will popup showing them the password you’ve shared with them and asking them to accept it.
It’s free and it’s easy so everyone can use it to share passwords!
Therefore I try to make it as easy as possible for readers by not requiring you to add your email address, unlike most comment sections you’ll encounter on blogs. I’ve gone a step further though because you don’t even need to include your real name. You do need a name of some kind…but that can be whatever you want it to be.
I’ve done it this way because it’s your actual feedback that’s really important to me. I’m not really interested in collecting readers’ email addresses which is usually done for the purpose of creating a subscription mailing list.
GlassWireis a free Windows application that I learned about from one of my kids. He’s much more technically ‘savvy’ than I am, and he ran across it in mid – 2014. He sent me a link to the forum discussion where he’d heard about it and I researched things a bit more, then I decided to download it and give it a try. At that point in time Glasswire was still being beta-tested, but I was convinced that the developers and their ideas were both credible and unique.
The Most “Up-to-Date” Version as of March 2017 is 1.2.96
Why I Wanted To Try It Out
Several years ago, my family’s home network was hacked. This led to an almost 2 year battle to regain control. This was a huge learning curve for me, but this was also the reason that I’m here today writing about tech topics I love and about how to use mobile technology.
Our experience, while not common, wasn’t something entirely out of the either. In the end we figured out that our network was being used in a Botnet, probably (in our case) to send huge amounts of Spam.
Slowly I got myself up to speed with Windows (first XP, then 7 & 8) and then networking. The end result was that eventually I gained the knowledge and skill I needed to keep our network safe and virus, malware and hacker free.
Unfortunately, the learning curve was huge! But I also had a lot of help along the way…from my kids, from my family and friends, and from several computer consultants who we hired on an adhoc basis to either troubleshoot some aspect, install our new hardware firewall, tweak our local settings to keep everything running really fast, etc…
Although I became well versed with Windows and we hired a service company to maintain our firewall, I still needed to monitor real-time activity on our network.
This is where GlassWire excels!!!
GlassWire Lets Me See What’s Occurring On My Computer & Our Network…All Activity Is Shown In Real-Time…
The technical details of networks are extremely complicated, and constantly changing. I realized that while it’s interesting for me to know about things like packets and sniffers, it isn’t really practical knowledge that I can utilize on a day to day basis for monitoring my network. What is useful however, is knowing exactly what my computer is doing as it communicates with the outside world. But that information is only useful if I understand it.
Fortunately, GlassWire Makes It Easy To See All My Network Activity With One Quick Glance…
GlassWire appeals to me aesthetically, because the user interface is so simple yet it’s simply beautiful too. It’s appeals to my easily distractable nature by providing me with snapshots that are useful and informative. If I need more information I can get more detail in several ways from right within the app. But that doesn’t take me long to accomplish either. If there’s information that the application displays that isn’t understandable to me, or complete enough, the user forum is easy to access, simple to navigate and so far I’ve found answers to all my questions almost immediately.
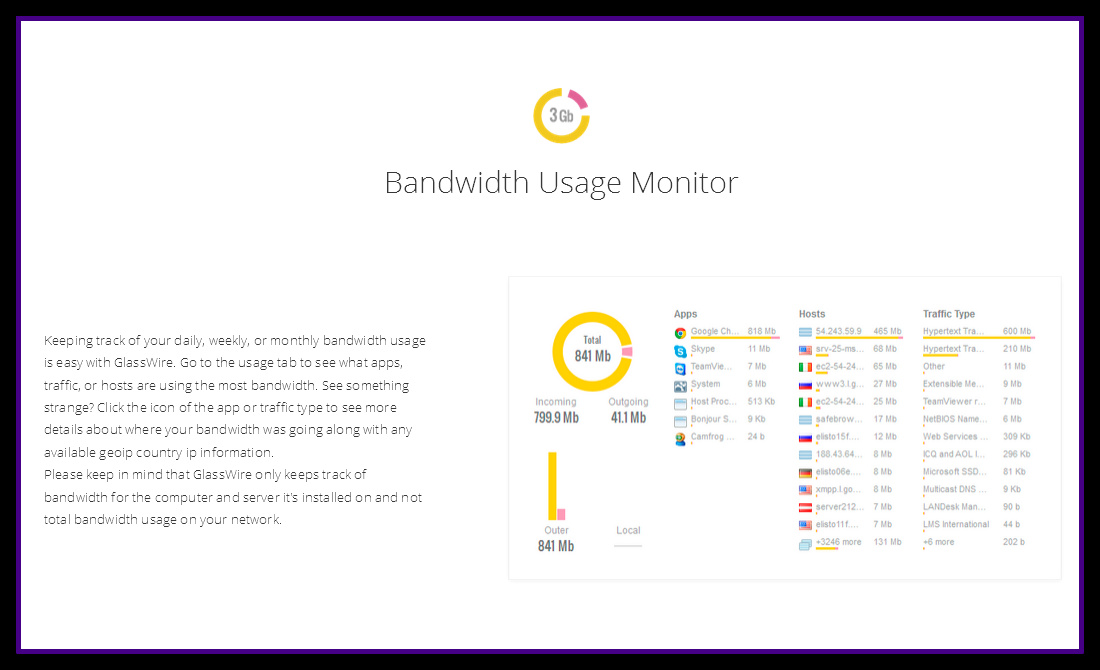
Glasswire Provides Four Modes To View Network Information
Graph Mode
Graph mode lets me see how my network bandwidth is being used. Primarily bandwidth used by my PC, but everything within the graphs is clickable so that oftentimes I see network activity from other devices on my network too. I haven’t explored this a lot, because I’m not usually worried about activity within my network, and bandwidth in general isn’t a big issue for me using a desktop PC at home.
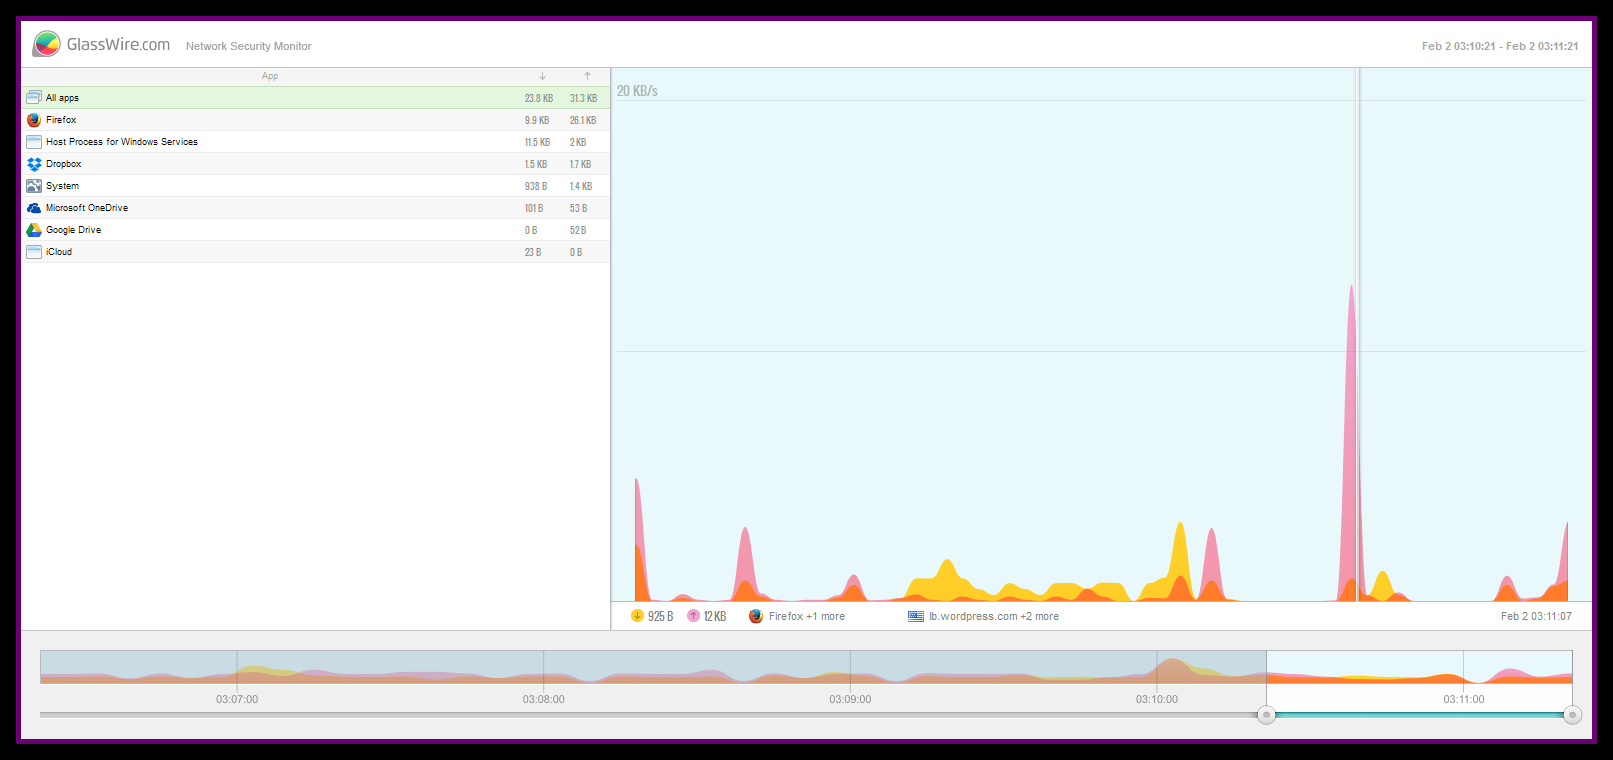
But what is really cool about the graph is that it provides data for the last 5 minutes, the last 3 hours, the last 24 hours, or the last week. By entering one of these time modes, you can click anywhere on the graph and see what exactly occurred then.
Here are 2 examples of the last five minutes on my computer as I’m writing this article on WordPress.
GlassWire displays the last 5 mins of activity by application
GlassWire display of all network activity in the last 5 minutes
Firewall Mode
Firewall mode is more useful for my purposes. I’ve had situations where some action I took while online, or an odd site or message that’s popped up has concerned me. If anything even mildly concerning occurs…I immediately shutoff my internet connection by closing down the browser I’m using.
But that doesn’t mean that things aren’t still happening behind the scene!
Viruses could be downloading and installing, Cryptolocking malware could be encrypting my data. There are a lot of dangerous things that could potentially be happening that are very troublesome.
Since I’ve begun using GlassWire, I’ve encountered maybe 3 or 4 unusual situations that arose. I’ve learned enough about Windows to really understand how to use the Task Manager (remember the old CTRL+ALT+DEL key combination from early Windows’ days?) By using that information along with the data that GlassWire gives me about active connections I feel I have enough information to be confident that everything is OK. Usually I can arrive at this in a very short span of time too. Without having to run virus scans, malware scans, etc.
Firewall Mode interacts with Windows Firewall. It’s actually really cool to see the amount of fine-grained data that you can glean from it so quickly!
Usage Mode
Usage mode is intended for monitoring everything related to bandwidth. What I think is so amazing about it is I can double click on any entry and have my antivirus software do any immediate scan of any data that was downloaded for viruses. I use this a lot when something suspicious occurs.
Alerts Mode
In this view you can see any alert that GlassWire generated. The alerts are user defined and controlled, and not annoying at all. By going into settings you can define what you want to be alerted about. You can also setup monitoring for when your computer is idle. I’ve only scratched the surface exploring the amount of information to be gleaned from these alerts. But so far, what I’ve learned has been so helpful.
GlassWire isn’t Only For Tech-Oriented People…
Because the software displays data to you in a ‘simple to understand’ format, this makes it extremely useful for the average computer user who doesn’t want or need to learn all the little details about networks and data exchange. Most people just want to explore the world wide web and to remain safe while doing so.
Personally I think of GlassWire as a learning tool too, and for me, it’s a great one. It’s precisely because the user interface is so simple, and the user forum is so readily accessible, that it’s the perfect tool for both learning about networking and keeping your data safe.
It’s a Truly Unique Approach To A Complicated Process
A short time after I published this the folks at GlassWire released several new versions that are available for a onetime fee for purchase. GlassWire continues to update their free version as well as they continue to enhance and add features for higher level versions, so I’m including links to both the paid and the free options below.
Glasswire’s Paid Premium Version & Mac Availability
As of March 2017 Glasswire is not yet available for Mac computers, but this is something they say they are working on and should have available soon. When I first started using a Glasswire it was in a beta version, but since then they’ve really developed the app and added a lot of new features which may or may not be useful to some users. So, thye’ve broken out some of the features that don’t impair the core functionality of the app and made them available as addons, I’m assuming to be able to keep offering their product for free to their larger user base.
I still haven’t explored every aspect of GlassWire in a great amount of detail. But I don’t need to, to be able to use it meaningfully…that’s what I love about it! But because it is so easy to use right from the start, I suspect that I’m forgetting to mention some of the features, that may be of real value to others. So here are a few more screenshots with more information. But I encourage you to use the links above to find out more too!
Some of the alerts you can setup
You can also use GlassWire to monitor computers remotely
Please leave a comment if you have any helpful information to add about GlassWire or any other great tools for monitoring network activity.
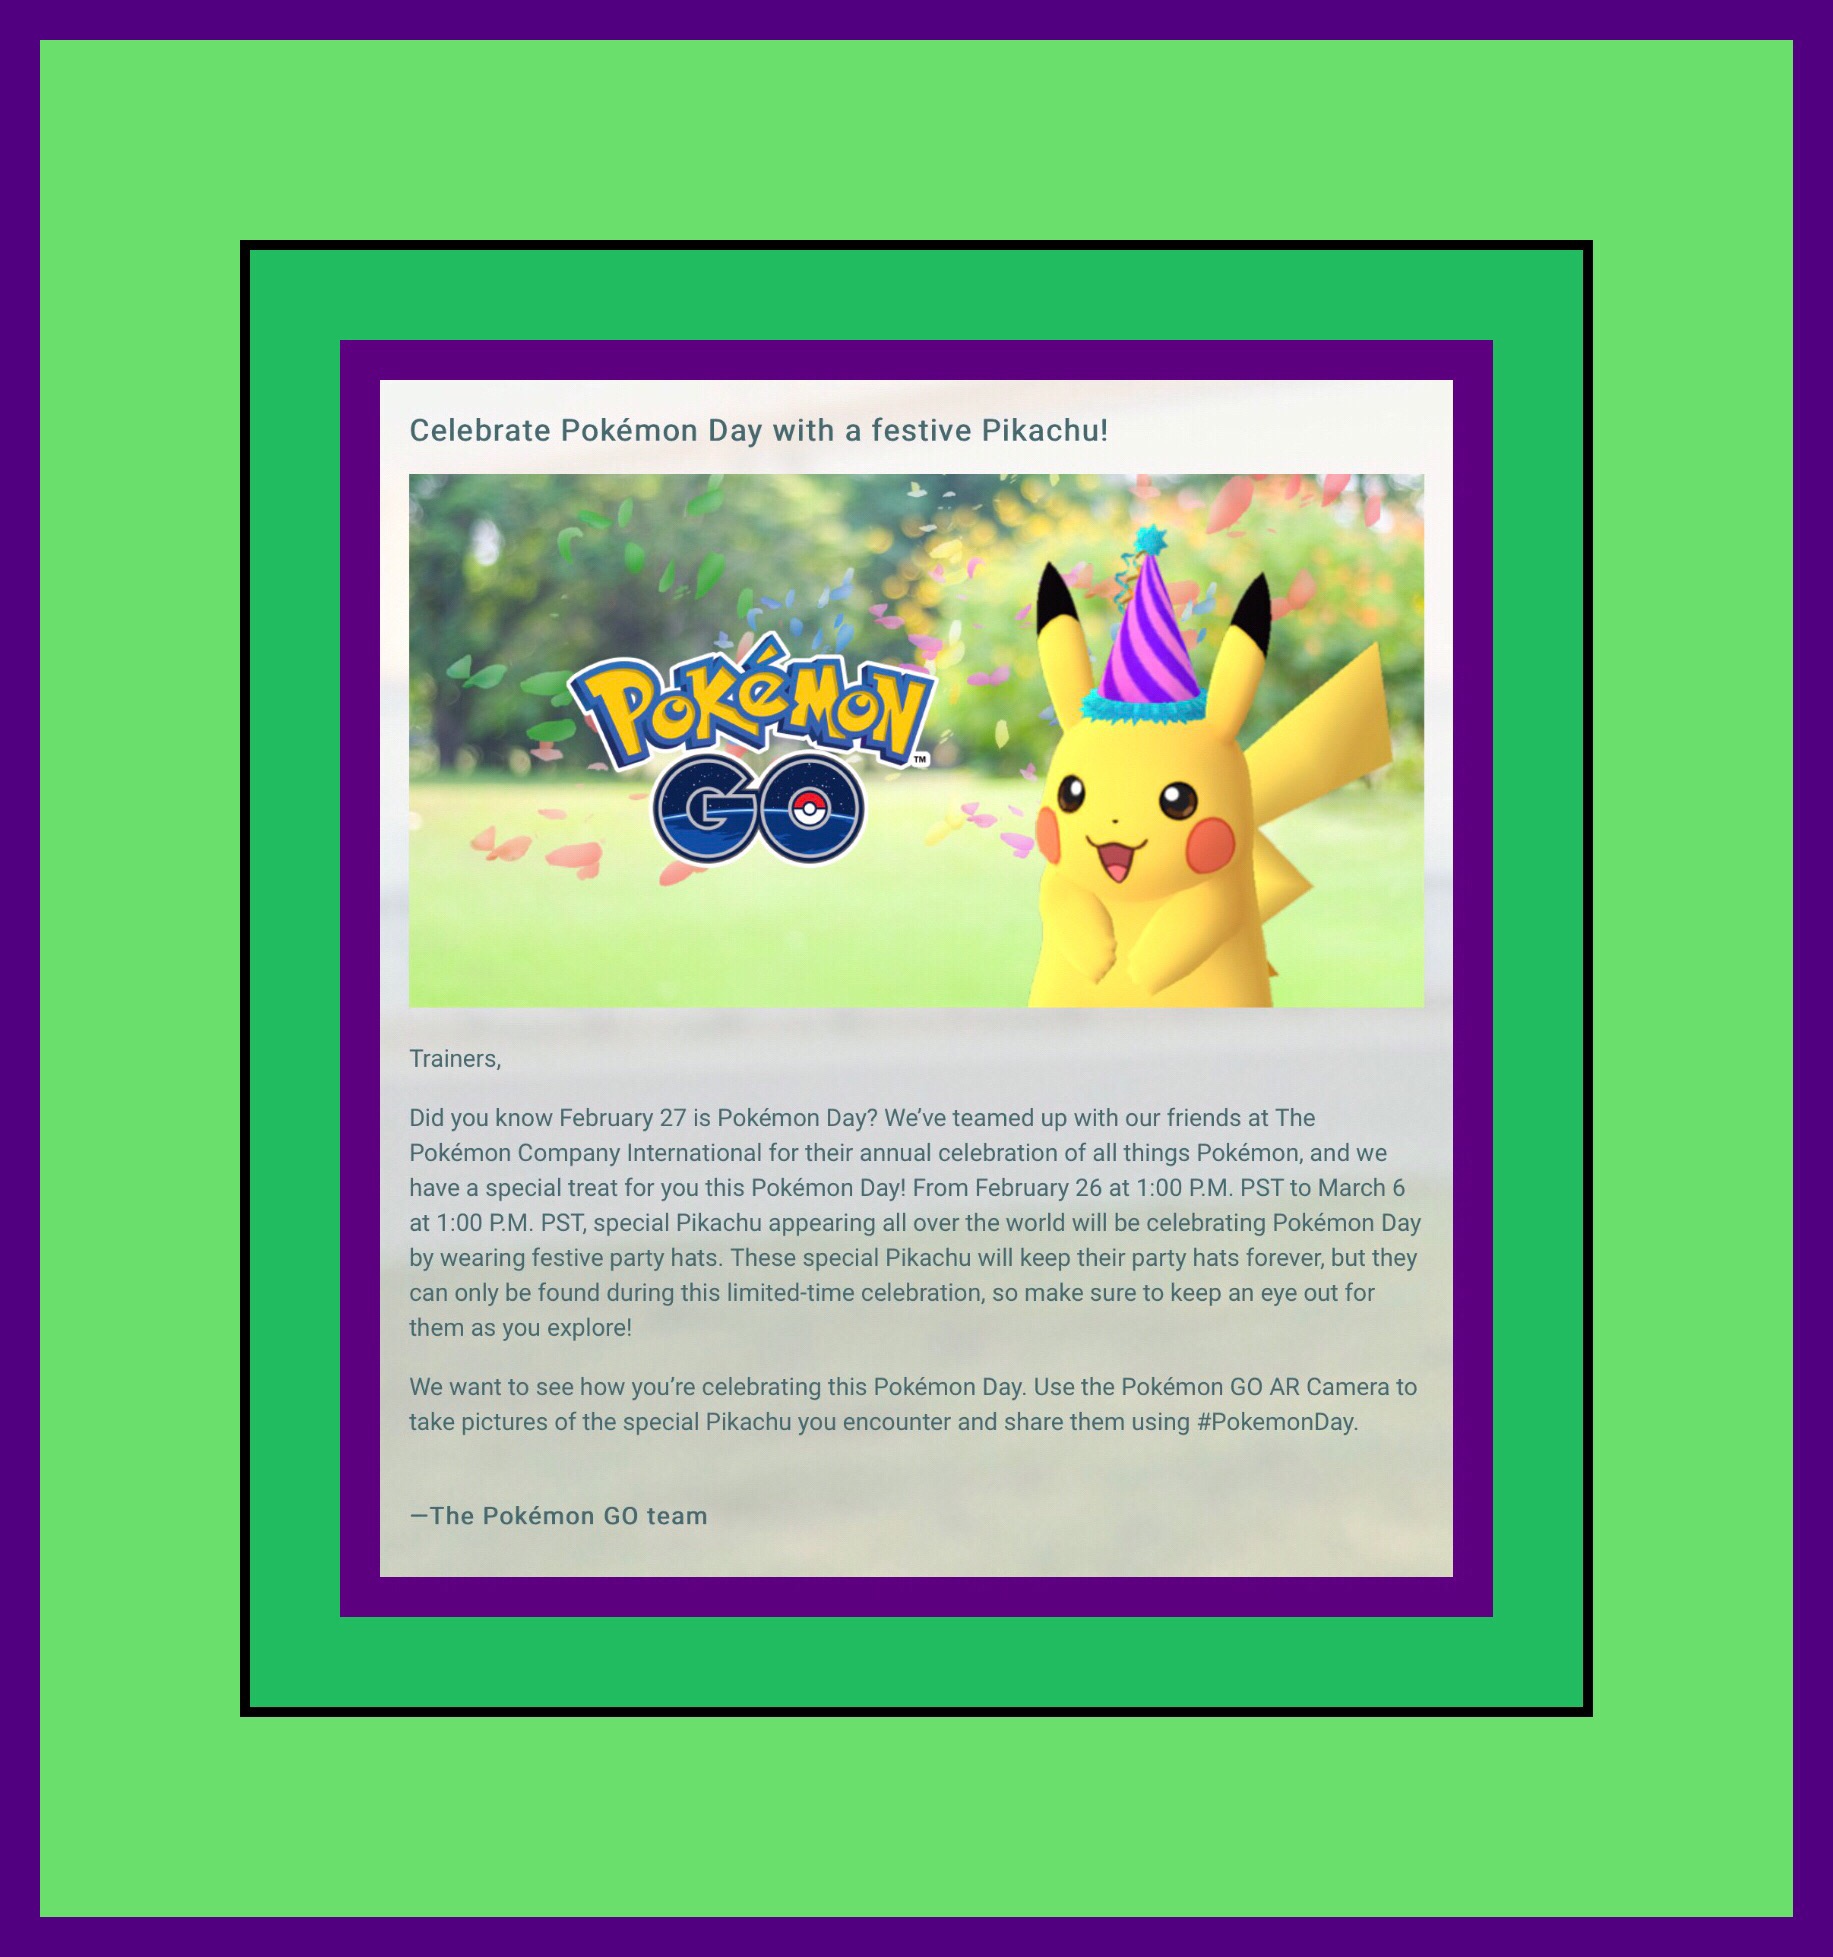
Pikachu’s Birthday Celebration Began February 26th and goes until March 6th
What this means for Pokémon GO fans is that you can capture Pikachu wearing a Birthday Hat until March 6th. Here’s a link to Niantic’s announcement, with the full details.
Here are all the details on capturing Pikachu with his Birthday Hat.
Not only that, but you can watch the very first Pokémon movie for free…and several other popular Pokémon movies as well at Pokémon’s main website here. Incidentally, while this isn’t Pokémon GO news exactly, it may interest Pokémon fans in general. Pokémon.com also has several apps for viewing all of their Pokémon related media here if you use an Android, ios or Amazon Fire device.
On February 27th, aka Pikachu’s Birthday, Gamestop reported that the PokémonGo mobile app has surpassed 650 million downloads!
More Exciting News for People Who’ve Grown Bored with the Pokémon GO Game
If you’ve grown bored with Pokémon GO and quit playing the game, then you’ll want to know that Niantic’s recently made some major upgrades to the game…I know, you’ve heard this all before right?
But this time I’m serious…this is major news!
On February 15th Niantic’s posted the news that 80 new Pokémon from the Johoto region were going to be released into the wild later that week. You can read more about that and watch their video here. Just to be clear, both links in the last sentence go to versions of the same information, but one is for Android users and the other for ios.
In that same post they told us that there would be new evolution items found at Pokestops for Pokémon from the Kanto region that in their current form couldn’t be evolved. The new evolutions would turn them into Pokémon from the Johoto region. But from all reports these new evolution items are extremely rare and hard to find.
There are also two new berries with some new twists to them. The original Razz berry helps players catch high CP Pokémon by sort of taming them, making them easier to catch. Now added to the mix are Nanab berries which help to slow down fast Pokémon and Pinab berries which will double the amount of candy you earn when you catch a Pokémon.
In late November Niantic finally fixed, or actually added a completely new tracking mechanism back into the game. This had been a source of frustration for players for a very long time. What’s also been a source of frustration is that user experiences playing the Pokémon GO game vary drastically depending upon whether or not you live in an urban area or a more rural one. The two topics are closely intertwined.
The Controversy Surrounding Urban Players’ Advantages Over Rural Players
Sadly, controversy regarding the new tracking mechanism in Pókemon GO has grown even more with the new version. One reason is because it’s made the urban versus rural disparity even greater…which doesn’t seem like what the game developer’s had intended. This may appear to be an insignificant issue, but trust me it’s not! That’s because the way Niantic has oriented the tracking now has ended up impacting a much larger user base than one would think. Basically anyone who lives in a newer suburb of a major city will typically fall into the ‘rural’ category!
I speak from experience. I live in a huge suburb of a very large city…but according to Pókemon GO’s tracking system…I’m in an area too rural to be allowed to use it!
There are many theories about why Niantic developed the tracking system in this manner. Among them one early conjecture that’s come to fruition is explained well in this Forbe’s article…the answer appears to be profit motivated.
A Pikachu toy my (now adult) kids made about 21 years ago!
Kotaku.com also wrote a really insightful article about these ‘rural versus urban’ differences as they relate to the new tracking mechanism here. Embedded in this article is a video by the popular YouTuber Nick creatorofTrainer Tips. The video is pretty long, and there are parts that can be fast forwarded through…like when they are driving…but his insights into Niantic’s motivation behind their new tracking system as well as his other great insights, make this one long video worth watching imo.
There are even more disparities in the game than just those. To make up for some of these inequalities a lot of app developer’s created tracking apps for finding Pokémon in the wild (also in part because the game’s tracking feature was nonfunctional for such a long period of time.) WhenNiantic’s finally brought back functionality for tracking in the app in late November, they went on a bit of a rampage against these developers demanding that most of those apps be taken down.
A new device came out in the fall that also addresses the tracking issue. It was created by Nintendo, and it’s called Pokémon GO Plus. It’s a standalone device about the size of a quarter (but thicker,) that aids in both tracking and capturing wild Pokémon. It’s also quite adept at gathering items and hatching eggs.
Nintendo and Niantic began hyping Pokémon GO Plus around the same time that the Go game went live. They promised a delivery date months before it finally really was available. Apparently there were a lot of manufacturing delays. Once it did become available it seemed like Japan, Pokémon’s home country, had many more units available than the United States market did. To my knowledge, Gamestop had been designated as the only ‘official’ retailer in the U.S. For several months Gamestop only sold the Plus in stores…not online. But finding one available at a Gamestop was extraordinarily difficult.
Which is why many Americans, myself included, went the route of buying one at a higher price from an Amazon third-party seller. This alternative was beset with problems and controversy. Some sellers were, and a few still are scalping the Plus at ridiculously high prices. In general now most sellers from both Japan and the U.S. appear to be selling it with about a $10 markup. But today, even that is unnecessary. While writing this I decided to check out current availability again and was surprised to find that the Plus is now available much more readily than even a month and a half ago.
Current Pokémon GO Plus Availability in the United States
GameStop now sells it online for the standard retail price of $34.99
I was surprised to see that it’s also available at Walmart for the same price.
If you have problems finding it there’s this pretty cool website called NowInStock which some brilliant person created as a way to earn affiliate commissions while providing a much-needed service too. It’s a truly brilliant concept! I have no idea how they manage to keep all of the products that they track up-to-date. You can check availability of many different products here, saving yourself a lot of time. If you go to one of their sources and purchase something, the site creator will earn a very tiny (we’re talking cents here) commission (which in no way impacts the price you pay.)
Read the Review Linked to Below If You Want an Extremely Thorough & Concise Overview of Pókemon GO Plus
Gaming.fit wrote an excellent review of the Plus on Amazon. It gives the most concise overview, from start to finish, for using it. This review highlights one specific scenario where using the Plus presents a clear advantage. I’ve modified and reworded that portion somewhat below.
The Pokémon GO Plus is Especially Helpful if You Live or Work Right At a PokéStop
If you happen to live or work right on top of a PokeStop, you can quietly collect Pokémon and items all day long without anyone being the wiser.
It also works great with lures in this situation. The instant a new Pokémon appears or the PókeStop is ready to give you more items, your device will vibrate to let you know. (Citation: Gaming.fit’s Amazon review)
Overall I think the PokémonGo Plus is really a neat device! If you end up getting one you may benefit from watching my YouTube video which demonstrates how to attach it to the included wristband.
The Best Reasons to Use the PokémonGo Plus
Probably the single most useful aspect of using the Pokémon GO Plus is that it preserves your phone battery. That’s because you can lock your phone or use other apps and still not miss out on nearby Pokémon, or Pokéstops (all while accruing mileage too!) While the Plus isn’t great for actually capturing Pokémon, it is excellent at notifying you when new Pokémon appear. Many people report that the Plus provides earlier notifications for new Pokémon appearances than the cell phone apps do. I concur.
Combine that with the added flexibility of playing the game so unobtrusively that someone standing right next to you need never know that you’re playing…makes this device a clear winner in my book!
PokemonGo’s Video Introducing the 80 New Pokémon
How the Plus Compares to Apple Watch
I know that Apple Watch is supposed to do all of the same things…and that is true, sort of. I have both alternatives available but I prefer the Plus for 2 main reasons.
First, I have the Series 1 Watch. Overtime my Watch battery life has degraded. I rely on my watch to tell time and to give me important notifications, so I don’t usually want to run down the battery with Pokémon GO. Currently, without playing the game or using it to track a work out, my battery only lasts 3/4’s of a the day.
Second is the fact that the Plus is better than the Watch is at recognizing new appearances of Pokémon. It also seems to me to be more accurate recording my mileage, which results in hatching eggs and finding new Buddy candy faster.
Watch does offer one significant advantage. It has a screen. So you can actually see what’s occurring just like you would if you were using the phone app! But with that advantage comes the same speed limitations. Overall the Plus allows game play at a slightly faster speed, which can sometimes make a difference. Until you become familiar with the somewhat complex series of colored light and vibration signals, I’ve been successful using this simpler strategy: When in doubt just to tap on the button. I can immediately see the effect of my action by waking up my phone. If I can’t right then, then later I can go into my game journal and see what transpired.
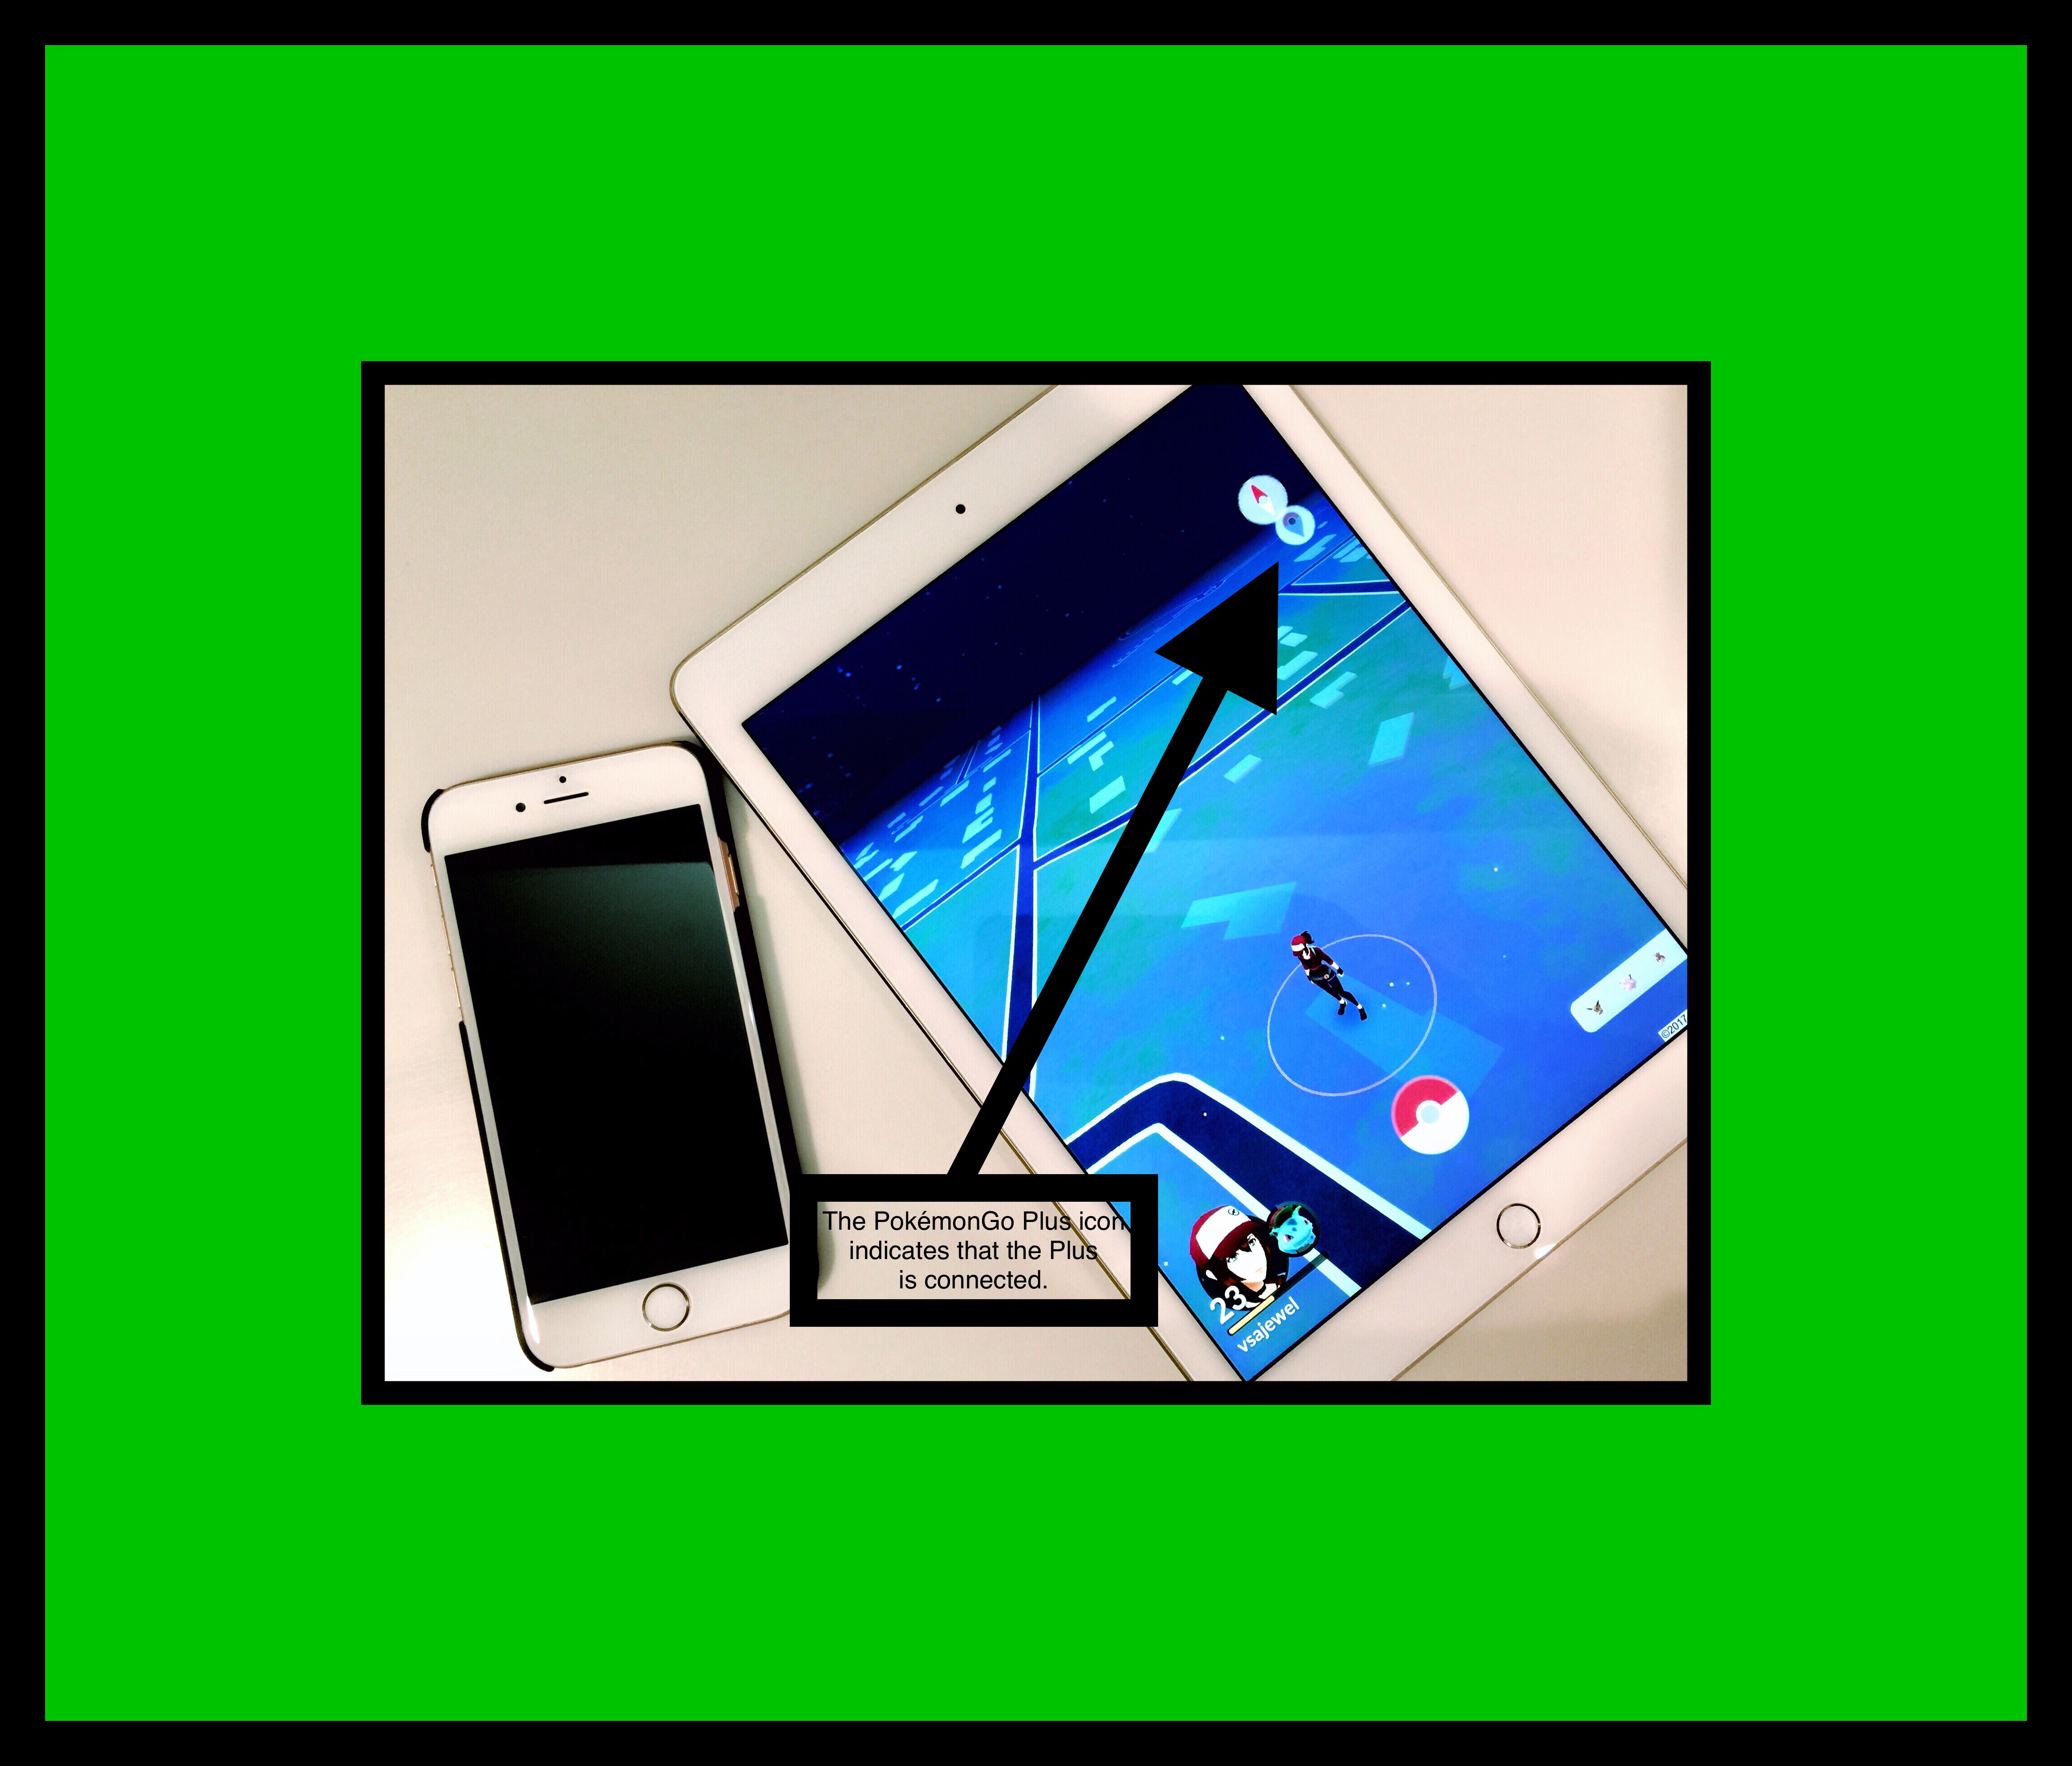
Contrary to all the information I could find online, my PokémonGo Plus also showed up as connected to my iPad…without my even trying to connect it! Well, I hadtried…but that was months earlier!
More Interesting Information & News
I have a few more items I want to include before I go.
If you’re interested in learning more about the chronology of event and history of the Pokémon franchise, Comic Books Now has written a short, but interesting article.
Apparently when the latest version of the game was released…the one in which all the new Pokémon appear…many players began experiencing a major glitch with the game…similar to the dreaded ‘blue screen of death’ Window’s user’s fear. Here’s BGR’s advice and one solution.
A writer at Forbes has written a compelling piece on why Niantic should consider getting rid of Stardust completely. I sort of agree with him.
Anything that you can view in Safari on an iPad (or an iPhone, or iPod Touch…but I’ll just use the term iPad for simplicity,) can be converted into a document quickly and easily. Even the results of a Google search!
In the past one popular method was to create and use a bookmarklet…but these newer methods are so much easier. There’s a surprisingly large number of ways to go about this. I’ll focus on the 3 methods that I think are so easy that anyone can master it readily.
My Favorite Method
My favorite method uses Safari’s built-in Print command. I’ll call this Method 1. I’ve made a Step-by-Step Guide showing you how to create a PDF document using the Print Command. The other 2 methods I describe below are equally easy, but each have some drawbacks, which is why the Print Command Methodhas become my favorite. So I’ll discuss how to use each of those methods too and then describe what their drawbacks are.
The main reason I’m showing you more than one method is because the document that’s generated by each one can differ a little bit. So, if you try one method and you don’t like the results, you can try a different one, which will generally produce a slightly different result.
Method 1 Using Safari’s Print Command
This method is super fast, easy, and free…which is why it’s my favorite method. Everyone has the built in tools at their disposal too. In the screenshots below I demonstrate, step-by-step, how to go about it.
Don’t let the number of steps involved worry you.The whole process can be done in less than a minute. It just looks like a lot of steps because I wanted to cover every single detail, so that there’s no confusion.
The Steps for Method 1
You need to think about what you want to do with the document first. Will you save it or email it? If you save it, where will you save it? One of the easiest places is Apple Notes. If that’s what you decide, I’d suggest beginning a note first…beforehand…basically by giving a new note a title. That’s what the screenshot below depicts.
It’s not mandatory to create the note title beforehand…I just think it’s easier in the long run because sometimes it can be hard to add a title to the beginning of a note after the PDF has been placed there.
The Steps Begin here:
Step 1
Step 2
Step 3
Step 4
Step 5
Step 6
Step 7
Step 8
Step 9
The PDF Result Using Method 1
Page 1
Page 2
Another Example of a PDF Made Using Method 1
Comparison Example Method 1
I’ve included a 2nd example that I produced a PDF of using each of the 3 methods, so that you can see the differences between them.
Page 1
Pages 2 & 3
Method 2 Using iBooks
For many years iBooks has been another one of the standard methods most ios users have relied on to create and save PDF documents. I did too for a very long time. But there is one huge drawback to using iBooks. If you save the document in iBooks I can pretty much guarantee it will disappear at some point in the future. The iBooks app is notorious for wiping out user’s complete libraries of their own work. This oftentimes occurs when a newer version of ios is released…after the update all your documents are gone. The actual content that you purchased from Apple will remain…but your own files, that you created are just wiped out. It is sometimes possible to find them again if you were syncing your device to a computer they may be in a backup file somewhere…but this is time-consuming and unreliable.
So, if you decide to use the iBook method, make sure to move your document somewhere else immediately! Sadly, that’s not very easy to accomplish either. The only method Apple provides users with to export content from iBooks is email. So you’ll need to find somewhere you can email it too. I use Evernote and I’m a huge fan of the service. One reason is because it’s so easy to get information into it. Emailing data into Evernote is one method they offer, so that’s what I usually do. Once my PDF Document is in Evernote, I’m in good shape, because from there I can export it to a ton of different places, just like Method 1 above, or Method 3 below.
As you are probably beginning to realize, Apple’s tried and true method for creating and saving PDF documents is less than desirable. You can’t rely in the safety of storing your document and it’s cumbersome trying to get it anywhere else! So, I’ll skip the steps involved, which are essentially the same as both other methods I do describe…you just pick iBooks instead of ‘Print‘or ‘Convert to PDF.’ But I am including an example of the PDF using the iBooks method produces for comparison purposes.
Comparison Example Method 2
Page 1
Pages 2 & 3
Method 3 Using an App called PDF Converter by Readdle
So, the main drawback to method 3 is that it requires the use of a paid app. The app is called PDF Converter and it presently sells for $4.99 in the App Store. It’s made by Readdle, a really great app developer who’s created a complete set of office suite of apps that work beautifully either as stand-alones or together to create an iPad friendly office suite that compares favorably to Microsoft Office for Windows.
Many people who use primarily Window’s computers really love Readdle’s apps. In the early days of iPads, when they were building their line of apps, most of them had free versions too. But now that they’ve refined and polished them and made a name for themselves in the Enterprise world, their apps, if purchased individually are on the upper end of the price spectrum for apps. But they’ve created a lot of app bundles that group together some of their most popular apps, and if purchased that way you get decent price breaks. Plus that, would you really think of $4.99 as expensive in any other realm other than the App Store? This is a great app that’s very user friendly and so simple to use that it might be appealing to either people who don’t want to have to remember the Print Method or who want the maximum amount of flexibility when it comes to converting content into PDF documents.
When I first began using an iPad, I was coming from a Window’s environment too. I loved Readdle and they still have a large user base in the corporate world. Overtime I adapted and grew more comfortable in the Apple universe…so now I use primarily Apple products. But I still keep several Readdle apps on hand for functions that Apple hasn’t created tools for yet. PDF Converter is one of those apps I keep on all my iPads (I have a lot of them because I do all my work on them,) because it still comes in handy and does some conversions I can’t accomplish using the other methods on an iPad.
Below are screenshots of the PDF Converter app, their Document 5 app, which is their word processor (including some reviews) and the full suite of their iPhone and iPad apps.
Method 3 Steps
To use PDF Converter just tap on the same Share Extension shown in Step 1 then tap on ‘Convert to PDF‘ shown in the screenshot below. The app will begin to generate the PDF for you, displaying a blue spinning circle in the middle of your screen that says…’One Moment Please…Converting.’ When it’s done it will ask you if you want to see the file and if you do it will then open the app and show it to you. At this point you can rename it (many times the name it auto-generates is fine) and then either move it to their iCloud folders or send it somewhere else. The options at this point are numerous! You can email it, save it in a ton of different places like Evernote, Good Reader, Drop Box, Google Drive etc.
I’ve used Readdle apps from the very early days of ios devices existence. As I mentioned above, many of them were free to begin with. But as Readdle developed a following and refined their suite of apps they began charging for them (but they offered a free version too.) Today their free versions are no longer offered, but what still makes them unique I think is that today most of the really good app developers are beginning to charge an annual subscription fee for using their apps…and Readdle doesn’t. Theirs are one-time charges. Hopefully it will stay this way! But I have no doubt if it changes that Readdle will treat their existing customers very well…unlike some of the app developers out there (i.e. Ulysses :-( or their new subscription version link.)
I recently began using a Readdle app that in my opinion is pretty expensive ($10.99.) But it’s well worth the cost imo! It’s called PDF Expert and you wan watch this short YouTube video about it if you’re interested in what it does.
Comments
I really love getting feedback from my readers!
Please scroll down towards the bottom of the page to leave a comment.