

This post includes a couple of very easy strategies you can employ if you find yourself spending way to much time searching for certain Apple Notes
A Few Simple Organization Ideas for Apple Notes
If like me you’ve begun using Apple Notes a lot more since Apple added all of their enhanced features beginning with ios 9, you’ve probably found yourself with a lot more notes than previously. You can organize these into folders quite readily using any ios or OS device and even into subfolders if you happen to have a Mac computer.
But the Folders used for organization may not always be enough for you. No doubt at some point you’ll find you need better, deeper, quicker, or more visual ways of referencing and finding specific notes.
I’m extremely challenged when it comes to things like this…it’s probably one reason I keep so many notes in the first place! So, I devised a few easy ways to help me keep my notes under control as their number increases…but tools which primarily help me find my notes again!
That’s where note links come into play.
It appears to be a closely guarded secret that you can create and use links that you generate for notes in Apple Notes. It’s taken me quite a long time to discover this feature…not for lack of trying. And now that I have I find myself using it often. The main idea is that you can generate a hot link or an URL to any note. Furthermore, you can share that link with someone else. Or, you can just share it with yourself. In the case of a third party, sharing is allowed as long as that someone else also has an Apple ID.
More About Sharing Apple Notes
The statement made above doesn’t mean that you can’t share your notes with non-Apple users…because you can. But you do so by using the Share icon. Then you can email or text anyone the note…just be forewarned however, that the note they receive will end up being displayed in a font much larger than that of the actual note (see the 2 screenshots below.)
This seems to be a longstanding but REALLY ANNOYING Apple Glitch!
But you can’t share them the note in the manner that I’m describing here…the one which allows you to create a note link. Because this method is a way that brings them right within the actual note itself. By doing that you are enabling them with the ability to edit the note’s content too.
Apple calls this method of sharing ‘Collaboration‘
Here’s a link I created to this note (my post began it’s life as an Apple Note) using this method. I don’t believe that this link will work for just anyone because it’s not a public link. I’m just displaying it as an example of what a note link looks like.
In fact, that’s one significant difference between Evernote and Apple Notes.*
In Evernote you can share your notes and even entire Notebooks publicly or privately. But in the case of Apple Notes, a private link means that you can share the note with someone else only if they too have an Apple ID and a device with the Notes App installed. That’s required in order for them to view the note via Apple’s ‘Collaboration’ utility.
Quick Overview of Note Organization in Apple Notes
Any avid note taker knows that:
The Key Requirement for Any Good Note System is..
it’s ability to organize notes easily and meaningfully…so that finding information is both simple and quick.
Creating a Notebook Scheme for Organization in Apple Notes
When you’ve written several notes on the same subject the sheer volume of those notes tends to build up overtime making it a good idea to organize all those notes into one unique subject folder. By doing that it renders finding all the information on that specific subject much easier in the future.
There’s one important thing to keep in mind however. When you create new notes on the same subject, you’ll need to remember to add them to the correct folder. If you’re like me, and take thousands of notes, it’s really easy to forget this little step, especially if notes are taken on the fly a lot.
One simple method I came up with to address this that’s easy to adhere to even on the fly is to assign and use specific icons (aka Emojis) and place one right before a note’s Heading or Title as you begin the new note. By doing this, not only are you taking advantage of the ios emoji keyboard, (which frankly I love but have no use for otherwise,) you’re also creating quite a few extra advantages for yourself that I’ll get into a little later.
Apple’s emoji keyboard includes a ‘Most Recently Used‘ Section which makes remembering the exact icons you’ve assigned to each notebook topic much easier when you 1st begin using this system.
Principles Behind Creating a Notebook Subject Hierarchy Based Upon Icons (Emojis)
When picking out the specific emojis to use for each subject, I find that following a couple of different principles really helps me in the long run:
1. Use Emojis that pictorially relate somehow to the subject matter of that Notebook
2. Use Emojis that are large and distinctive, therefore easier for you to readily notice and grasp the meaning of quickly.
3. If you’re at all ADHD like me you’ll want to differentiate emoji’s by color too so that there’s a clear, well defined color pattern in addition to the emoji itself that provides a visual cue for you.
4. If, in addition to being ADHD, you’re also visually challenged like I am…you might discover that sometimes one emoji doesn’t make quite enough of the visual impact that you need. Usually in instances like those, I’ve found that placing 2 together, side by side solves that problem.
Here’s a view of my Notebook Structure on the new 10.5″ iPad Pro

One More Tip
You might think that employing my system would be a lot of work but trust me when I tell you it isn’t or it doesn’t have to be.
The way I began was by just using one single emoji…the one you see most often above…the half yellow/half green arrow, for any notebook of note that had to decide with my WordPress websites. Very slowly overtime, the system just grew from that one simple tweak. Now I rely heavily upon it, and it’s saved me on more than one occasion when important notes, I knew I’d written, simply where nowhere to be found! Which leads quite readily into what I believe are the 2 best aspects of my system.
2 Great Aspects of My Visual System
One really great aspect of my visual method for tagging notes is that I can quickly and easily file notes into their correct subject Notebook after-the-fact, just by looking for the emoji or icon identifiers.
A second big advantage is that the use of emojis can off in time really help me find a note that may not have been filed correctly or filed at all.
Using Note Collaboration as an Organizational Device for Yourself
My Simple Hack Let’s You Use the Builtin Power of Apple’s New Collaboration Feature to Help Yourself Instead of Collaborating Per Se…As an Additional Tool for Finding Important Notes Readily
If you’re worried about the important contents of a note being lost to you there are really 2 simple things I employ to defend against this. The first I’m writing about in more detail in a separate post because, while the concept is simple, the steps to using it aren’t necessarily…but they can be when you fully understand the ins and outs of the concept. I’m referring to creating an exact duplicate of the note to file in different locations, But that technique is really only useful for a note with static content. Because duplicate notes won’t be updated if or when you add new information to the original note.
That’s why this 2nd tool, creating a note link is so useful. The link takes you to the original note. If the original note has been updated…that’s what you’ll see too. Case in point and the only reason I happened to mention the first alternative above, is because sometimes I’ll employ both methods together.
How I Use Both Methods Together & How Much Better Both Are When Used in This Manner
What I sometimes do for really important information that I don’t want to lose track of, is I’ll create one or two duplicate notes, and then, at the top of each of those, I’ll add a note link which leads back to the original note. I take this extra precaution so that I can see the most current information contained within that note.
Before You Can Create Note Links You must Have Updated Your Notes When ios 9 Came Out
The easiest way for you to determine whether or not you took this step back when ios 9 came out is just trying to follow my steps below. If they don’t make sense then you need to still do that. (Another way to tell is if you’re using Title and Headline sized fonts within Apple notes…you needed to upgrade in order to use those.)
You can find out how to upgrade now by visiting Apple’s support here. If you’re worried that it’s going to be complicated or take a long time to do so…don’t be. From what I recall it’s simply a matter of checking off ‘yes’ somewhere. The hard part, which is finding where and how to do it, I’ve already done for you with the link above.
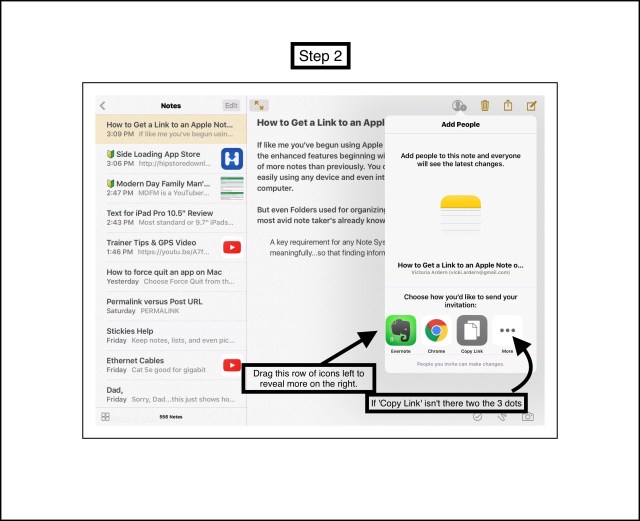
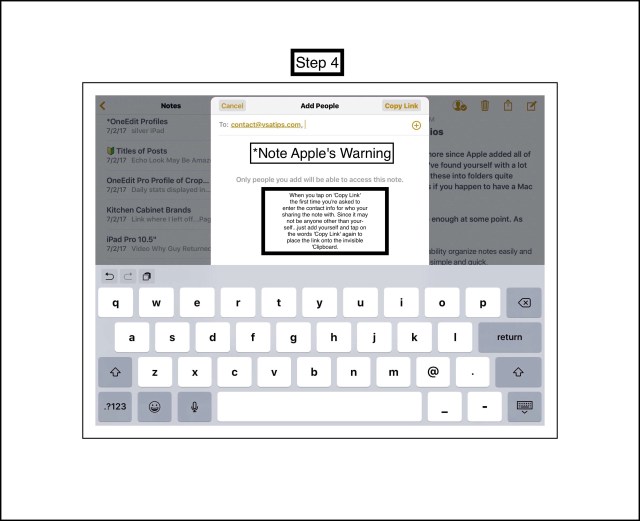
Steps for Creating a Note Link
Just follow my step by step visual guide below:


Learn More About Apple’s Shared Note’s Features
Apple continually updates their support pages to include their most recent information because they are constantly fixing and tweaking performance of ios and OS X as well as adding minor enhancements to their stock apps that interface with their operating systems. Therefore, what you see one day at their site may be totally different a month later. That’s why it’s never a bad idea to visit Apple’s support pages first when you’re trying to figure out how to do something.
Here’s a Link to All of Apple’s Current Information About Sharing Notes.
If you’d like to know more about the differences between Apple Notes and Evernote, you can read my article on that here:


