
Updated January 2018

Photo resolution is really important for my website illustrations…but not in the way that you might think. While it’s important to have great images which can be clearly seen, it’s equally if not more important to have a website that actually loads the page quickly enough to not frustrate people. Finding this fine line is a constant challenge for me and it’s perhaps the one thing that I spend more time on than any other when writing this blog.
Introduction & Objectives
iPads are great tools for editing photos, yet anyone who’s used iPads a lot for this purpose has realized that the final resolution that your photos are exported in can vary a lot. Some apps let you adjust this…some don’t. But if you use photos a lot in your professional work you do need to know what control you’ll have over the final resolution of the photos you’re exporting.
This quick guide includes my favorite editing apps which do allow some user control over final resolution output.
Frankly, for me, if an app doesn’t offer user control over exported photo resolution and file size…well then the app is isn’t worthwhile for me!
The Apps I Discuss
- Pixelmator
- Snapseed
- Enlight
- Photogene⁴ | Photogene⁴ only can be used in ios 10 or lower
- PhotoToaster
- OneEdit Pro
How to Use This Guide
This guide is essentially a visual one aimed at giving you a very quick way of referencing how to change resolution for each of my favorite apps. Think of these as simple cheat sheets for each app. Each one shows you where in the app you need to go and then how to go about changing what you need to, to assure that the best resolution is used when exporting your photos.
Also each cheat sheet links to that editing app in Apple’s apps store.
Pixelmator App |
One app I use a lot I’m not including a cheat sheet for is Pixelmator. I’m not including it for the simple reason that Pixelmator has no setting to change resolution because photos always kept at the same resolution that they were when imported into the app. In that sense, Pixelmator works as closely to the iPad’s built-in photo editing utility as is possible.
‘Pixelmator is an amazing photo editing app that probably works more like Photoshop than any of the others I’ve used.’
That includes Adobe’s own Photoshop apps for ios too! It uses layers, and most of the tools are designed to function exactly like Apple’s own apps do, so for people who use Pages in particular, there’s less of a learning curve. There is in-app help, which is good, but that can’t come close to addressing all of the powerful features this app offers…so expect a significant learning curve (unless you use Pages with images and Photoshop already.) The tools offered are too numerous to list here but some include adding shapes and text in ways which make this app a great graphics layout tool, painting, drawing and retouching down to a single pixel size with tons of brushes, a clone tool, a lot of great easy customizable filters (my favorites are sharpening, light bleed and bokeh effects,) and quite a few preset templates as well as integration with iCloud.
The visual guides:
Setting the Highest Export Resolution for Most Popular ios Photo Apps
Snapseed App |
I was under the assumption that Snapseed saved photos in their original resolution unless that was changed. Something I read recently led me to think that I may be incorrect in my assumption. Since Snapseed is owned by Google, there doesn’t appear to be an easy method to contact support…so I don’t have anymore information about final resolution output currently. I’ll add an update here if I learn anymore. But, my gut instinct tells me that isn’t correct. I’m fairly confident that my original assumption still holds true, meaning that resolution won’t change unless you change it.
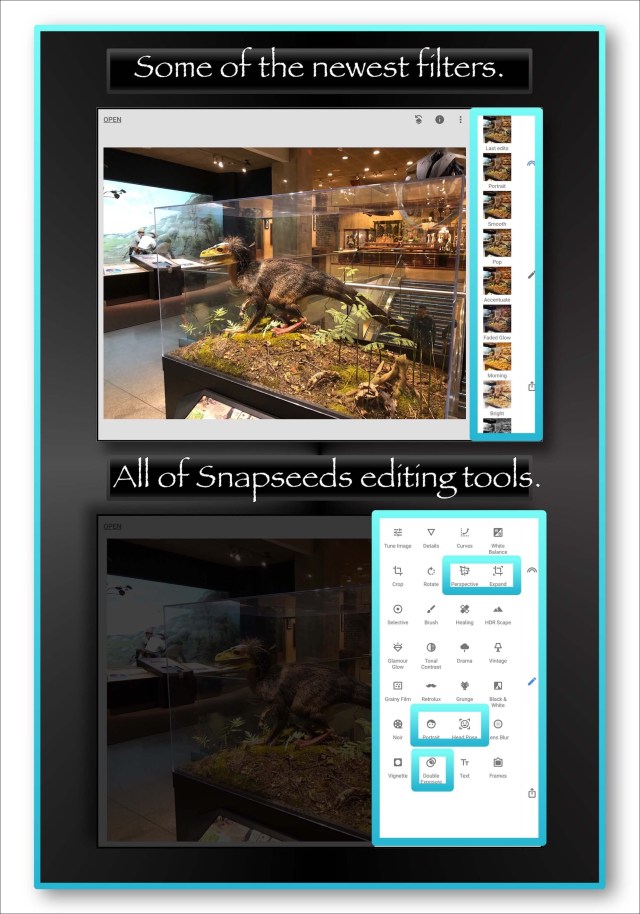
I love Snapseed and use it a lot because it offers a broad range of tools including fine-grained user controls, a great sharpening and noise reduction tool, a lot of really great customizable filters for HD, dramatic, grunge, retrolux, vintage, noise, black & white, glamour glow and tonal contrast filters, as well as a repair tool, a selective adjustments tool, and the ability to add great looking text. They also offer a lot of in-app tutorials for doing advanced editing. In late 2017 some newer, sort of ‘instant’ filters were also added which bundle several edits together to create effects many people would want as ‘stock’ tools. Most of these are displayed in the top image of the screenshot above.
Additional updates Google made in 2017 add a whole host of new tools which I also love. One for me that’s really important is called Expand which you can use to add black or white space to the outside edges of an image. By doing this I can now take advantage of Snapseed’s borders and frames which are destructive normally. Some other new tools include White Balance, Curves, Double Exposure and 2 which allow you to enhance faces, Portrait and Head Pose.
Screenshot Below Shows the Pre-Updated Version of Snapseed.

This Screenshot shows the newest version as of January 24, 2018

Enlight App |
Enlight is one of my favorite apps because of the broad range of editing tools they offer. Everything from great preset filters to fine-grained tuning controls, to adding text, manipulating and retouching actual images, and they have some really cool artistic filters like painting and drawing too. This app also offers more tools for borders, frames and collages than the vast majority of apps out there…however their borders are destructive (unlike Photogene⁴s) meaning that they do encroach upon the image…with one exception. If you use their Instafit tool you can add cool decorative or solid colored borders that aren’t destructive.
But it is also unclear in Enlight’s settings whether or not you can set the app up to maintain a photo’s original resolution.

Photogene⁴ App |
It appears to me that Photogene⁴ does allow you to save your exports in the original resolution…however I’ve not thoroughly tested that aspect. One important thing to note here is that while Photogene is an amazing app that I use daily in my work for adding borders to photos that fall outside the original photo’s dimensions…thereby not obstructing any portion of my image…the app is no longer supported. It still generally works great but can exhibit some flukey behavior. In fact when you open the app, Apple displays a warning telling you that the app hasn’t been optimized for the current ios and it may function slowly…and it sometimes does.
So sometimes the app won’t open properly. My workaround for this is to open an image in Snapseed 1st and then use Snapseed’s ‘open in’ share extension utility to reopen the image in Photogene…which bypasses the glitch. The only issue with using my workaround is this…now that I know Snapseed does decrease resolution, that would probably occur before the image was passed on to Photogene.
It’s worth it to me to deal with the glitches because of the broad range of editing tools Photogene offers including some great frames, nondestructive borders, unique filters, a lot of fine-grained user controls, a clone and retouch tool and adding text and annotations to images.

PhotoToaster App |
I’m not entirely certain if PhotoToaster allows you to maintain the original resolution of photos entirely. It’s not completely spelled out in the settings I show below, and I’ve not tested it or researched that aspect yet. If I do discover anything useful I’ll update it here. In general PhotoToaster and the suite of apps it’s a part of (developed by East Coast Pixels…these guys were originally with Adobe) offers a broad range of quick filters, great assortments for textures, light bleeds and frames, and one of the best fine-grained sets of user controls available.

OneEdit Pro |
OneEdit Pro is unique in this group because it’s a batch editing app. It’s an extremely useful tool which has lots of different features that you can use to change a whole group of photos at one time. You can do things like remove metadata, add text or watermarks, add borders or use roughly 20 different filters which change the image look…like sharpening, or pixelating. You can also batch scale the size of photos or batch crop them.
Because this app is so different from the others, and because it doesn’t give you direct control over the exact export resolution and file size, I’ve not included a cheat sheet. But if you decide to buy it, it costs $2.99 which is well worth it for all the features it has. I especially love the huge number of options you have while exporting. You can export all your images into various grid layouts, or into a PDF, as well as export them to most cloud services. After purchasing it if you use the App Store’s listing of the app, find the link to the Developer’s website to view some videos showing how to use it. Even watch the older ones because the app structure has always remained constant so they are useful too.

No one has written a good tutorial for this app. I’ve thought about doing it but it would just be too overwhelming of a task because the app can do so much. What I primarily use the app for is scaling and cropping photos and then applying multiple borders to them (like in the screenshot above) for use on my websites and in videos on my YouTube channel.
I Made 2 YouTube Videos Which Demonstrate Some of One Edit Pro’s Features
I made the first video right after Apple added screen recording to ios 11’s beta. In it I demonstrate how I apply multiple borders. A 2nd part adds some more of the apps features…but I should warn you that neither are great videos. I was entirely new to screen recording and it was very glitchy too. I was using the older version on One Edit and an old iPad that I wouldn’t mind getting messed up with beta software.
Add Borders to Photo in Batches (Many Pics at Once) with One Edit Pro | iPad & iPhone | Part 1
Batch Edit Many Photos at Once with One Edit Pro | iPad & iPhone | Part 2
I’d planned to update these with completely new videos. But now my channel has been terminated from YouTube’s Partner Program, effective in Feb 2018, in their huge ‘abolishment program’ of small Channels.
I don’t think I can afford to stay on YouTube anymore as my earnings there while not huge, were significant enough to really mess me up by their loss. If YouTube hadn’t gone to great lengths to cutoff all of the avenues in which small channels like me earn, it might have been possible…but things like Patreon will be closed to us too.
I’m looking at other video sharing sites to replace YouTube for my channel. One thing you could to do help would be subscribe to my channel (assuming you like it) because if I could get the subscription numbers higher while I try to figure out a new plan, maybe I could stay here.
If you read reviews of the app you’ll notice many addressing the glitches which were fixed when OneEdit Pro was updated in 2017. One problem was that after edited photos were exported you’d sometimes receive an error message telling you that the export failed…but it didn’t! The error message was the error…because the photos exported just fine. Another was that you couldn’t rely on the final file size show in the app. In fact finding out what an image’s actual file size is on an ios device continues to be challenging, which is why I’m describing my best methods next.
The Best Way to Find Out the File Size of an Image on ios
I use 2 different methods currently. Many times the sizes shown by various apps isn’t correct. The one I find to be most reliable is Photogene⁴. Snapseed used to be accurate but lately it hasn’t so that must have been goofed up in an update. I use a great app called Workflow that lets you automate tasks. The app is so great that Apple purchased it recently and has made it free. Workflow provides a lot of already built workflows and there’s one for determining file size of photos. I tweaked that to let me select multiple photos at one time.

The other method I use is a website called Tiny PNG. I know it sounds counter-productive to have to upload images to a website…but Tiny PNG is such an excellent photo optimizing utility…better than any app I’ve found which claims to do the same thing, that it’s worth it. You can batch upload images to Tiny PNG and it will automatically compress the images too if that’s what you want…I usually do.

I uploaded the screenshot above of Tiny PNG to Tiny PNG. The site told me it’s file was was 748 kb which is too large for a single image to use on this website. Because I use a lot of images. Each one takes more time for the webpage to load. So using Tiny PNG I reduced it to 238 kb’s. The original screenshot size was much larger…over 1 mb, but when I applied the borders to it using OneEdit Pro, the final image that was exported was 765 kb, which I then compressed using Tiny PNG. The difference in quality is imperceptible I think.
Link to a great article that explains a lot more about photo resolution, photo quality and how these are affected by photo editing apps.

This chart shows some of the apps he tested and the resolution they use natively.
I ran across the above article right after I published this post. In it Rob DePaolo discusses in great detail more about this topic as well as provides a great comparison of several of the most popular ios photo apps. I thought I understood a lot about this but his article filled me in on some points I was confused about.
Comments
Please feel free to leave me any comments or questions by scrolling down further past my bio.
